| S Copyright � 2008 Sailboat Rig Dimensions All Rights Reserved. The Worldwide Leader in Sailmaking - Sail Care & Repair
- Sailing Gear
- Find A Loft
- Sail Finder
- Custom Sails
- One Design Sails
- Flying Sails
- New Sail Quote
- 3Di Technology
- Helix Technology
- Sail Design
- NPL RENEW Sustainable Sailcloth
- Sailcloth & Material Guide
- Polo Shirts
- Sweaters & Cardigans
- Sweatshirts & Hoodies
- Accessories
- Summer Sale
- Shop the look
- Mid & Baselayers
- Deckwear & Footwear
- Luggage & Accessories
- Spring Summer '24
- North Sails x 37th America's Cup
- Sailor Jackets
- SALT X North Sails
- NS x Slowear
- T-shirts & Tops
- Sailor Jacket
- Sustainability
- North Sails Blog
- Sail Like A Girl
- 37th America's Cup
- Icon Sailor Jacket
- Our Locations
- Certified B Corporation
- North SUP Boards
- North Foils
- North Kiteboarding
- North Windsurfing
SAIL FINDER SAILING GEAR COLLECTIONS & COLLAB COLLECTIONS WE ARE NORTH SAILS ACTION SPORTS Popular Search Terms Organic cotton Scuba fleece Drawstring hood Utility pocket Stand collar Sorry, no results for "" SubscriptionWelcome aboard. We want to make our emails as relevant as possible for you. Interests saved Something went wrong, please try again Welcome to North SailsStay up to date with the latest North Sails news. Receive a 10% discount code for your first apparel order. Excludes sails and SUP’s. See our Terms and Conditions . Yes, I agree to the terms of use and privacy policy. SAIL PLAN DIMENSIONSFigure out your rig dimensions when it comes to your sails.  The basic rig dimension for a yacht are generally understood. However, there are some differences in how some sailors describe these dimensions. Here is how we define them at North Sails. I – Height of Foretriangle Elevation of Forestay, measured down to elevation of main shrouds at sheer line. J – Base of Foretriangle Horizontal distance measured from front face of mast at deck to position of headstay at sheer line. P – Mainsail Hoist Elevation of upper mast band or maximum main halyard position, measured down to lower mast band or top of boom. E- Mainsail Foot Horizontal distance measured from aft face of mast at top of boom to boom band or maximum outhaul position. Is – Height of Inner Foretriangle Elevation of Forestay, measured down to elevation of main shrouds at sheer line. Js – Base of Inner Foretriangle Horizontal distance measured from front face of mast at deck to position of inner headstay at sheer line. Py – Mizzen Mainsail Hoist Elevation of upper mast band or maximum main halyard position, measured down to lower mast band or top of boom. Ey – Mizzen Mainsail Foot Horizontal distance measured from aft face of mizzen mast at top of boom to boom band or maximum outhaul position. ISP – Elevation of Spinnaker Halyard Measured down to elevation of main shrouds at sheer line. SPL – Spinnaker Pole Length STL – Spinnaker Tack Length Horizontal distance measured from front face of mast at deck, forward and horizontally to position of spinnaker tack attachment point.  GET IN TOUCH REQUEST A QUOTEBROWSE ALL SAILS FIND YOUR SAILFeatured stories, offshore sailing guide, how to care for your foul weather gear, npl renew faq.  By Product Categories Small Boat Blocks  Big Boat Blocks  Complementary Hardware  Travelers & Genoa Leads  Mainsail Handling  Headsail Handling  Mooring Solutions  Spare Parts  Accessories  Harken Canvas  Sportfishing Fly Soft-Attach Blocks Carbo Air Blocks Small Boat Classic Flip-Flop Small Boat GP Catamaran Ceramic Mainsheet Systems Protexit™ Exit Blocks Through-Deck Wire High-Strength Dinghy Vang Small Boat Deck Organizers Midrange Classic Midrange Deck Organizers Zircon Blocks Element Blocks Black Magic Air Blocks Cruising ESP Blocks Megayacht Blocks Stainless Steel Blocks Black Magic Air Runners FlatWinder Powered Blocks Mastbase Blocks Over-the-Top Crossover Blocks Big Boat Deck Organizers Cam Cleats & Kits Cam Cleat Accessories Cam Cleat Bases Stand-Up Bases Deck Organizers Spinnaker Pole Cars Soft Attachments Fixed Padeyes Removable Padeyes Bolt-Down Fairleads Grand Prix Jib Leads Halyard Tensioners Tiller Extensions Peter's Desk Drawer Dinghy Jib Leads Crossbow Pivoting Self-Tacking Jib Traveler 13 mm Micro 22 mm Small Boat 27 mm Midrange 32 mm Big Boat Windward Sheeting 42 mm Mini-Maxi T-Track Genoa Lead Access Rail System 13 mm AA Battcar System 22 mm A Battcar System 27 mm B Battcar System 32 mm C Battcar System 18 mm Switch Battcar System 26 mm Switch Battcar System 26 mm Trysail Switch 32 mm Switch Battcar System 32 mm Trysail Switch 40 mm Switch Battcar System 40 mm Trysail Switch System Furling Mainsail Outhaul Systems Single Line Reefing Harken Vang-Master Carbo Racing Foil Small Boat Furling Small Boat Underdeck Reflex Furling MKIV Jib Reefing & Furling MKIV Underdeck Jib Reefing & Furling Furling Accessories Powered Furling MKIV Ocean Furling SnubbAir (Not a Winch) Grand Prix Winches Air Winches Circuit Breakers Analog Switches Digital System Switch Aluminum, Chrome & Bronze Winch Handles Carbo OneTouch Locking Winch Handle Service Kits CLR Mooring Winches Electric Captive Reel Winches Hydraulic Captive Reel Winches UniPower Radial Single-Acting Integral Backstay Adjuster Single-Acting Cylinders Locking Cylinders Double-Pull Cylinders Grand Prix Cylinders Hydraulic Cylinder Rod End Blocks Hydraulic Cylinder End Fittings Control Valves Control Manifolds Control Panels Compact Control Panel Rotary Pumps Hydraulic Pump Handles Power Systems Repair Kits Ball Bearings Block Spare Parts Traveler Cars Furling Spare Parts Winch Spare Parts Winch Service Kits Blockheads Gear Promo & Gifts Marine Grip Blue Performance Jeep/Truck tops Garage storage One-design Covers Boat accessories Canvas bags By Type of SailingDinghy / One-Design Offshore Racing Coastal / Day Cruising Bluewater Cruising Megayachts / Custom Service Guide Tech/Service deck layouts Data Sheets (SDS) How to choose System diagrams Calculators Reeving diagrams Traveler Purchase Selection Guide How to Choose Testimonials Hoister Videos Request a Quote Request Samples Fabric details Cover Styles Canvas Videos Contract Services Materials and Components Our Equipment Contract Cut-and-Sew Project Spotlight - Harken at the front
- Safety & Rescue
Support / Tech/Service Articles Rig DimensionsThe following abbreviations are often used to describe various measurements on a sailboat. Precise technical definitions exist for each abbreviation, but the following is a list of simple descriptions. | LOA | Length Overall - overall tip-to-tip length of the boat | | LWL | Length Waterline - length of waterline of the boat | | DWL | Design Waterline -theoretical waterline length of boat as opposed to LWL, which is actual waterline length | | BMX | Beam Maximum - width of the boat at the widest point | | BWL | Beam Waterline - widest beam of boat at the waterline | | I | Height of the foretriangle measured from the top of the highest sheave to the sheerline | | I2 | Height of staysail halyard above deck | | J | Base of the foretriangle measured from the front of the mast to the intersection of the forestay and deck | | J2 | Base of staysail triangle | | P | Luff length of the mainsail | | E | Foot length of the mainsail | | LP | Shortest distance from headstay to the clew of the jib | If you would like to link to or reprint this article please contact [email protected] .  Product Categories- United States
- New Zealand
- United Kingdom
- Types of Sailboats
- Parts of a Sailboat
- Cruising Boats
- Small Sailboats
- Design Basics
- Sailboats under 30'
- Sailboats 30'-35
- Sailboats 35'-40'
- Sailboats 40'-45'
- Sailboats 45'-50'
- Sailboats 50'-55'
- Sailboats over 55'
- Masts & Spars
- Knots, Bends & Hitches
- The 12v Energy Equation
- Electronics & Instrumentation
- Build Your Own Boat
- Buying a Used Boat
- Choosing Accessories
- Living on a Boat
- Cruising Offshore
- Sailing in the Caribbean
- Anchoring Skills
- Sailing Authors & Their Writings
- Mary's Journal
- Nautical Terms
- Cruising Sailboats for Sale
- List your Boat for Sale Here!
- Used Sailing Equipment for Sale
- Sell Your Unwanted Gear
- Sailing eBooks: Download them here!
- Your Sailboats
- Your Sailing Stories
- Your Fishing Stories
- Advertising
- What's New?
- Chartering a Sailboat
- Sail Dimensions
What Sail Dimensions are Required to Calculate Sail Areas?The required sail dimensions for calculating the area of any triangular sails are usually its height and the length of its foot. But that only works for mainsails and mizzens with no roach, and jibs with a 90 degree angle at the clew - and what about high-cut headsails, spinakers and cruising chutes? Read on... Foresail and mainsail dimensions are universally referenced with the letters 'J', 'I', 'E' and 'P' approximating to the length of the foredeck, height of the mast, length of the boom and the height of the main sail - but more accurately defined further down this page. Yacht designers need these sail dimensions to calculate thought provoking stuff such as the sail-area/displacement ratios of their creations, and sailmakers need them before they put scissors to sailcloth. If our sailboat's sails were perfectly triangular then, as every schoolboy knows, their area would be 'half the height, times the base' - but with the possible exception of a mainsail with a straight luff, generally they're not. Here's how it works... Main and Mizzen Sail DimensionsThese are almost right-angled triangles except for the curvature of the leach (the 'roach') which increases the sail area.  It's usually calculated as:~ Area = (luff x foot)/1.8, or Area = ( P x E )/1.8, where:~ - 'P' is the distance along the aft face of the mast from the top of the boom to the highest point that the mainsail can be hoisted, and
- 'E' is the distance along the boom from the aft face of the mast to the outermost point on the boom to which the main can be pulled.
For the mizzen sails on ketches and yawls , 'P' and 'E' relate to the mizzen mast and boom. For more heavily roached sails, the increased area can be accounted for by reducing the denominator in the formula to 1.6. Clearly calculating sail areas isn't going to be an exact science... Jibs, Genoas and Staysail Dimensions For a working jib that fills the fore triangle - but no more - and with a foot that's parallel to the deck, then you've got a 'proper' right-angled triangular sail, whose area is:~ Area = (luff x foot)/2, or Area = ( I x J )/2, where:~ - 'I' is the distance down the front of mast from the genoa halyard to the level of the main deck, and
- 'J' is the distance along the deck from the headstay pin to the front of the mast.
Genoas, by definition, have a clew which extends past the mast and are described by the amount by which they do so. For instance a 135% genoa has a foot 35% longer than 'J' and a 155% genoa 55% longer. Areas are calculated as follows:~ Area (135% genoa) = (1.44 x I x J )/2, and Area (155% genoa) = (1.65 x I x J )/2 High-cut Headsails But these formulae don't work for a high-cut jib with a raised clew - unless you imagine the sail turned on its side such that the luff is the base and the luff perpendicular is the height. It's still a simple calculation though, once you know the length of the luff perpendicular ( LP ), the sail area is:~ Area = (luff x luff perpendicular)/2, or Area = ( L x LP )/2, where:~ - 'L' is the distance along the forestay from the headstay pin to the front of the mast, and
- 'LP' is the shortest distance between the clew and the luff of the genoa.
Spinnaker Sail DimensionsMuch like calculating foresail areas, but with different multipliers for conventional spinnakers and asymmetric spinnakers... Conventional SpinnakersArea = (0.9 x luff x foot), or Area = (0.9 x I x J ), where:~ - 'I' is the distance from the highest spinnaker halyard to the deck, and
- 'J' is the length of the spinnaker pole.
Asymmetric SpinnakersArea = (0.8 x luff x foot), or Area = (0.8 x I x J ), where:~ - 'I' is the distance from the highest spinnaker halyard to the deck, and
- 'J' is the distance from the front face of the mast to the attachment block for the tackline.
More about Sails... Are Molded and Laminate Sails One Step Too Far for Cruising Sailors?Although woven sails are the popular choice of most cruising sailors, laminate sails and molded sails are the way to go for top performance. But how long can you expect them to last?  Is Carrying Storm Sails on Your Cruising Boat Really Necessary?It's good insurance to have storm sails available in your sail locker if you are going offshore, and these are recommended fabric weights and dimensions for the storm jib and trysail  Using Spinnaker Sails for Cruising without the Drama!When the wind moves aft and the lightweight genoa collapses, you need one of the spinnaker sails. But which one; conventional or asymmetric? Star cut, radial head or tri-radial? The Mainsail on a Sailboat Is a Powerful Beast and Must Be ControlledLearn how to hoist the mainsail, jibe it, tack it, trim it, reef it and control it with the main halyard, the outhaul, the mainsheet and the kicker. Is Dacron Sail Cloth Good Enough for Your Standard Cruising Sails?Whilst Dacron sail cloth is the least expensive woven fabric for standard cruising sails, do the superior qualities of the more hi-tech fabrics represent better value for money? Recent Articles Beneteau Oceanis 400 Specs & Key Performance IndicatorsAug 27, 24 05:09 AM Grand Soleil 37 Sailboat Specs & Key Performance IndicatorsAug 27, 24 01:19 AM GENERIC KPI TemplateAug 25, 24 07:21 AM Here's where to:- Find Used Sailboats for Sale...
- Find Used Sailing Gear for Sale...
- List your Sailboat for Sale...
- List your Used Sailing Gear...
Our eBooks... A few of our Most Popular Pages... Copyright © 2024 Dick McClary Sailboat-Cruising.com  Home > Resources > Rig Specification Diagram For Sailboats: Mainsail & Headsail Rig Specification Diagram For Sailboats: Mainsail & Headsail30 December 2020 Ask Precision Sails , Design , Featuring - Partners , Headsail , Mainsail , Measurements , Sails , Technical Tags: Furling , Headsail , Mainsail , Precision Sails , rig , Sails , Specifications , Specs Sailboat Rig Specs: Precision Sails DefinedThe above infographic shows how Precision Sails label sailboat rig specifications. Continue reading below to see definitions and basic how-to tips on how to measure them below. Rig specs are important for designing a sail suited for your applications and boat. When you decide to get a custom sail from Precision, in most cases, you will be taking your own boats measurements. So it’s important to know about rig specs! One thing we tell sailors here at precision is “The effort you put into measuring really does translate into the quality of sail you get” If quality measurements are given to designers, it allows them to create an excellent performing sail. It’s essential that good information is passed on to the designers when they create your sail. The more information you can give to us, the better. One detail we strive to get right with sailors is the sailboats measurements. Taking your own sail boats measurements is an imperative part of creating a custom sail. Photographs are also a handy tool. They let our designers understand your rigs better and can make suggestions and improvements. Sometimes sailors think sails are like Lego, or the marine equivalent of a Honda Civic car part, where you can just swap out sails like its nothing. But this isn’t further from the truth. Sailboats are handmade. There can be many differences from one model to the next. Your boat might not be fresh out of the boatyard. It might be 36 or more years old, all this time equates to the boat changing, modifications being made, new parts being installed, break in periods, different maintenance intervals. There are a whole slew of reasons why your boat’s rig specs could be, and probably are, different from the next. This is the main reason we are so thorough with our measurement forms and design process. Mainsail Rig SpecsP – Maximum Mainsail Hoist Length (Maximum luff): On the main halyard, hoist a measuring tape measure until it stops without jamming the halyard into the shiv. Measure straight down along the mast to the top of the boom at the tack. Disconnect Mainsail from Halyard. Be sure the boom is in the normal sailing position. E – Maximum Foot Length: Measure from the aft face of the mast to the shackle of the outhaul. Make sure the outhaul is pulled back to it’s tightest position. When you get a maximum foot length we are not actually going to design the sail exactly to that length but rather a couple inches shorter. This allows you to adjust your outhull and not have your adjustments pushed against the shiv at the end of the boom, as well as changing tension in the sail. Backstay Measurement: This measurement serves as a guide so we know how far the leech of your sail can be pushed without it overlapping the backstay. Sometimes you want this for certain performance reasons, but most cruisers do not want it to overlap, because it results in less wear. Headsail Rig SpecsI – Foretriangle Height: Measure from the top of the halyard to the side deck on the forward side of the mast. J – Foretriangle Base: Measure along deck from the forestay to the Forward face of mast. The J measurement is just a secondary check to make sure nothing has been changed over the years and there’s no surprises. 1. First Hank: Measure from tack to the first hank position on headstay wire above turnbuckle. 2. Maximum Luff Measurement: Measure from top of halyard to the bearing point of tack fitting 3. Waterline to Forestay: At the bow, measure the vertical distance from the waterline up to the intersection of the deck and forestay. 4. Waterline to Base: At the front of the mast, measure the vertical distance from the waterline up to the deck. 5. Headstay to Forward Track: Measure from tack attachment on deck to the forward edge of the headsail track you will be sheeting to. Furling Head SailsHeadsail rig dimensions change slightly with a furling unit. The following videos do a good job of displaying the process of taking the measurements. Furling drum height: Measure from the deck to the location of the tack attachment point on your furling drum. Measure the pennant separately. After you get us your measurements. We will start customizing the design of your sail. There will be a consultation during the design process. We get you involved with this process because there are several things you can adjust for your sail – how far do you want the clew off the deck, where do you want the clew to sit and any thing else you might think of. Put the knowledge you just gained into good use and take some good measurements! If you’re in need of a sail request a quote!  precisionsails Related Posts Full Battens vs Partial Battens vs 2 Full plus 2 Partial Battens Full Battens VS Partial Battens At Precision Sails we are asked every day during our customer quote consultation “Should I choose Full Battens or Partial Battens for my new mainsail?” Whether you are cruising or racing you will need to examine the pros and cons of adding full battens to your main sail.Positive Aspects of Full […]   Memories of Sail Repairs, Replacement Sails and FINALLY New SailsI have had a Tanzer 26 for over 20 years now. The vessel, without much imagination I call The Boat, has served me well and without complaint through yearly cruises on Lake Ontario with my three kids and day sailing with the wife. Did I mention that my wife is a good sport but a definitive lover of a good.  My Need for Cruising Speed Demands a Great Suit of SailsMy Need for Cruising Speed Demands a Great Suit of SailsI like to sail fast mostly in the heavy winds that Lake Ontario throws. " * " indicates required fields Thanks for telling us a bit about yourself and your boat. Our team will send you a preliminary quote based on information we have gathered from sailors similar to you. We will give you a call in order to narrow down the options on your quote and improve the accuracy. If you want us to call you at a specific time, feel free to schedule a time on our calendar! Thanks for telling us a bit about yourself and your boat. Our team will reach out to offer some suggestions and get started on finding you the perfect sail!  On this pageRig measurements are following the WS Equipment Rules of Sailing (ERS) with only a couple of modifications specific for offshore boats: - Mast datum point is at the top point of the section at the foreside of the mast
- Rigging point is attachment of the forestay to the mast, or the intersection of the extended forestay with the mast structure.
Mast datum point and Foretriangle base BAS and J with SFJ measurements are defining vertical and longitudinal position of the mast and sail plan relative to the hull. BAS is the height from the mast datum point to the boom or lower black band on the mast. It is used also as a reference point for the halyards hoist measurements on the mast. J is probably the best-known measurement on boat, since it is used to define the size of headsails. It is defined as the horizontal distance between the front side of the mast and the intersection of the forestay with the deck. SFJ then determines the distance of the forward point of J to the actual foremost point on the hull.  P is distance between the black bands and the mast that are limiting the position of the mainsail luff - while racing the mainsail luff must be between these bands. In the absence of the upper black band, P is measured to the upper part of the main halyard sheave. IG is defined as the height of the foretriangle and is the vertical distance from the mast datum point (at the sheerline at the mast) to the forestay attachment to the mast. Similar to IG , ISP is the spinnaker halyard height and is the maximum height that the head of the spinnaker or headsail set flying can be hoisted.  Mast profiles are measured for maximum dimensions above 0.5 * P transversely (MDT1) and longitudinally (MDL1) as well as for the minimum dimensions transversely (MDT2) and longitudinally (MDTL2) . Taper length TL is the vertical distance from the upper black band to the point where maximum mast profile dimensions occurs. Thus, TL is 0 if mast is not tapered. If there is a structure element of forestay attachment to the mast, then its distance from the aft side of the mast is measured as GO . Mast width MW at that height provides elements for the calculation of the actual intersection of the forestay with the front side of the mast.  Mast weight (MWT) and mast centre of gravity (MCG) are important factor determining a boat's stability. It can be measured by weighing the mast at a single point and finding the actual centre of gravity, or by two separate weight measurements at the same points from which total weight and centre of gravity position are calculated.  The mast is weighed with: forestay, backstay, spreaders, jumpers, shrouds, chain plates, runners, lights, antennae, wiring and other permanently fitted components all slack stretched down and secured with light material at the bottom of the mast. Excluded are: checkstays, halyards, boom vang and reefing lines. If the mast is not weighed, then lightweight defaults for aluminium or carbon mast are used. Actual mast weight measurements will therefore always give a more favorable rating. E is the measured distance from the aft side of the mast to the black band on the boom that limits the position to which mainsail foot may be extended. In the absence of the black band, it shall be measured to the point on the boom as aft as the mainsail clew can reach. Boom diameter BD is measured as a vertical cross section.  Spinnaker pole and bowspritSpinnaker pole length ( SPL ) the horizontal distance from the forward face of the mast spar, ignoring any fittings and tracks, measured on or near the centerline of the boat, to the extremity of the spinnaker pole. . The tack point of spinnaker ( TPS ) when it is tacked on the boat's centerline is the distance from the foreside of the mast to the foremost point on which the asymmetric spinnaker or any headsail set flying can be tacked. If the bowsprit is retractable TPS shall be measured with it in its fully-extended position.  Other rig detailsIn addition to the measurements set above, the following rig details are also recorded: - Inner stay , which may be adjustable or fixed
- Foresetay tension , which may be controlled by Forestay, Backstay, Both or be Fixed.
- Number of spreaders
- Number of runners
- Carbon mast and fiber rigging
- Mainsail furler
- Headsail furler
- Use of non-manual power for adjusting running rigging or spars
Offshore Racing Congress Partners Log in to ORC Sailor services using email and passwordORC Sailor Services allows you access to ORC Database of all ORC certificates issued worldwide such as accessing speed guides, target speeds and do test runs on any certificate. ORC Sailor Services - Password reminderPlease enter the e-mail address registered for the ORC Sailor Services to receive your password ORC Sailor ServicesWith an ORC Certificate you are getting more than just a rating. ORC Sailor Services allows you access to the ORC Database of all ORC certificates issued worldwide.  Sailboat Rig: Everything You Need to Knowby Emma Sullivan | Jul 26, 2023 | Sailboat Maintenance  Sailboat rigA sailboat rig refers to the arrangement of sails and mast on a sailboat. It determines how the boat harnesses wind power for propulsion. Common types include sloop, cutter, and ketch rigs. Each rig has distinct characteristics affecting sailing performance and maneuverability. Demystifying the Sailboat Rig: An Essential Guide for Beginners Setting sail on a boat for the first time can be an exhilarating yet daunting experience. The complex rigging system that makes a sailboat sail, known as the sailboat rig, may seem like a puzzle to unravel. But fear not! In this comprehensive guide, we will empower beginners with all the knowledge needed to navigate the intricacies of a sailboat rig. To understand the mechanics of a sailboat rig, let’s embark on a metaphorical voyage. Imagine your sailboat as a magnificent seafaring vessel, equipped with masts and sails resembling the wings of a grand albatross gliding effortlessly through the open ocean. At its core, the sailboat rig consists of three primary components: mast(s), boom(s), and sails. Think of these parts as crucial players working harmoniously, relying on wind power to propel your vessel forward. The majestic mast stands tall and proud in the center of your vessel. It serves two vital purposes – providing stability and acting as an anchor point for various ropes and fittings. Commonly made from aluminum or carbon fiber, masts come in different shapes (round or oval) and sizes (tall or short) depending on your boat’s design. Secured to your mast is another essential component—the boom. This horizontal beam runs along the bottom edge of your mainsail – the primary driving force behind your journey through water. Complementing each other seamlessly, both mast and boom facilitate efficient sail control and maximize performance under varying wind conditions. Now it’s time to unfurl those magnificent sails that will catch gusts of wind like gossamer wings harnessing nature’s hidden powers! Sails come in various forms—mainsails (attached to masts), jibs (forward-facing triangular sails attached to bowstays), genoas (larger overlapping jibs), spinnakers (giant, colorful downwind sails), and more. Each sail offers a unique purpose, allowing you to navigate different wind angles and speeds with finesse. As a beginner, it’s vital to comprehend the intricate network of ropes and lines that connect your rigging components. Rigging lines travel up your mast through blocks or pulleys, offering mechanical advantage for hoisting sails or adjusting their positions. These ropes, cunningly woven like a master craftsman’s tapestry across your vessel, give you control over the delicate dance between wind and water. It’s important to familiarize yourself with key terms commonly used in the sailing lexicon as they relate to rigging. Terminologies such as halyards (ropes used to raise/lower sails), sheets (lines controlling the angle of sails relative to the boat), outhauls (apply tension along the boom), vangs (control vertical position of the boom), and many more will soon become an essential part of your nautical vocabulary. Remember, understanding how these elements work together is just half the battle—tuning your sailboat rig correctly enhances its efficiency. Adjusting tensions on various lines ensures optimal sail shape and minimizes unwanted fluctuations due to gusts or lulls in wind power. The art of sailing lies in delicately balancing science and intuition. As you become more acquainted with your sailboat rig, experiment with different adjustments during your voyages – an alchemical process honed over time through experience. Now that we’ve shed light on the enigmatic world of sailboat rigs, embrace this newfound knowledge with confidence! Step aboard your trusty vessel armed with a deeper understanding of its intricate workings – ready to embark on countless memorable adventures on open waters. In closing, demystifying the sailboat rig is not just about unraveling technicalities; it signifies unlocking the true essence of sailing itself—a breathtaking fusion of nature’s power and human ingenuity, offering endless opportunities to explore uncharted horizons. So, hoist those sails high and let the winds of discovery carry you forward! Mastering the Art of Sailboat Rigging: A Step-by-Step TutorialTitle: Mastering the Art of Sailboat Rigging: A Step-by-Step Tutorial Introduction: Welcome aboard, aspiring sailors and sailing enthusiasts! Embarking on a sailboat journey is an exhilarating experience, but before you set sail, it’s vital to master the art of sailboat rigging. This step-by-step tutorial will guide you through every aspect of rigging technique, ensuring a seamless and efficient sailing experience. 1. Understanding the Basics of Sailboat Rigging: Before delving into the finer details, let’s start with the basics. Sailboat rigging refers to the configuration and setup of ropes, wires, and other components that control your boat’s sails. These interconnected systems play a crucial role in adjusting sail shape, maintaining stability, and achieving optimal performance while navigating wind currents. 2. Essential Equipment for Rigging: Your journey towards rigging mastery begins by familiarizing yourself with the essential equipment required. Items such as halyards (ropes used to hoist the sails), sheets (ropes used to adjust sail position), standing rigging (stainless steel wires stabilizing mast and spreading loads), and running rigging (control lines) must be carefully selected based on boat size, type, and your intended sailing adventures. 3. Inspecting Your Rigging Components: Safety should always be your priority when embarking on any sailing adventure. Therefore, inspecting your rigging components becomes imperative before setting sail. Thoroughly examine all standing riggings, checking for visible wear or damage that may compromise their integrity. Pay attention to worn-out turnbuckles or frayed wire strands – promptly replacing or repairing them ensures that you’ll have robust support while riding the waves. 4. Tuning Your Mast: Once your safety checks are complete, it’s time to tune your mast – one of the key elements determining how efficiently your boat captures wind power. By adjusting tension in both upper and lower shrouds, you can optimize mast bend and sail shape. With a properly tuned mast, your boat will be better balanced, promoting stability and enhancing your overall sailing experience. 5. Hoisting Sails and Adjusting Sail Shape: With an optimally tuned mast, it’s time to hoist the sails! Begin by attaching the halyards to the sail’s head, meticulously ensuring a secure connection. As you raise the sails, closely monitor their shape – envisioning how different adjustments will impact performance. Experiment with trimming the sheets while observing changes in airflow over the sail surface; this practice facilitates controlling speed and direction with precision. 6. Mastering Reefing Techniques: Even the mightiest sailors occasionally encounter rough seas or strong gusts of wind. Hence, mastering reefing techniques becomes paramount for maintaining control during adverse weather conditions. Learn how to reduce sail area by reefing or partially lowering mainsail or jib – keeping your boat manageable while preserving stability and preventing excessive heeling. 7. Routine Maintenance and Care: Finally, achieving mastery in sailboat rigging requires ongoing maintenance and care throughout your journey. Regularly inspect all lines for wear or chafe marks caused by friction against shackles or blocks; lubricate blocks for smoother operation and prevent corrosion on metal components; protect ropes from UV damage by using covers or stowing them away when not in use. Conclusion: Congratulations on taking this adventurous step towards mastering the art of sailboat rigging! By understanding the basics of rigging techniques, diligently inspecting equipment, tuning your mast effectively, adjusting sails for optimal performance, learning reefing techniques for unpredictable conditions, and performing routine maintenance – you are well-equipped to embark on unforgettable sailing experiences with utmost confidence and skillfulness. So hoist those sails high, catch that perfect wind current – let your magnificent voyage begin! Sailboat Rig FAQ: Expert Answers to Common QuestionsTitle: Sailboat Rig FAQ: Expert Answers to Common Questions Introduction: Embarking on a sailboat journey brings an exhilarating mix of adventure, freedom, and connection with nature. However, navigating the intricacies of sailboat rigging can sometimes be perplexing for beginners and even experienced sailors. To help you unravel the mysteries of this vital component, we have compiled the most frequently asked questions about sailboat rigs along with expert answers that aim to demystify this topic. So grab your seafaring hat and join us as we delve into the depths of the Sailboat Rig FAQ! 1. What is a sailboat rig? Answer: Think of the rig as a sailboat’s skeleton. It encompasses all components involved in supporting and controlling a vessel’s sails. This includes masts, booms, shrouds, stays, halyards, and various fittings that work in harmony to manipulate the sail shape and control its position relative to wind direction. 2. How does mast height affect performance? Answer: Mast height plays a crucial role in determining a boat’s performance capabilities. Taller masts enable larger sails to be hoisted higher above turbulent air close to water level, resulting in increased wind power and better upwind sailing ability. Additionally, taller masts often allow for more sophisticated rigging systems which offer greater control over sail shape adjustments. 3. What are the different types of rigs? Answer: There are several types of rigs commonly found on sailboats today: – Bermudan Rig: This type features one main triangular-shaped mainsail with a single jib or genoa headsail at the bow. – Gaff Rig: Characterized by a four-sided mainsail utilizing both gaff (a spar) and boom. – Schooner Rig: A two-masted configuration featuring fore-and-aft rigged sails on both masts. – Cutter Rig: Combines multiple head sails with one mast and a mainsail, allowing for enhanced versatility in varying wind conditions. 4. Why do some sailboats have multiple masts? Answer: Multi-masted configurations offer advantages including greater sail area, increased flexibility for varying wind conditions, and the ability to achieve smaller, more manageable sail sizes. They can enhance downwind sailing performance and are often seen on larger vessels or traditional sailing ships. 5. What is standing rigging vs. running rigging? Answer: Standing rigging refers to the fixed components that support the mast, such as shrouds and stays. On the other hand, running rigging comprises movable equipment like halyards and sheets responsible for adjusting sails’ position and tension. 6. How frequently should I inspect my rigging? Answer: Regular inspections of your rigging are crucial to ensure your safety on the water. Check for signs of wear, damage, or corrosion at least once a year or before embarking on an extended voyage. Pay special attention to critical areas like connections, turnbuckles, chainplates, and spreader tips. 7. Can I adjust my sail shape while underway? Answer: Absolutely! Modern sailboat rigs provide ample opportunities to manipulate sail shape through various control mechanisms such as halyard tensioning devices (winches), boom vangs (kickers), cunninghams (downhauls), traveler systems, adjustable backstays, outhauls and more—all designed to optimize performance by maximizing aerodynamic efficiency and controlling power distribution across different wind conditions. Conclusion: Understanding sailboat rigs is fundamental knowledge every sailor should possess. Mastery over this crucial aspect enhances both safety at sea and overall performance capabilities. By gaining insights from our expert-driven Sailboat Rig FAQ guide, you’re now equipped with in-depth knowledge about key concepts related to masts’ impact on performance, different types of rigs available today, the importance of regular inspections as well as understanding various control mechanisms for sail shape adjustments. So hoist your sails, captain, and let the wind carry you to new sailing adventures! Exploring the Different Components of a Sailboat RigTitle: Demystifying the Enigmatic Components of a Sailboat Rig – A Journey into the Heart of Sailing Mastery Introduction: Embarking on a sailing adventure instantly transports us to a world of freedom, tranquility, and excitement. As we glide across the open water under the power of nothing but the wind, it’s easy to feel at one with nature. However, behind this seemingly effortless experience lies an intricate system called a sailboat rig. Today, we embark on a voyage of knowledge as we unravel and explore the different components that make up this marvelous mechanism. 1. Mast: The Graceful Backbone Let’s start our journey by familiarizing ourselves with the focal point of any sailboat rig – the mast. Rising majestically toward the sky like a guardian angel, this towering structure plays multiple roles. First and foremost, it provides vertical support to secure the sails in place while absorbing forces generated by various elements such as wind pressure and wave motion. This sturdy column ensures stability and plays an instrumental role in shaping our boat’s performance. 2. Boom: A Swinging Arm Revolutionizing Sail Control As we move down from aloft to uncover another pivotal component, our gaze lands upon an unsung hero – the boom. With its silent elegance, this horizontal spar extends off the mast and helps to maintain tension within our mainsail or other layers of sailcloth. Additionally, its ability to swing horizontally facilitates improved control over our vessel’s speed and maneuverability through one key concept – trimming! By adjusting the position of our boom relative to both wind direction and sail angle, we harness an incredible spectrum of possibilities for enhanced performance. 3. Sails: Sculpting Nature’s Breath No discussion surrounding sailboat rigs would be complete without dwelling on their most captivating feature – sails themselves! These sprawling canvases blend artistry with technicality as they capture windswept energy from Mother Nature herself. Composed of broad sections called panels, these sails enroll and unfurl, shaping the very essence of our sailing experience. The mainsail, jib, spinnaker, and other types each serve different functions and adapt to varying wind conditions. Mastering the art of sail manipulation is the pinnacle of any sailor’s journey towards achieving true maritime expertise. 4. Standing Rigging: Lifelines Amidst Windy Waters Now that we’ve explored the dynamic elements above deck let us delve further into an unseen but vital part of the sailboat rig – the standing rigging. Comprising stainless steel wires or lines known as stays and shrouds, this network holds our mast aloft while enduring immense forces transmitted during sailing maneuvers. Far from being mere static support, these lifelines counterbalance stresses generated by our sails’ incredible power. Proper tuning and maintenance are crucial here to ensure reliable integrity necessary for a safe voyage. 5. Running Rigging: The Orchestra Conducting Sailing Symphony Finally, our exploration brings us to running rigging – a symphony in control! Consisting of ropes, lines, and blocks adorning our vessel like intricate threads through a tapestry, this dynamic system empowers sailors with direct influence over their boat’s speed and direction. By deftly manipulating halyards and sheets among other key components like cleats or winches, we fine-tune various aspects ranging from sail trim to hoisting or dousing sails at will. Conclusion: From its soaring mast to its intertwined running rigging, a sailboat rig demonstrates a perfect fusion of science and artistry nurturing our maritime experience. As we navigate uncharted waves or glide under starlit skies on these remarkable vessels, may this enlightening journey into their multifaceted components encourage profound respect for both nature’s forces and human ingenuity. So step aboard your adored craft today – armed with newfound knowledge – as you set off on extraordinary adventures across the vast oceans that beckon. How to Properly Set Up and Adjust Your Sailboat RigHow to Properly Set Up and Adjust Your Sailboat Rig: Achieving Smooth Sailing Setting up and adjusting the rig on your sailboat may seem like an overwhelming task, but with a little guidance, it can become a seamless process that enhances your sailing experience. In this blog post, we will delve into the key steps and considerations for ensuring proper rig setup, allowing you to navigate the waters with confidence. 1. Understand the Anatomy of Your Sailboat Rig Before diving into adjustments, familiarize yourself with the different components comprising your sailboat rig. The main parts include the mast, spreaders, shrouds and stays (also known as standing rigging), forestay, backstay, and boom. Each element plays a vital role in maintaining a balanced sail shape and overall stability. 2. Begin with Setting Up the Mast The first step is to properly set up the mast – this is crucial for achieving an optimal sail shape while underway. Securely attach it to the keel or deck using appropriate means such as wooden wedges or metal shoes. Laminate any spaces between the mast base and stepping fixture to eliminate unnecessary movement. 3. Checking Mast Alignment and Rake To ensure proper alignment, double-check that your mast stands upright without any bends or twists when viewed head-on from various angles. A slightly forward incline at its top section known as rake can contribute to better sailing performance by generating more lift force on your sails. 4. Tensioning Shrouds and Stays Now it’s time to tackle tensioning your shrouds and stays effectively. These cables support your mast by distributing forces exerted by wind pressure evenly throughout its structure. Start by tightening all shrouds moderately until they’re taut but not excessively stretched – precise tension ultimately depends on factors like boat size, type of sailing, and weather conditions. 5. Precise Tuning: Balancing Shroud Tension Professional sailboat rigging entails finding the right balance of tension between port and starboard shrouds. You can fine-tune this by adjusting the turnbuckles, effectively altering the mast’s side-to-side bend. Carefully observe that your mast remains centered and straight under normal wind conditions when tweaking shroud tensions. 6. Fine-tuning Forestay and Backstay Next, focus on optimizing your forestay and backstay tension to refine your sail shape further. The forestay keeps your mast from falling forward under heavy winds, while the backstay stabilizes it amidst strong gusts. Achieving the correct adjusted length for each is key to maintaining an efficient airflow over your sails. 7. Adjusting Boom Height and Angle Don’t forget about the boom – it plays a significant role in controlling sail shape and twist. Position it parallel to the deck when sailing at a beam reach or on a run. Fine adjustments can be made by tightening or loosening its topping lift, ensuring optimal clearance above crew heads during maneuvers. 8. Continual Assessment: Monitoring Your Rig Once you’ve set up your sailboat rig as per our guidelines, ongoing monitoring is essential for its longevity and performance efficiency. Regularly inspect cables for wear, corrosion, or fatigue that might weaken their integrity over time. By following these detailed steps with due diligence, you’ll have a professionally set up and well-adjusted sailboat rig that will help you navigate any waterways with ease and finesse — ultimately affording you smooth sailing adventures! Remember: mastering this process takes practice, so stay patient while honing your skills. So why wait? Embark on this exciting endeavor today, taking charge of your sailboat’s rig setup like an experienced sailor would. Let the winds guide you towards unforgettable voyages as you harness the true potential of your vessel’s capabilities! Avoiding Common Mistakes in Sailboat Rigging: Tips and TricksTitle: Sailing Smoothly: Tips and Tricks to Avoid Common Mistakes in Sailboat Rigging Introduction: Setting sail on a beautifully rigged sailboat is an exhilarating experience for any sailor. However, even the most seasoned sailors can fall prey to common mistakes that can affect the performance and safety of their vessel. In this blog post, we will explore some professional, witty, and clever tips and tricks to help you avoid these pitfalls in sailboat rigging. So grab your cup of coffee, sit back, and let’s dive into the world of flawless rigging! 1. The Importance of Proper Alignment: Imagine trying to walk in shoes that are too loose or too tight – uncomfortable and difficult “sailing” indeed! Similarly, misalignment in your rigging can cause unnecessary strain on your sails, mast, and standing rigging. To ensure a seamless sailing experience, take the time to meticulously align all key components such as spreaders, shrouds, forestay, and backstay. Trust us; this attention to detail will pay off with improved boat handling and increased efficiency. Witty tip: Just like cooking pasta al dente (firm but not hard), give your rigging alignment some love so you stay aligned with smooth sailing! 2. Regular Inspection for Chafe: Chafe is akin to corrosion slowly eroding the strength of your rigging over time. Keep a watchful eye on areas prone to chafing such as halyards running over sheaves (pulleys), cleats rubbing lines together or against metal fittings. Invest in protective covers or tapes specially designed for chafe-prone areas like spreader tips or jib sheets rubbing against lifelines. Clever trick: Think of chafe as the sneaky Bermuda Triangle lurking within your sailboat’s rigging – stay vigilant lest it weakens your ship! 3. Tensioned Correctly – Not Too Tight, Not Too Loose: Finding that perfect balance between too tight and too loose is essential for optimal sail shape and increased boat performance. Over-tightening can strain the rigging, causing undue stress on sails and decreasing their lifespan. Conversely, under-tightened rigging may result in saggy sails and compromised boat speed. Seek professional guidance or refer to your sailboat’s manufacturer specifications to achieve the ideal tension for each part of your rigging. Professional advice: Like a good massage, aim for just the right tension – firm enough to feel supported but not so tight that it becomes uncomfortable! 4. Regularly Inspect Swage Fittings: Swage fittings are commonly used to terminate wire standing rigging, providing a secure connection between wires and terminal ends. However, these fittings can suffer from fatigue or corrosion over time, compromising their strength and reliability. Inspect swage fittings closely for any signs of cracking, leaking (in hydraulic swages), or corrosion. If detected, promptly consult an expert rigger who can address the issue before it jeopardizes your safety at sea. Witty observation: Remember, even tiny cracks can make swages crumble like well-baked cookies – nip them in the bud before they create chaos during your sailing adventures! Conclusion: Avoiding common mistakes in sailboat rigging requires a combination of precision, regular inspection, and a touch of wit. By properly aligning your rigging components, diligently inspecting for chafe damage, maintaining correct tension levels throughout your rigging system, and regularly monitoring swage fittings’ integrity – you’ll be setting yourself up for smooth sailing experiences both metaphorically and literally! So grab those tools and set sail with confidence as you navigate the vast seas hassle-free. Happy sailing! Recent Posts - Sailboat Gear and Equipment
- Sailboat Lifestyle
- Sailboat Maintenance
- Sailboat Racing
- Sailboat Tips and Tricks
- Sailboat Types
- Sailing Adventures
- Sailing Destinations
- Sailing Safety
- Sailing Techniques
 How To Measure Your Sailboat For A New MainsailMany sailors simply pull their sail measurements off their old sails when it’s time to order a new sail . But what if your old sails were lost or destroyed? What if you weren’t happy with the performance or shape of the old sails, or if you are ordering sails for a newly built vessel that has never had sails before? In this article, we are going to discuss how to get measurements from your sailboat for a new mainsail. In order to gather the right information to order a new mainsail, you will need to take a variety of measurements as well as collect information on details like the outhaul and the type of sail slides. Keep reading to learn everything you’ll need to know about how to take the measurements for a new mainsail from your sailboat. Types of Measurements Required for a New MainsailThere are three types of measurements that you will need to take in order to construct a new mainsail. These are the rig specs, existing mainsail measurements (if you have one), and the rig measurements. Let’s take a closer look at each of these types of measurements. The rig specs are the first thing you’ll want to find. These are used to make sure that the sail loft has quoted you for the correct size of sail and that the measurements taken were accurate. You can get your rig specs from your boat manufacturer, online, or in your boat manual. If you already have an existing mainsail, that will help a lot with getting the right measurements. You can compare measurements taken from the existing sail with measurements taken from your rig to make sure the new sail is cut right. You’ll need to measure the luff (leading edge of the sail), the leech (trailing edge of the sail) and the foot (bottom edge of the sail). Lastly come the rig measurements, like the maximum luff, maximum leech, and the length of the backstay. You will also want to collect information on things like the type and size of your sail slides, and the outhaul and clew attachments. We will go over these measurements in further detail in the sections below. Maximum Luff, Maximum Leech and Backstay MeasurementsThe three most important measurements you will need to take from the rig are the maximum luff, maximum foot, and backstay measurements. Let’s start with the maximum luff. You take this measurement by hauling a tape measure up your mainsail halyard until you get to the top and measuring all the way down to the top of your boom. You can measure for the maximum leech the same way, except you measure from the aft end of the top of the mast down to the longest outhaul setting. While you are taking this measurement it is a good time to also measure your backstay, since you are already at the top of your mast. This helps the sailmaker know the maximum roach that the sail can have before hitting the backstay. Outhaul, Clew Attachment and Sail Slide MeasurementsYou have now taken all of the most important measurements for your new sail. However, there are still some more data points that need to be collected in order for you to get the best possible fit for your new sail. There are two different types of outhaul attachments, either a shackle style connection or a car style connection. Take note of what type of outhaul attachment your boat has and let your sailmaker know. Next, it’s time to take a look at the tack connections. The sailmaker will need this data to know where to put the tack ring on the sail. In order to measure the location of the tack attachment point, measure back from the mast to the bearing point of the tack fitting and measure up from the boom to your tack bearing point. You can measure the appropriate location for the reef hooks using the same technique. After you have finished with these measurements, you will want to take a close look at your mainsail track. The new sail will need to have slides that are appropriate for the existing track. Sail slides can come in round, flat, external, half round, or bolt rope style, where you feed the sail directly into the track. The sail slides will need to be the right style and size for your mainsail track or you won’t be able to hoist the sail. If you aren’t sure what slides are supposed to be used with your mainsail track, ask an experienced sailing friend or your sailmaker for help. If your clew attachment is a shackle, you can use the same technique to measure for the clew attachment slug. Mast Rake and Mast Bend MeasurementsThe final measurements that the sailmaker will need to know are the mast rake and mast bend measurements. A professional sail designer will know how to get this information from a picture taken of the side of the vessel and rig. They can also measure the mast rake by using a plumb bob. That’s it! A mainsail is a significant purchase that you hope to use for many years. By taking the time to measure both your old sails and your rig prior to ordering a new mainsail, you can ensure that you will get the best possible fit for your new sail. It will all be well worth it the first time you hoist your new mainsail , and watch as the perfectly shaped sail fills with wind!  The Sailor’s Marketplace for Sailboats and Sails. Sell Your SailboatSailboats for sale. - New Sailboats
- Used Sailboats
- Cruising Sailboats
- Racing Sailboats
Sell Your SailsSails for sail, sail manufacturers. - North Sails
- Quantum Sails
- Doyle Sails
- UK Sailmakers
Sailing Reviews- Sailing Line
- Safety Equipment
- Sailing Accesories
As an Amazon Associate SailTrader earns from qualifying purchases. This website uses cookies to ensure you get the best experience possible. 10% Off Hobie Parts / 15% Off Rigging / 10-15% Off Select Kayaks - SHOP NOW  - Call Us +1-503-285-5536
- Sign in & Register
- Recently Viewed
Guide to Laser Sail and Rig Sizes Over 200,000 Laser sailboats have been built over the last 40 years, more than most other small dinghy sailboats. In this article we are going to answer one of the most common questions we get: What size rig do I have? This will help answer what size sail and/or rig you already have and what size sail and/or rig you need to purchase to update your Laser. What size rig / sail do I have? Standard vs. Radial vs 4.7 Explained The Laser sailboat has had a number of different rig sizes, with the intention of making the boat sailable by a wide range of sailors (and different sailor weights) by simply swapping out the lower mast section and sail while keeping all other components the same. There are currently three different rig sizes and they are commonly referred to as 'Standard', 'Radial' and '4.7'. Below you will find an image that shows the three rigs side by side, and in the following section we'll explain each one.  Laser Standard / MK2 / ILCA 7 This is the most common Laser rig size, and the original rig on the boat when it was designed. It features a 7.06 square meter sail (about 76 square feet). In 2018, the Laser Class approved a new 'Standard' sail, which is referred to as the 'MKII' or 'Mark 2' to distinguish it from the first version. The difference, among other things, is in the panels. The original 'Standard' sail featured horizontal cut panels. The new MkII sail has radial cut panels. There is no difference in size between these two versions, and as of 2020 all new Laser Standard sails are available in this updated cut.  How to tell if you have a 'Standard' sail: The first and most obvious way to tell if you have a 'Standard' sail is to look at the panels. If they are horizontal, it is most likely a standard sail. Next, you can measure the luff (the front edge of the sail along the mast sleeve). This measurement should be about 5130 mm or 200 inches from the top of the sail to the bottom. How to tell if you have a 'Standard' lower mast section: The 'Standard' lower mast section should measure about 2865 mm or 113 inches . It is a fairly stout mast section compared to the two smaller mast sections. Laser Radial / ILCA 6 Originally called the 'M' rig when first designed, the Laser 'Radial' sail is smaller than the 'Standard' sail at 5.76 square meters (62 square feet). At the time, it was the only Laser sail to feature the radial cut panels, which allowed the sail to be de-powered more easily in bigh winds. Per the notes about the 'Standard' rig above, both the Standard and Radial sail feature the radial cut design. Another typical indicator of a Radial size sail are the blue panels at the tack and clew of the sail.  How to tell if you have a 'Radial' sail: The first and most obvious way to tell if you have a 'Standard' sail is to look at the panels. If they are radial, as in emanating out from the center, it is most likely a radial sail. Next, you can measure the luff (the front edge of the sail along the mast sleeve). This measurement should be about 4560 mm or 180 inches from the top of the sail to the bottom. How to tell if you have a 'Radial' lower mast section: The 'Radial' lower mast section should measure about 2262 mm or 89 inches . It is also a bit smaller in diameter than the standard section. Laser 4.7 / ILCA 5 The Laser 4.7 (or ILCA 5) is the smallest of the three Laser sails and was designed for young sailors just getting into Laser sailing. The 4.7 lower mast section is also different from the others in that is has a pre-bend near the boom fitting, allowing the sail to depower much easier. This is the least common Laser sail size, and if you have an old one around, chances are it is not a 4.7 sail.  How to tell if you have a '4.7' sail: The 4.7 is similar to the old 'Standard' sail as it has cross cut panels. Many 4.7 sails also have an obvious 4.7 logo somewhere on the cloth. Next, you can measure the luff (the front edge of the sail along the mast sleeve). This measurement should be about 4080 mm or 160 inches from the top of the sail to the bottom. How to tell if you have a '4.7' lower mast section: The '4.7 lower mast section has a pre-bend in it and should measure about 1810 mm or 71 inches . The bend is the easiest way to tell it apart from the others. Subscribe To Our NewsletterSign up for our newsletter to receive exclusive discounts, new product announcements, and upcoming sales. Great choice! Your favorites are temporarily saved for this session. Sign in to save them permanently, access them on any device, and receive relevant alerts. 1970 Pearson WandererSeller's DescriptionAtomic 4 unknown hours Rig and SailsAuxilary power, accomodations, calculations. The theoretical maximum speed that a displacement hull can move efficiently through the water is determined by it's waterline length and displacement. It may be unable to reach this speed if the boat is underpowered or heavily loaded, though it may exceed this speed given enough power. Read more. Classic hull speed formula: Hull Speed = 1.34 x √LWL Max Speed/Length ratio = 8.26 ÷ Displacement/Length ratio .311 Hull Speed = Max Speed/Length ratio x √LWL Sail Area / Displacement RatioA measure of the power of the sails relative to the weight of the boat. The higher the number, the higher the performance, but the harder the boat will be to handle. This ratio is a "non-dimensional" value that facilitates comparisons between boats of different types and sizes. Read more. SA/D = SA ÷ (D ÷ 64) 2/3 - SA : Sail area in square feet, derived by adding the mainsail area to 100% of the foretriangle area (the lateral area above the deck between the mast and the forestay).
- D : Displacement in pounds.
Ballast / Displacement RatioA measure of the stability of a boat's hull that suggests how well a monohull will stand up to its sails. The ballast displacement ratio indicates how much of the weight of a boat is placed for maximum stability against capsizing and is an indicator of stiffness and resistance to capsize. Ballast / Displacement * 100 Displacement / Length RatioA measure of the weight of the boat relative to it's length at the waterline. The higher a boat’s D/L ratio, the more easily it will carry a load and the more comfortable its motion will be. The lower a boat's ratio is, the less power it takes to drive the boat to its nominal hull speed or beyond. Read more. D/L = (D ÷ 2240) ÷ (0.01 x LWL)³ - D: Displacement of the boat in pounds.
- LWL: Waterline length in feet
Comfort RatioThis ratio assess how quickly and abruptly a boat’s hull reacts to waves in a significant seaway, these being the elements of a boat’s motion most likely to cause seasickness. Read more. Comfort ratio = D ÷ (.65 x (.7 LWL + .3 LOA) x Beam 1.33 ) - D: Displacement of the boat in pounds
- LOA: Length overall in feet
- Beam: Width of boat at the widest point in feet
Capsize Screening FormulaThis formula attempts to indicate whether a given boat might be too wide and light to readily right itself after being overturned in extreme conditions. Read more. CSV = Beam ÷ ³√(D / 64) In 1970 (model shown here), a number of minor changes were made to the rig and interior. This listing is presented by SailboatListings.com . Visit their website for more information or to contact the seller. View on SailboatListings.com Embed this page on your own website by copying and pasting this code. ©2024 Sea Time Tech, LLC This site is protected by reCAPTCHA and the Google Privacy Policy and Terms of Service apply.  Sailboat Rig Dimensions: J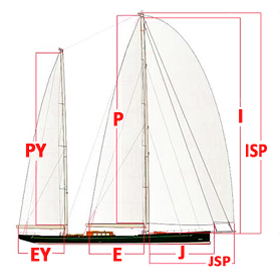 | TYPE/CLASS | I | J | P | E | DSPL |
|---|
| | | | | | | | J-100 100/POLE | | | | | | | J-100 100/SMALL ASYM | | | | | | | J-100 155/POLE | | | | | 6000 | | J-105 | 40.5 | 13.5 | 41.5 | 14.6 | 7750 | | J-105 OD SAILS | 40.5 | 13.5 | 41.5 | 134.6 | 7750 | | J-105 SD | 40.5 | 13.5 | 41.5 | 14.6 | 7750 | | J-105 SD ODR | 40.5 | 13.5 | 41.5 | 14.6 | 7750 | | J-109 | 46.5 | 13.3 | 43.25 | 15.5 | 10900 | | J-109 SD | 46.5 | 13.3 | 43.3 | 15.5 | 10900 | | J-110 AL ODR | 46.2 | 13.2 | 42.3 | 15.5 | 1200 | | J-110 CF ODR | 46.2 | 13.2 | 42.3 | 15.5 | 12200 | | J-120 AL ODR | 52 | 14.5 | 46.5 | 17.8 | 14144 | | J-120 AL SD ODR | 52 | 14.5 | 46.5 | 17.8 | 14144 | | J-120 CF ODR | 52 | 14.5 | 46.5 | 17.8 | 14144 | | J-120 CF SD ODR | 52 | 14.5 | 46.5 | 17.8 | 14144 | | J-122 | 54.24 | 15.2 | 51.42 | 17.57 | 14900 | | J-124 | 49 | 14 | 48.4 | 17 | 12500 | | J-125 ODR | 49 | 14.8 | 46.5 | 18 | 7900 | | J-130 AL ODR | 56 | 16.5 | 52.5 | 18.5 | 15000 | | J-130 CF ODR | 58.5 | 16.5 | 52.5 | 18.5 | 14850 | | J-130 ODR | | | | | | | J-130 SD AL ODR | 58.5 | 16.5 | 52.5 | 18.5 | 14850 | | J-130 SD CF ODR | 58.5 | 16.5 | 52.5 | 18.5 | 14850 | | J-133 | 57 | 17.25 | 54 | 18.6 | 17900 | | J-133 CRUISING INTERIOR | 57 | 17.25 | 54 | 18.52 | 19760 | | J-145 | 63 | 18 | 58.25 | 20.5 | 19000 | | J-145 SD | | | | | | | J-160 ODR | 66.5 | 19 | 62 | 24 | 26200 | | J-160 SD ODR | 66.3 | 18.83 | 62 | 24.16 | 33000 | | J-22 | 24.6 | 8.6 | 26 | 9 | 1889 | | J-22 ODR | 24.6 | 8.6 | 26 | 9 | 1889 | | J-24 | 26.3 | 9.5 | 28 | 9.8 | 3031 | | J-24 ODR | 26.3 | 9.5 | 28 | 9.8 | 3031 | | J-27 | 30 | 10.5 | 33 | 12.5 | 3800 | | J-27 ODR | 30 | 10.5 | 33 | 12.5 | 3800 | | J-27 SDR | 30 | 10.5 | 33 | 12.5 | 3800 | | J-28 | 34 | 10.5 | 36 | 13 | 7000 | | J-28 SD | 34 | 10.9 | 36 | 13 | 7900 | | J-29 IB FR | 35 | 11.5 | 38.8 | 13 | | | J-29 IB MH | 40 | 12 | 35 | 12 | | | J-29 OB FR | 35 | 11.5 | 38.8 | 13 | 5500 | | J-29 OB MH | 40 | 12 | 35 | 12 | 5500 | | J-30 | 34.2 | 11.5 | 38 | 13 | 7000 | | J-30 ODR | 34.2 | 11.5 | 38 | 13 | 7000 | | J-32 | 39.2 | 11 | 38.5 | 15.5 | 10250 | | J-32 SD | 39.17 | 11 | 38.5 | 15.5 | 9000 | | J-33 | 44 | 12.6 | 39 | 14.5 | 7500 | | J-33 ODR | 44 | 12.6 | 39 | 14.5 | 7500 | | J-34 | 44 | 12.6 | 38 | 12 | 8100 | | J-34 C | 45.7 | 13.5 | 40.5 | 15 | 10000 | | J-35 | 46.4 | 14.7 | 41.5 | 14 | 9200 | | J-35 C | 46.2 | 13.2 | 40.8 | 15.5 | 12000 | | J-35 C SD | 46.2 | 13.2 | 40.8 | 15.5 | 12000 | | J-35 CR INT | 46.4 | 14.7 | 41.5 | 14 | 10000 | | J-35 OD | 46.4 | 14.7 | 41.5 | 14 | 10000 | | J-35 SD | 46.4 | 14.7 | 41.5 | 14 | 10000 | | J-35 WK | 46.4 | 14.7 | 41.5 | 14 | | | J-36 | 44.2 | 14 | 47 | 15 | 10760 | | J-37 | 51.5 | 14.7 | 45 | 16.5 | 13500 | | J-37 C | 51.5 | 14.8 | 45 | 16.5 | 14500 | | J-37 WK | 51.5 | 14.7 | 45 | 16.5 | 13500 | | J-39 | 53.5 | 15.5 | 47.2 | 16.3 | 12900 | | J-40 | 50 | 14.7 | 44.3 | 18 | 15500 | | J-40 SD | 50 | 14.7 | 44.3 | 18 | 15500 | | J-40 WK | 50 | 14.7 | 44.2 | 18 | 15500 | | J-41 | 52.9 | 15.5 | 46 | 14.1 | 15000 | | J-41 FR | 48 | 13.7 | 54.3 | 19 | 15000 | | J-42 | 50.5 | 14.7 | 46.5 | 18 | 18000 | | J-42 CF | 50.5 | 14.7 | 46.5 | 18 | 18000 | | J-42 SD | 50.5 | 14.7 | 46.5 | 18 | 19400 | | J-44 | 60 | 17.2 | 54 | 19.4 | 20600 | | J-44 ODR | 60 | 17.2 | 54 | 19.4 | 20600 | | J-44 WK | 60 | 17.2 | 54 | 19.4 | 22800 | | J-46 | 58.5 | 16.7 | 53.5 | 19.9 | 24400 | | J-47 | 60 | 17.4 | 54 | 19.4 | 21500 | | J-80 | 31.5 | 9.5 | 30 | 12.5 | 2900 | | J-80 ODR | 31.5 | 9.5 | 30 | 12.5 | 2900 | | J-90 ODR | 35.6 | 10.5 | 35.85 | 14.5 | 3200 | | J-92 | 37 | 11.5 | 37 | 14 | 5500 | | J-92 ODR | 37 | 11.5 | 37 | 14 | 5500 | | J-92 S | 40.68 | 11.5 | 39 | 13.95 | 5610 | | J-92 SD ODR | 37 | 11.5 | 37 | 14 | 5500 | | JACKETT 25 | 24.16 | 9.83 | 26.16 | 9.58 | 2800 | | JACKETT 33 | 35.25 | 10.2 | 37.5 | 12 | | | JAQUAR 21 | | | | | | | JAQUAR 23 | | | | | | | JAQUAR 26 | | | | | | | JAQUAR 27 | | | | | | | JAQUAR 28 | | | | | | | JAVELIN 35 | | | | | | | JAVELIN 37 | 40.7 | 13.8 | 35 | 17 | | | JAZZ | | | | | | | JEANNEAU 11.2 VOYAGER | 44.95 | 12.4 | 39.7 | 12.8 | 12125 | | JEANNEAU 12.5 VOYAGER | 51.41 | 13.88 | ###### | 14.11 | 17967 | | JEANNEAU 23 FUN | 24.6 | 8.5 | 27.9 | 10.5 | | | JEANNEAU 24 TONIC | 25.92 | 7.87 | 27.87 | 10.5 | 2866 | | JEANNEAU 24 TONIC CB | 25.92 | 7.87 | 27.87 | 10.5 | 2932 | | JEANNEAU 25 EOLIA CB OB | 29.9 | 9.2 | 24.9 | 8.3 | 4000 | | JEANNEAU 25 EOLIA OB | 29.9 | 9.2 | 24.9 | 8.3 | 3750 | | JEANNEAU 27 | 33.5 | 10.3 | 28 | 9.5 | 5720 | | JEANNEAU 27 FANT IB CB | 31.83 | 9.68 | 26.58 | 9.19 | | | JEANNEAU 27 FANT OB CB | 31.8 | 9.7 | 26.6 | 9.2 | 4994 | | JEANNEAU 27 FANTASIA | 31.8 | 9.7 | 26.6 | 9.2 | 4704 | | JEANNEAU 28 | | | | | | | JEANNEAU 28 SUN ODESSY | 33.18 | 9.44 | 33.12 | 11.48 | 5720 | | JEANNEAU 28 SUNDREAM | 35.27 | 11.71 | 30.19 | 10.83 | 5936 | | JEANNEAU 28 SUNDREAM CB | 35.27 | 11.71 | 30.19 | 10.83 | 6398 | | JEANNEAU 30 ARCADIA | 37.3 | 11.7 | 32.3 | 10 | 6175 | | JEANNEAU 30 SUNLIGHT | 41.18 | 11.98 | 36.58 | 10.5 | 6834 | | JEANNEAU 30 SUNLIGHT CB | 41.18 | 11.98 | 36.58 | 10.5 | 7044 | | JEANNEAU 30 SUNLIGHT SD | 41.18 | 11.98 | 36.58 | 10.5 | 6834 | | JEANNEAU 30 SUNLIGHT SM | 38.06 | 11.98 | 33.47 | 9.84 | 6834 | | JEANNEAU 32 ATTALIA | 39 | 12.3 | 34.1 | 10 | 7616 | | JEANNEAU 32 ATTALIA CB | 39 | 12.3 | 34.1 | 10 | 7840 | | JEANNEAU 32.1 SUN ODYS. | 38.16 | 10.6 | 31.83 | 11.81 | 8400 | | JEANNEAU 32i SUNFAST | 39.2 | 11.83 | 36.6 | 12.2 | 9237 | | JEANNEAU 34 | 47 | 14.6 | 41.6 | 11.8 | | | JEANNEAU 34 MELODY | 46.5 | 14.8 | 42.4 | 11.9 | 13200 | | JEANNEAU 34 SUNRISE | 43 | 13.8 | 38.1 | 11.5 | 10361 | | JEANNEAU 34 SUNRISE CB | 43 | 13.8 | 38.1 | 11.5 | 11243 | | JEANNEAU 34.2 SUN ODYS | 41.67 | 11 | 39.42 | 13.75 | 10700 | | JEANNEAU 35 | | | | | | | JEANNEAU 35 SUN ODYSS | 44.67 | 13.25 | 38.67 | 12.58 | 11464 | | JEANNEAU 35 SUN ODYSS SD | 44.67 | 13.25 | 38.67 | 12.58 | 11894 | | JEANNEAU 35 SUNFAST | 45.8 | 13.3 | 42.1 | 13.1 | 12203 | | JEANNEAU 35 SUNRISE | 39.4 | 10.8 | 43.2 | 17.4 | 8045 | | JEANNEAU 36 SUNFAST | 44.5 | 12.4 | 44.5 | 15 | 13600 | | JEANNEAU 36 SUNSHINE | 46.3 | 14.7 | 40 | 13.5 | 11872 | | JEANNEAU 36 SUNSHINE CB | 46.3 | 14.7 | 40 | 13.5 | 12544 | | JEANNEAU 36.2 SD | 42.33 | 11.83 | 36.08 | 14.42 | 13046 | | JEANNEAU 36.2 SUN OD | 42.33 | 11.83 | 36.08 | 14.42 | 12320 | | JEANNEAU 36.2 SUN OD TM | 46.3 | 11.8 | 40 | 14.4 | 12320 | | JEANNEAU 37 SELECTION | 38.9 | 12.1 | 43.8 | 16.4 | 9980 | | JEANNEAU 37 SUN FAST | 46.42 | 12.67 | 43.3 | 15.67 | 13052 | | JEANNEAU 37 SUN ODYSS SD | 44.79 | 12.5 | 39 | 13.91 | 13448 | | JEANNEAU 37.2 SUN ODESSY | 45.27 | 13.12 | 39.37 | 15.09 | 13715 | | JEANNEAU 38 GIN FIZZ KTH | 46.33 | 12.83 | 41.75 | 11.67 | 16700 | | JEANNEAU 38 SUNSHINE | 46.3 | 14.7 | 40 | 13.5 | 11872 | | JEANNEAU 39 REGATTA FR | 41.2 | 13 | 46 | 16.5 | 10600 | | JEANNEAU 39 REGATTA MH | 46.3 | 14.7 | 39.9 | 13.5 | 10600 | | JEANNEAU 40 | 50 | 13.9 | 49.5 | 15.7 | | | JEANNEAU 40 SUN ODYS SD | 51.41 | 13.88 | 43.64 | 14.11 | 21605 | | JEANNEAU 40 SUNFIZZ | 50 | 13.9 | 45 | 14.3 | 16100 | | JEANNEAU 40 SUNFIZZ CB | 50 | 13.9 | 45 | 14.3 | 16100 | | JEANNEAU 40.3 SUN ODY DS | 50 | 13.75 | 43.25 | 15.67 | 18254 | | JEANNEAU 41 SUN LEG CB | 52.5 | 15.1 | 45 | 14.1 | 17306 | | JEANNEAU 41 SUN LEGEND | 52.5 | 15.3 | 45 | 14.1 | 17196 | | JEANNEAU 42 SUN OD DS | 51.57 | 15.92 | 49.92 | 16 | 18083 | | JEANNEAU 42 SUN OD DS SD | 51.67 | 15.92 | 49.92 | 16 | 18083 | | JEANNEAU 43 SUN ODYSS DS | 51.7 | 15.3 | 45.1 | 16.3 | 20503 | | JEANNEAU 43 SUN ODYSS SD | | | | | | | JEANNEAU 44 SUNMAGIC | 51.51 | 16.57 | 44.79 | 15.75 | 22050 | | JEANNEAU 44 SUNMAGIC CB | 51.51 | 16.57 | 44.79 | 15.75 | 23163 | | JEANNEAU 45 SUNKISS | 53.5 | 17.2 | 47.3 | 14.9 | 25312 | | JEANNEAU 45 SUNKISS CB | 53.5 | 17.2 | 47.3 | 14.9 | 26432 | | JEANNEAU 45.1 SUN ODY | 51.18 | 16.08 | 46.07 | 15.75 | 20570 | | JEANNEAU 45.1 SUN ODY SD | 51.18 | 16.08 | 46.07 | 15.75 | 20570 | | JEANNEAU 45.2 SUN ODY | 51.13 | 16.25 | 46 | 16.42 | 20570 | | JEANNEAU 45.2 SUN ODY SD | 51.13 | 16.25 | 46 | 16.42 | 21208 | | JEANNEAU 47 SUN ODYSSEY | 58.1 | 16 | 50.8 | 17.1 | 2600 | | JEANNEAU 47 SUNKISS | 53.48 | 17.23 | 47.25 | 14.93 | 25353 | | JEANNEAU 47 SUNKISS CB | 53.48 | 17.23 | 47.25 | 14.93 | 26473 | | JEANNEAU 48 TRINIDAD | 59.06 | 17.49 | 52.5 | 19.36 | 28000 | | JEANNEAU 48 TRINIDAD CB | 59.06 | 17.49 | 52.5 | 19.36 | 27552 | | JEANNEAU 48 TRINIDAD TM | 59.06 | 17.49 | 52.5 | 19.36 | 28000 | | JEANNEAU 49 SUN ODYSSEY | 16.92 | 55.75 | 51.67 | 17.67 | 28661 | | JEANNEAU 51 SUN ODYSSEY | 62 | 18.81 | 54.75 | 17.5 | 32900 | | JEANNEAU 52 SUNFAST | 63.3 | 17.4 | 56.7 | 21.1 | 28600 | | JEANNEAU 52.2 SUN ODYS | 57.5 | 18.6 | 51.2 | 17.7 | 33000 | | JEANNEAU 54 SUN ODYSS DS | 65.75 | 19.33 | 57.92 | 19.17 | 37479 | | JEANNEAU 54 SUN ODYSS SD | 58.75 | 19.25 | 50.9 | 19.17 | 37479 | | JEANNEAU ESPACE 1100 | 42.46 | 12.53 | 37.24 | 11.81 | 14080 | | JEANNEAU ESPACE 1100 CB | 42.46 | 12.53 | 37.24 | 11.81 | 14168 | | JEANNEAU ESPACE 990 | 41.3 | 12 | 35.1 | 10.9 | 10538 | | JEANNEAU LEGENDE 1 TON | 47.4 | 14 | 50.7 | 17.8 | 13500 | | JEANNEAU ONE DESIGN 35 | 39.37 | 10.83 | 43.17 | 17.37 | 8047 | | JEANNEAU SD SUN OD SD SM | 58.75 | 19.25 | 50.9 | 19.17 | 38361 | | JENSEN 24 | | | | | | | JONMERI 40 | 53.5 | 16.7 | 46.8 | 13.1 | 18900 | | JONMERI 48 | 63.98 | 18.87 | 57.42 | 18.05 | 36400 | | JONMERI 48 TM | 65.62 | 18.86 | 60.41 | 18.4 | 34480 | | JOUET 760 | 32.5 | 10 | 26.4 | 8.7 | 4850 | | JOUET 950 CB | 41.3 | 12 | 35.8 | 10.5 | 7938 | | JOUET GOLIF | 27.3 | 8.5 | 25.16 | 9.25 | 2860 | | JS 9000 | 27.08 | 9.5 | 30.83 | 8.83 | 208 | | JUPITER 30 | | | | | | | 
COMMENTS
Sailboat Rig Dimensions Database. Sailboat Rig Dimensions Database. Sail area calculations. Mainsail Area = P x E / 2. Headsail Area = (Luff x LP) / 2 (LP = shortest distance between clew and Luff) Genoa Area 150% = ( 1.5 x J x I ) / 2. Genoa Area 135% = ( 1.35 x J x I ) / 2.
Here is how we define them at North Sails. I - Height of Foretriangle. Elevation of Forestay, measured down to elevation of main shrouds at sheer line. J - Base of Foretriangle. Horizontal distance measured from front face of mast at deck to position of headstay at sheer line. P - Mainsail Hoist.
Rig Dimensions. The following abbreviations are often used to describe various measurements on a sailboat. Precise technical definitions exist for each abbreviation, but the following is a list of simple descriptions. LOA. Length Overall - overall tip-to-tip length of the boat. LWL.
Sailboat Rig Dimensions. I = Height of headstay termination above the sheer line. J = Distance between the headstay termination at the deck and the front of the mast at the sheer line. P = Distance between black bands on the mast, or the maximum luff length of the main. E = Distance between black bands on the boom, or the maximum foot length of ...
Primary dimensions for calculating areas of triangular sails. It's usually calculated as:~. Area = (luff x foot)/1.8, or. Area = ( P x E )/1.8, where:~. 'P' is the distance along the aft face of the mast from the top of the boom to the highest point that the mainsail can be hoisted, and. 'E' is the distance along the boom from the aft face of ...
The following rig dimensions designated by " I ", " J ", " P ", and " E " are needed to produce a price quote. They are convenient names to use because they are short and are understood throughout sailmaking…. " P " is the luff length of the main-sail, measured along the aft face of the mast from the top of the boom to the ...
Learn how Precision Sails defines their Rig Spec measurements and Dimensions. This blog will help you to understand how Precision Sails labels sailboat rig specifications. If you need a replacement or new mainsail and /or headsail you will need to measure your sailboat’s rigging, sails, and rigs. One thing we tell sailors here at Precision Sails is “the effort you put into ...
Sailboat rigging specifications refer to the measurements and details of the various components that make up a sailboat's rig. This includes the type and size of the standing rigging (such as shrouds and stays), running rigging (such as halyards and sheets), mast height, boom length, and sail dimensions. These specifications are essential for ...
The thickness of the mast wall, the number and location of the halyard exits, and the longitudinal and lateral dimensions are all taken into account. A rig designer will also work to the boat's intended use and sailing conditions: a boat used for weekending and round-the-cans racing in a light-airs region, for example, may be able to get away ...
You may also enter a boat's dimensions directly in Part 2. Part 1: Search Database. Search. Search Results. ... RIG MEASUREMENTS (when available): Definitions I: J: P: E: Press Reset CALCULATE. to see the derived quantities displayed below in Part 3. PART 3: RATIO RESULTS BOX.
Use this list every time you need to determine your boat's sail area. Click on the appropriate letter to find the rig dimensions of your sailboat: The following formulas will give you approximately areas for: Mainsail = (P x E) / 2 (add 10% for racing mains) 155% Genoa = ( ( J x I ) / 2) x 1.65. 135% Genoa = ( ( J x I ) / 2) x 1.44.
from SAILSETC Rigging Packs using Alloy GROOVY mast section or plain round tube before starting Read these instructions and study the One Metre Rig Plan RP16D so that you are familiar with the tools/techniques required and the general layout of the rig. rig dimensions The dimensions will provide rigs suitable for use on most IOMs.
ORC - Measuring rig on a sailboat. Rig measurements are following the WS Equipment Rules of Sailing (ERS) with only a couple of modifications specific for offshore boats: Mast datum point is at the top point of the section at the foreside of the mast. Rigging point is attachment of the forestay to the mast, or the intersection of the extended ...
A sailboat rig refers to the arrangement of sails and mast on a sailboat. It determines how the boat harnesses wind power for propulsion. Common types include sloop, cutter, and ketch rigs. Each rig has distinct characteristics affecting sailing performance and maneuverability.
Sailboat Rig Dimensions - I MAKE LOA MODEL I J P E PY EY IDEAL 18 19.00 7.00 23.50 9.25 IMPERIAL 23 25.00 7.83 22.00 10.00 IMPULSE 21 20.50 7.00 26.00 9.70 IMPULSE 26 29.50 8.60 32.80 12.20 ... Microsoft Word - Rig Data I.doc Author: Linda Created Date:
Sailboat Rig Dimensions: B. I = Height of headstay termination above the sheer line. J = Distance between the headstay termination at the deck and the front of the mast at the sheer line. P = Distance between black bands on the mast, or the maximum luff length of the main. E = Distance between black bands on the boom, or the maximum foot length ...
The fore-and-aft rig, however, has a lot of variations. The three main sail rigs are: Bermuda rig - most used - has a three-sided (triangular) mainsail. Gaff rig - has a four-sided mainsail, the head of the mainsail is guided by a gaff. Lateen rig - has a three-sided (triangular) mainsail on a long yard.
You can compare measurements taken from the existing sail with measurements taken from your rig to make sure the new sail is cut right. You'll need to measure the luff (leading edge of the sail), the leech (trailing edge of the sail) and the foot (bottom edge of the sail). Lastly come the rig measurements, like the maximum luff, maximum leech ...
This measurement should be about 5130 mm or 200 inches from the top of the sail to the bottom. How to tell if you have a 'Standard' lower mast section: The 'Standard' lower mast section should measure about 2865 mm or 113 inches. It is a fairly stout mast section compared to the two smaller mast sections. Laser Radial / ILCA 6.
Sailboat Rig Dimensions: I. IN - IO - IR - IS. Definitions: I = Height of headstay termination above the sheer line. J = Distance between the headstay termination at the deck and the front of the mast at the sheer line. P = Distance between black bands on the mast, or the maximum luff length of the main. E = Distance between black bands on the ...
SailboatData.com …is a database that contains information on over 9000 production and semi-production sailboats dating back to the late 1800's. COMPARE BOATS. To compare up to three boats at one time, click the (+) Remove a compared boat by clicking (-) ... Rigging Built After. Built Before ...
Sail Area / Displacement Ratio. A measure of the power of the sails relative to the weight of the boat. The higher the number, the higher the performance, but the harder the boat will be to handle. This ratio is a "non-dimensional" value that facilitates comparisons between boats of different types and sizes. Read more. Formula. SA/D = SA ÷ (D ...
Definitions: I = Height of headstay termination above the sheer line. J = Distance between the headstay termination at the deck and the front of the mast at the sheer line. P = Distance between black bands on the mast, or the maximum luff length of the main. E = Distance between black bands on the boom, or the maximum foot length of the main. JSP is the length of the spinnaker pole or the ...
Sailboat Rig Dimensions: J. JA - JE - JO. Definitions: I = Height of headstay termination above the sheer line. J = Distance between the headstay termination at the deck and the front of the mast at the sheer line. P = Distance between black bands on the mast, or the maximum luff length of the main. E = Distance between black bands on the boom ...