LAHOWIND » Just you, me, + the dog.

Just you, me, + the dog.

| Wanna receive our blog updates via email? Just type your email address ^up there^ in the box, hit subscribe, and voila! ...our updates delivered straight to your inbox. We've sailed our way through the Bahamas, Turks+Caicos, Dominican Republic, Puerto Rico, the Virgin Islands...and then again all the way home to Florida! We're loving every second of our grand adventure at life! You know, give us awesome stuff? And in return, we'll take pretty pictures and blog about it for you! Email us at moc.liamg@dniwohal! | ) And since we are currently in the process of re-plumbing the head and have had to remove a wall as part of the project, what better time to rebed the chainplates in this area (since they too were leaking)??? To start this chainplate re-bedding project, Jereme removed the rigging by loosening the turn buckles, making sure to measure them and mark them where they were attached so that he would be able to reattach them in the same spot. Once the shrouds were disconnected, he removed each chainplate cover and unbolted the chainplate (we did one chainplate at a time over the course of 3 days). He then got to work removing the actual chainplate. , muscling and several hours of hard work. After the plates were free, Jereme thoroughly cleaned them by scrubbing each with WD-40 and using a razor blade to scrape off the old caulk. >>Here’s where this project becomes a butyl tape party.<< 😉 Jereme used butyl tape to rebed (or seal) the chainplates. From his extensive research, butyl tape is a better solution for bedding than using silicone or caulk because the tape never dries, always remains flexible, has unlimited working time, isn’t messy, etc. etc. etc. We’re big butyl tape fans on this boat. Shout-out to , where we found was the best place to buy butyl tape — plus their website shows you how to use it! We bought . (We’ve also already used butyl tape to rebed our head tank pump-out fitting.) After reattaching the chainplates and re-bolting them, Jereme made sure to continuously tighten the nuts every few hours since we used butyl tape. Tightening and re-tightening (multiple times) is necessary because the butyl tape is slow to react (for lack of a better technical description) — every time you tighten it, it squeezes out a little more and more. Then, Jereme rebedded the chainplate with… …butyl tape! Once everything was nice and tight, Jereme reattached the shrouds. Voila! Two of our three port shroud chainplates rebedded. sailing blog! We’d love for you to get to know us and follow our story as we attempt to navigate a whole new world of sailing. , Tags: , , , , , , , , , , , , , , , , Making headway on our boat project list! |
© 2024 LAHOWIND | ProPhoto theme • Designed by Swoone

Rebedding Chain Plates With Butyl Tape
My chain plates have started to leak badly, so it’s time to rebed them. This process closely follows Tom Keffer’s excellent project log on treefools.org with a few interesting twists.
I’ve been using Bed-It Butyl Tape for my bedding projects and highly recommend it. Bed-It is formulated specifically for marine environments, is slightly lighter in color (but still gray) than the stuff you might find at the hardware store, and is rolled relatively thin, which I find easier for bedding applications. I can imagine very few bedding applications where I’d go back to the 4000 I was using before. Don Casey has a great overview on different types of sealants if you’re interested.
Starting out
My Allied Seabreeze has 1 upper and 2 lower shrouds per side for a total of 6 chain plates. I gave quite a bit of thought to the most efficient strategy for this project. The ideal of course, would be to unstep the mast and rebed all 6 chain plates at once, but for me that wasn’t feasible. On the other hand, doing them one at a time would add a lot of time to the project since I live about an hour’s drive from the boat yard. I didn’t like the idea of removing more than 2 plates at a time. So in the end, I worked in stages: lower shrouds on the starboard side, upper shroud once the lower ones were reattached, then repeat on port side.
Except where noted, the pictures here are taken on the port side, by which I’m I’d already completed the starboard side. You may also notice that the toe rails are missing. At this point, they are in the process of being replaced .
Step 1: I tied my 2 halyards to the nearest cleats or stanchions to steady the side I was working on and winched these down as tight as I could.

Step 2: I measured and recorded the distance of my turnbuckle bolts before loosening them. Assuming your rig is reasonably tuned, this is important so you can restore it to its original state.
Step 3: Loosen the turnbuckle and remove the pin attaching it to the chain plate. Use crescent wrenches for this; do not use a screwdriver, which stresses the turnbuckle. Remove the pin on the opposite end that attaches the turnbuckle to the shroud and lash the shroud(s) to the mast.
Note: try to keep the parts of each turnbuckle and chainplate assembly together as you remove them and label them with tape. In my rig each chain plate, backing plate and corresponding set of fastener bolts are all different. This will save a lot of time and guess work down the road.

Step 4: Remove the fastener screws on the chain plate covers. These will easily get lost, so have a cup or an old vitamin bottle ready to hold them. You might also consider replacing these with new hardware as the heads can get damaged.
Step 5: Patiently work loose the chain plate covers and remove them. Unless you don’t mind wrecking your deck paint this requires quite a bit of patience. I used the thinnest paint scraper I could find to slowly and gently break through the old (4000) sealant and avoid as much as possible scraping into the paint. Also avoid putting to much pressure on the cover itself until the sealant has lost its hold. Even stainless covers will bend if they are thin, and will need to be reflattened again later.

Once the cover is removed you can take these home and remove all the old sealant and other crud however you like. Here you can see I once attempted to temporarily seal this chain plate from above with silicone: a poor decision I won’t repeat :)

Step 6: Time to remove the chain plate. This of course needs to be done from within the cabin and typically means partially reorganizing and possibly disassembling stuff in your living quarters. In my case, I’d already done this as part of the toerail progject so it was no big deal. Otherwise, this can be a major hassle.
This step of the project can be notoriously difficult. On the Seabreeze the chain plates were originally glassed to the hull making inspection much less removal a daunting task. Even then, chain plates are often difficult to reach, and removing them involves work in cramped conditions at odd angles. I consider myself very lucky. On my boat the chain plates appear to have already been replaced with 316 stainless steel at one point, and the glass was removed to do so. It was a relatively easy (but still arduous) matter of removing the 3 bolts holding each plate in place.
Again, keep track of your hardware and keep each assembly together if you can. Be sure to note which side of the chain plate faces the bulkhead or whatever it is mounted to. There’s a good chance that if you try later to install it backwards or mix up your plates, things won’t fit.

Step 7: Remove remaining sealant from the deck, chain plate and hardware. 4000 comes off easily enough with a paint scraper and perhaps a bit of fine sandpaper. Looking at the deck it becomes obvious that a previous owner replaced the chain plates at some point; those holes look a bit nasty. However, with the chain plate in place it’s actually not too bad, at least on the port side. So I don’t think I’ll do much to repair the holes in this case. The starboard side, which I did previously, was another matter (see next page).

After repeating these steps for the other lower shroud on the port side, that’s enough for one day. I cut a temporary cap from some old plywood and afixed it over the chain plate holes with hardware store grade butyl tape to prevent rain from getting in until I could return later.

Back at home, I cleaned up the chain plates and covers, removed old sealant and tarnish, etc. This is an excellent time to inspect the chain plates and fasteners for damage and make replacements as necessary. I’m always surprised at how far a 3M ScotchBrite pad and water will go in cleaning up metal parts. If that doesn’t do it then I add a bit of an oxalic acid-based cleaner such as Bar Keepers Friend. Perfection isn’t necessary; I only need to clean the parts enough to expose possible failure points. But a good shine always looks nice anyway. I also disassembled the turnbuckles and quickly cleaned everything with a ScotchBrite pad; for some reason the bolts got rather dirty.

Fixing my Chainplate Holes
While the chain plate cutouts through the deck were reasonably snug on the port side, for whatever reason the ones on the starboard side were another matter. There were major gaps all around the chain plate, too much to reasonably fill with butyl tape or any other sealant. No wonder they were leaking!

Time to break out the epoxy. I’ve recently been fixing a lot of cosmetic dings using the no blush epoxies that Paul Oman sells. Really great stuff. For this job I used the winter cure hardener thickened with fumed silica. Normally the winter cure isn’t recommended above 50 degrees or so, and the temperature this day was nearly 80. But since I’m making a very small batch and as long as I work very quickly (I’ll only have a few minutes), I can get away with it, and it will fully cure within a couple of hours. If that’s living too dangerously for you, use the standard or the summer cure.
Normally filling a deck hole of this size with epoxy would be fairly straight forward. The challenge here is that I need to somehow leave a cutout for the chain plate. If I fill the hole in completely then I’d just have to drill and file out space for the chain plate, based largely on guess work, and I might not be any better off than when I started.
My solution was to cut a plug out of XPS foam to create a cutout for the chain plate. XPS foam is used for insulation and can be bought at most hardware stores. A friend had some scraps so I didn’t have to buy a 4x8’ sheet. It turns out the 1.5” thick sheets were exactly the width of the my chain plates! So I rough cut some approximately 1/4” slabs with a hobby knife and sanded them down until the thickness matched that of my chain plates.

Note: do not use styrofoam for this; it will disintegrate when it comes in contact with the epoxy.
The next challenge is to get the cutout properly positioned in the middle of the opening. If the hole is small you can probably just eyeball the cutout’s location. But if the hole is especially large you risk putting the cutout in the wrong place or twisting it out of alignment. The best way to get the right position is to temporarily bolt the chain plate back in place and mark its position with a shim or small ruler. After the chain plate is removed, the shim provides a guide for correctly positioning the cutout.

Then I sealed the hole from beneath with painter’s tape or duct tape. That keeps the epoxy from running through the opening into the cabin and provides a base for the cutout to rest upon and stick to. Back on deck, I placed the cutout in the hole using the position guide made sure it stuck to the duct tape underneath to hold it in place, and removed the guide.
Next, I mixed up my epoxy using fumed silica to get to a peanut butter thickness. It’s important to make sure the cutout remains fairly straight in the hole as the epoxy is flowed in.

Once the epoxy has fully cured simply cut the foam out with any sharp object and lightly file away any remaining bits.
Finally, I cut a slight countersink bevel around the hole with a Dremel.
Here is the final result with the chain plate in place (I had not yet cut bevel at this point).

Replacement and Installation
Every boat is different, and I’m sure the process of installing and sealing the chain plates is different for everyone, but here’s what worked for me.
My first step was to Dremel out the screw holes that held the chain plate covers in place and fill them with fresh epoxy. If your fiberglass is thick enough you can just bore out the old hole with a grinding bit, but you might also opt to drill all the way through the deck. In the latter case, you’ll need to tape the bottom of the hole so the epoxy doesn’t drip into the cabin. Plastic syringes like the kind you use to give medicine to pets are nice tools for filling these little holes; a swizzle stick as a sort of mini-spatula also works well.

The next step is to reinstall the chain plates. Depending on the location, this can be much easier said than done.
That’s it for today. I want to allow the epoxy to cure overnight before drilling pilot holes and installing the chain plate covers. There’s a tropical storm coming up the coast, so I’d really like to have the stays back in place, even without the covers. I reattach them, temporarily seal the deck with hardware-store grade butyl and wrap up for the day.

After the epoxy has fully cured I can finish the installation. I’ve seen a couple different ways to do this, but what works for me is to simply drill very thin pilot holes with a Dremel and a 1/32” drill bit. 1/16” or larger is already too big, and the screws that hold the chain plate covers in place end up stripping (I tested this in my workshop). The chain plate cover itself needs to serve as a guide, so temporarily tack it in place with a bit of (what else?) butyl tape so it doesn’t slide around while you drill the holes.
Next, it’s time to apply the butyl tape, both to the bottom of the chain plate cover and the area around the chain plate itself. The butyl tape will want to stick more to your fingers than to the metal; an easy fix for this is to use the wax paper to press the butyl in place. I try to get the tape as flat as possible and cover the entire area of the bottom of the chain plate cover, but provide plenty of sealant around the chain plate.

Next, thread the screws into place and through the butyl tape on the bottom of the chain plate cover, and start to turn the screws into the pilot holes, but don’t tighten them down yet. Then reattach the turnbuckle to the chain plate and tighten it back to its original position (you recorded that with calipers when you first started, right?). This may be just me, but it makes sense that the chain plates be sealed while they are under at least some load to avoid stretching the seal later. Don’t forget to reinstall the turnbuckle covers if you have them.
Finally, screw in the fastener screws, applying a few turns to each screw in sequence so the plate tightens down evenly across all four corners. The butyl tape will start to seep out of the seems (and will continue to do so over several days), and in your leisure time you can cut away the excess with a plastic putty knife or other soft but stiff edge.

- BOAT OF THE YEAR
- Newsletters
- Sailboat Reviews
- Boating Safety
- Sails and Rigging
- Maintenance
- Sailing Totem
- Sailor & Galley
- Living Aboard
- Destinations
- Gear & Electronics
- Charter Resources
- Ultimate Boating Giveaway

Rigged Right: Refitting your Chainplates
- By Steve D'Antonio
- Updated: May 22, 2013
Chain Plate
Here’s the problem with chainplates: These vital components are often buried in the deck, hull, or behind joiner work where they can’t be easily seen. So how do you know when they need to be serviced? Luckily, telltale signs indicate when they require a refit.
Most chainplates installed on fiberglass boats are made of stainless steel. While it’s tough and durable, in order for stainless steel to remain corrosion-resistant, it must have access to oxygen; that’s where the trouble often begins. Most chainplates pass through a deck, where they’re fastened to the hull or a frame. Ideally, in new installations, the area where the chainplate makes its transit through the deck is kept dry with bedding.
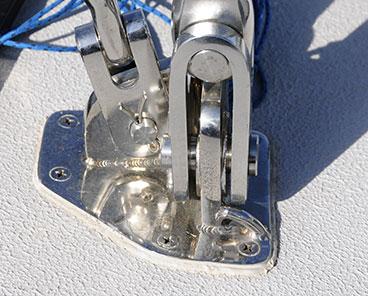
| |While integral chainplate flanges promote watertight seals, the surface on which they’re installed should be smooth, not non-skid.|
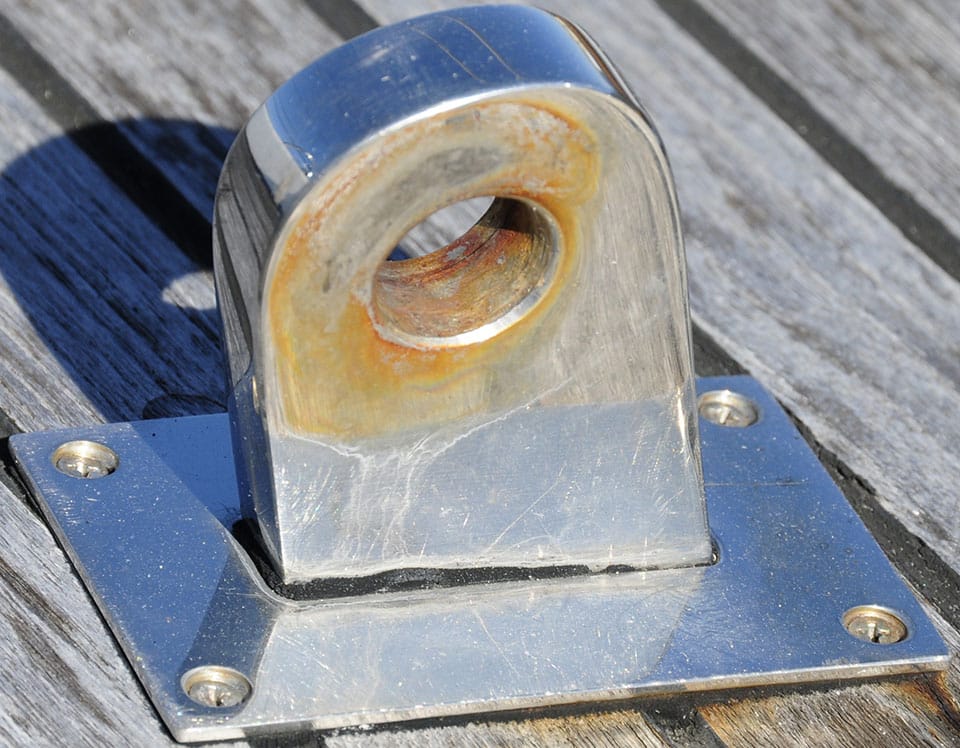
But as the chainplate flexes and the bedding ages, a gap often forms, allowing water to enter. This can ultimately cause the chainplate to suffer from crevice corrosion or, if it’s not properly sealed, saturation of the deck core. Rust stains that emanate from chainplates or fasteners are cause for concern, warranting the removal and inspection of each. Once removed, chainplates should be thoroughly cleaned and carefully inspected for any signs of cracking, pitting, or other irregularities.
To complicate matters, it’s very difficult to get traditional polyurethane sealants, even venerable 3M 5200, to adhere tenaciously to stainless steel for very long. Some installations are more problematic than others. In many cases, the wax that was used to polish the part when it was originally fabricated contaminates the stainless steel. Wax is a release agent—any trace of it will virtually guarantee non-adhesion. Therefore, before installation, chainplates and stainless-steel deck hardware must be dewaxed using a solvent. (Horizontal compression plates are less prone to sealant failure, leakage, and corrosion because these plates compress the sealant, which acts like a gasket and mostly protects everything from the elements.)
Additionally, polished stainless steel is extremely smooth, which further inhibits the sealant’s ability to forge a mechanical grip. However,
| |The rust on this stainless-steel chainplate is troubling. Inspect where it passes through the deck, then rebed it.|
you can give it a fighting chance to adhere to chainplates by dewaxing the metal, then giving it some “tooth” by sanding it with 220-grit emery cloth. Afterward, clean the chainplate and the surrounding deck bedding surface with solvent, then liberally apply bedding material. For numerous reasons, I’m not a member of the “let it cure before tightening the fasteners” school of thought. Instead, torque it down tightly from the start, then clean the excess material out or let it cure and trim it later.
For bedding deck hardware, I prefer polysulfide over polyurethane. And while this may sound like heresy to diehard traditionalists, for over a decade I’ve also had very good results using silicone sealant, specifically GE Silpruf, rather than polyurethane, especially with stainless steel. If you do choose to use silicone, be very careful not to get it on surrounding deck areas and especially not on your boat’s brightwork. Silicone is the nemesis of paint and varnish.
Steve D’Antonio offers services for boat owners and boat buyers through his company, Steve D’Antonio Marine Consulting .
- More: boat maintenance , How To , maintenance , monthly maintenance , sails & rigging
- More How To

Best Practices for Boat-Show Shopping

Grease the Wheels of Your Boat: A Guide to Proper Lubrication

A Bowsprit Reborn: A DIY Renovation Story

Rigging Redo: Our Switch to Synthetic

Understanding Wind in the West Indies

Catalina Introduces the 6 Series

At Your Service

Galápagos: A Paradise Worth the Paperwork
- Digital Edition
- Customer Service
- Privacy Policy
- Terms of Use
- Email Newsletters
- Cruising World
- Sailing World
- Salt Water Sportsman
- Sport Fishing
- Wakeboarding
Visit our Popular Forums
- Monohull Sailboats
- Multihull Sailboats
- Powered Boats
- General Sailing
- Antares Yachts
- Fountaine Pajot
- Lagoon Catamarans
Cruising Business
- Boat Classifieds
- General Classifieds
- Crew Positions
- Commercial Posts
- Vendor Spotlight
Life Aboard a Boat
- Provisioning: Food & Drink
- Families, Kids, & Pets Afloat
- Recreation, Entertainment, & Fun
- Boat Ownership & Making a Living
- Liveaboard's Forum
Seamanship, Navigation & Boat Handling
- Seamanship & Boat Handling
- Training, Licensing, & Certification
- Health, Safety, & Related Gear
- Rules of the Road, Regulations, & Red Tape
Engineering & Systems
- Const. / Maint. / Refit
- Product / Service Reviews
- Electronics: Comms / AV
- Electrical: Batts / Gen / Solar
- Lithium Power Systems
- Engines & Propulsion
- Propellers & Drive Systems
- Plumbing / Fixtures
- Deck Hdw: Rigging / Sails
- Aux. Equipment & Dinghy
- Anchoring & Mooring
Photo Categories
- Member Galleries
- Life Onboard
- Sailing in the Wind
- Power Boats
- Cruising Destinations
- Maint. & Boat Building
- Marine Life
- Scuba Diving & Divers
- General Photos
Recent Photos

Listing Categories
- African Cats
- view more »
- Crew Wanted
- Crew Available
- Enhance Your Account
- Meet the Mods
- Meet the Advisors
- Signup for The Daily Cruiser Email
 | | | Please support our sponsors and let them know you heard about their products on Cruisers Forums. | | 29-09-2009, 14:36 | | Boat: 1979 Hughes 35
| , and the chainplates are through bolted to it. The chianplates are then heavily glassed over which makes it impossible to inspect.
When I rebed the chainplates I would rather have them exposed so they are more easily inspected. Is it best to inspect the hanging knee and then re-glass the knee to the , and then install the chainplates over top of the glass?
It seems that bolting over top of the glass would make it stronger, as it is then anchored to the glass. When the glass is over top of the plate does it give it the same strength? Doesn't glass over the chainplates allow the SS to erode easier? Although the top and the bottom aren't glassed, which may allow to drain out??
This job should be fun.
Any good on this? I have a Don Casey book, but it doesn't really talk about this in it. | | | | | 29-09-2009, 15:46 | | Boat: Sundeer 64
| on the other side between the plate and the hull.
cheers,
Nick. | | | | | 29-09-2009, 16:04 | | Boat: Roberts Offshore 38
| , and that there are no voids. Check them for , and the joint between them and the hull and for cracking or any sign of problems. Perhaps add another layer of glas over the face of the knee and around the joint onto the hull for a few inches if you want to beef that up. Then take the chainplate and make a backing plate for it that stops just under the . Thru bolt the chainplate and backing plate, with sealer where needed. Seal the chainplate where it exits the deck and rebed the cover plate which usually goes round the and bolts to the deck.
My had a similar set up, and that was how I did the job.
66 days n a wake up | | | | | 29-09-2009, 17:05 | | Boat: 1979 Hughes 35
| on the other side between the plate and the hull.
cheers,
Nick. | | 29-09-2009, 17:21 | | Boat: 1976 Sabre 28-2
| with glass over and then the chain plates were also glassed in. Because of , the plywood has rotted on most of them. That requires grinding the glass away from the chainplates and removing them. Then the knees had to be split open, the rotten dug out, and some non compressible, free added or the whole smear built up with new glass laminates without any . A real PITA but doable by any amatuer who has monkey genes, for contortion ability.
Hopefully would not have used or some other rot prone material for the core of the knees. The chain plates should not be glassed over. Perfect for crevice of the SS if they are. | | | | | 29-09-2009, 22:30 | | Boat: Sundeer 64
| on top of that on a workbench. Adjust a heatgun temperature setting so that it doesn't discolor the plywood (using scrap left over piece) and heat the top surface and sides of the part with it. Mix & hardener and coat top surface and edges. When this cures & cools down, the is drawn in by vacuum of the contracting air inside the wood. Before cured, you can turn and repeat for the other surface. Sand it with 120 grit (dry) after that.
Now, bond the pieces in place but don't add any yet. Fit the (i.e. chain plates) and dril the holes. Remove and enlarge the holes to double the size (i.e. for a 1/2" bolt you make 1" holes). Tape one side of the holes, wet the hole with epoxy and a small brush. Now make a thick peanut butter consistency mixture using high density filler (the same as you used for bonding, high density filler is the way to go for this) and fill the holes.
After that, glass the part in and redrill the holes that go through solid epoxy instead of plywood. Make gaskets for both sides (one behind the and the other behind the backing plate) out of 1/8" thick neoprene sheet with the holes for the bolts oversized (use hole punch). If the surface is very smooth, you can use 1/16" neoprene. Use nylock nuts and tighten using a torque wrench. You use the torque for a bolt of it's diameter in shear loading. You must compensate the torque value for using a nylock nut, most tables show a percentage compensation or even have a 2nd table for nylock. This torque is very important because the bolts must be tensioned to (from memory) 20% of their breaking strength for shear loading.
The neoprene gaskets will compress to almost nothing and spread the load over the complete surface without crushing fibers. Use no other bedding compound. The advantage of neoprene is that you can't squeeze it all out plus it's re-usable.
cheers,
Nick. | | | | | 29-09-2009, 23:30 | | Boat: Irwin 41 CC Ketch
| | | | | | 30-09-2009, 07:59 | | Boat: 1979 Hughes 35
| | | | | | 30-09-2009, 09:21 | | Boat: Sundeer 64
| word?) to push it into the corner so that the surfaces show no voids. Scrape away the excess epoxy because with this filler it gets very hard and almost impossible to sand. When it is cured, put a strong fillet around the joint. Use Colloidal silica filler for that. This greatly improves the strength of the joint and it provides a nice radius for the glass that goes over later.
The reason for using high density filler is that the joints and "filled bolt-holes" are in and the higher the density of the mixture, the more resistant to force it gets.
About the glassing: many use mat + woven roving but I wouldn't. Matt is really just a filler and doesn't provide much strength. Also, you are working on vertical and upside down surfaces which isn't the easiest thing to do. This is what I do for good results while making it as easy as possible:
Make a syrup consistency mix using both micro fibers and colloidal silica fillers in 50/50 ratio. The micro fibers filler is very good for laminating and the colloidal silica provides anti sagging properties. Coat the area to be glassed with this mixture. Next, use woven cloth, pressing it into the wet epoxy, trimming it with scissors where needed. Use multiple pieces: one piece on each side for knee-to-hull joints, one piece on each side for knee-to-deck joint (which is the second layer on the knee already) and a 2" wide tape around the edges. Keep working wet on wet: wet out & fill the weave of the cloth with just epoxy/hardener mix with a roller. Next is woven roving and next is cloth again. Make each layer bigger so that it completely covers the previous layer. You're gonna use a lot of rollers, you can cut them into three smaller pieces.
cheers,
Nick. | | | | | 30-09-2009, 11:31 | | Boat: 1979 Hughes 35
|
, when the temperature will be around freezing level, is there any draw backs to this?
| | | | | 30-09-2009, 12:57 | | | | at or near the deck. If there is no corroded away metal etc from deck level down an inch or two.... a rebed may be all you need. The glass on the knees and over the plates does little. The deck essentially holds the knee from moving. The glass that holds the knee to the hull does a lot to strengthen the system. It keeps the deck from having to hold all the strain of the rig. If you do disassemble it, there is no need to glass over the chainplates. If the glass is thick and well bonded to the hull and deck, the old plywood inside may mean little really, just something to glass over when it was built and keep the bolts from squeezing the glass together........ | | | | | 30-09-2009, 13:54 | | Boat: 1979 Hughes 35
| it flat; I can't think of anything. Am I right to assume that drying out and re-glassing from below the deck will provide sufficient strength even though the deck its still slight raised? | | | | | 30-09-2009, 14:37 | | Boat: 1979 Hughes 35
| | | | | | 30-09-2009, 15:59 | | Boat: 1976 Sabre 28-2
| get into the wood and repeating the rot process you are correcting. No mater how careful you are sealing the plywood, you risk water getting in and causing rot.
The problem with working in cold is getting the resin to go off. Polyester resin is a bit easier to with as you can use more hardener to get it to kick off quicker. Epoxy has to be mixed to a specific ratio. There are cool wx hardeners available for Epoxy so be sure you get the right one. In any case, you will need a to keep the temperature of the laminate to at least 50 degrees, warmer is better, or whatever the resin manufacturer suggests. If you don't keep the temps up, the resin will drain out of the laminate before it goes off making for a weak, resin starved .
Mat adds stiffness to the lay up. It also fills in the depression in the woven roving so you get a stronger laminate. I would never do a lay up without mat. Lay your pieces of roving and or cloth on a piece of plywood. On top of that, put the mat and wet out the whole smear resin. the cloth/roving holds the matt in place and makes it as easy as possible to laminate on the vertical. On an overhead, may have to thicken the resin to get it stick till it goes off.
Aloha
Peter Ogilvie | | | | | Thread Tools | | | | Rate This Thread | :
| | Posting Rules | | post new threads post replies post attachments edit your posts is are code is are are are | | Similar Threads | | Thread | Thread Starter | Forum | Replies | Last Post | | | windsaloft | Construction, Maintenance & Refit | 17 | 01-05-2016 08:36 | | | Catamount | Construction, Maintenance & Refit | 11 | 09-03-2010 15:15 | | | easterly | Deck hardware: Rigging, Sails & Hoisting | 24 | 04-09-2008 18:52 | | | schoonerdog | Construction, Maintenance & Refit | 4 | 28-10-2006 18:55 | | | rleslie | Construction, Maintenance & Refit | 3 | 12-04-2005 09:49 | Privacy Guaranteed - your email is never shared with anyone, opt out any time.  - Forum Listing
- Marketplace
- Advanced Search
- About The Boat
- Gear & Maintenance
- SailNet is a forum community dedicated to Sailing enthusiasts. Come join the discussion about sailing, modifications, classifieds, troubleshooting, repairs, reviews, maintenance, and more!
Rebedding chainplates, but first...  I'm going to guess that that tie rod is welded to the exterior eyes and needs to pull out of the deck with it. Have you tried undoing whatever is connecting the rod at the other end? Mark Thanks Mark. That's a good point to start with. The other end is behind a panel, with just a small hole to inspect or operate, I would say 2 inches wide, the area. The other end of the rod has like a cylindrical block screwed into the rod, and before that it's embedded in fiberglass protruding from the hull..? Again, small hole. Will try to post some pics other day. Still, wondering about the top block, underneath the deck, and how it's attached (glue?).  Attachments Thanks for the replies. Sorry, there was a mistake in mi original description, fixed. What overbored mentioned is what I thought would be the case; remove the nuts and the pad eye will be released (with some extra force from the top). But I am still puzzled by the aluminium block-rod connection. I just want to make sure when I start pulling things, they are really free to go. I can't tell what the white color on the threads is, but it wouldn't surprise me, if these were originally bed in some sort of sealant. Depending on the adhesion, these could take a bit of prying to remove. Maybe a putty knife knocked in from the side to try to free some of it, if you deterimine this is right. Sometimes heat helps weaken adhesive, but be sure not to damage the glass. I think Overboard nailed it - that is what you have. Remove the nuts and you should be able to pull out the padeye. Maybe use a wood block and hammer to pop it up from below if the sealant is holding it tight. Mark This was a rigging support system used by several builders in the 80's. Navtec internal rod with machined flats on it, to tighten up the headed rod is supposed to turn in the aluminum block. The forged U-bolts/eyes come down thru the deck into the block. Our Olson has this system and all the rig and the deck "connectors" are off the boat currently while we repaint the deck. Only weakness is due to owners ignoring it (along with all the other deck penetrations...) and letting water seep down around those threads and corroded the aluminum block. Also, deck leaks will rot the balsa around the place where the U-bolts penetrate the deck. If you this apart, over-drill, epoxy, and redrill those half inch holes. You should find another aluminum piece of round bar glassed into a stout frp molding down inside the boat on each side. You tighten it sort of like you would a rigging screw. ...but how could I removed (and replace if necessary) the aluminum plate (top left from the pic above) once the nuts and U-bolt/eye is release? I mean, do I need to take the rod all the way up? Look where it is enclosed in the small locker. I do not know how to extract the rod/screw on your boat. Sure hope some sister ship owners check in. While you have the U-bolts off the deck, inspect the inside radii very carefully with a magnifier. If you find a crack starting, replace them. Garhauer has made duplicates for Ericson owners, and of course their prices are reasonable, and they are nice folks to deal with. on our Soverel 33 the deck has a hole above the rod head so you could pull the rod straight up and out thru the deck Sorry guys, I need to retake this post. It's taking me forever to pull out those U-bolts off deck. I believe the problem is the U-bolts - deck - aluminum block have some kind of sealant welding them altogether, as minnewaka already mentioned, which I'm not able to free. This is what I'm doing: Heat gun, under the deck (5 minutes or more), then go up and with a small and big (24') ply bar and try to pull. Nothing moves, well the actual deck around u-bolt have some move. But bolts and block stays together. Well, let's try with a putty knife trying to go through the block and deck after some heat; not much advance. There is fiberglass scratched, aluminum debris...you get the idea. But bolts and block stays as one. Also, banging with a hammer, trying to push up the bolts from underneath...nope. So just trying to get new ideas fro the infinite wisdom shared in this forum. Any? Maybe a dremmel and try to cut in between the block and deck? I guess I'll need new bolts doing this. I have one cheap dremmel for cleaning rusty connections, could it be enough? Some kind of magic sealant solvent? Thanks  My guess is one of/or both of two things: 1)The fittings were bedded with 5200 adhesive sealant, which makes a very tenacious bond between aluminum and fiberglass but which is not the best sealant, and 2) the stainless steel bolts have electrolytically bonded to the aluminum block. Not much you can do for number 1 but a sharp thin bladed saw. PB Blaster works as good as anything for number 2. Does anyone know if there are other shops, aside from RigRite, which could machine make the aluminum backing blocks depicted in this post. The actual specs are: 3/8" U-Bolt Chainplate Tie-rod Block - Double : Nav UB6-TRB2 (from rigrite.com). WHY? Well, I have tried to set this order with them (rigrite), but after more than 2 weeks and a few emails and several calls, they are still not able to confirm my order. And I mean confirm the order, take my credit card number and agree to make the piece. I have tried Garhauer, but they don't make this in aluminum and say the SS replacement need a different rod set-up. Actually, if you can provide a good example from your boat, most any machinist should be able to make a replacement. I am not sure if this needs the normal marine alloy of 6061, or a different alloy. Then just have it "hard coat anodyzed" . You could take the old block to any local machine shop, they will be able to make new ones for you. I would have a bigger top plate made and you can hid all the cracks. the more surface area the better the bedding compound works Top Contributors this Month  - Forums New posts Unanswered threads Register Top Posts Email
- What's new New posts New Posts (legacy) Latest activity New media
- Media New media New comments
- Boat Info Downloads Weekly Quiz Topic FAQ 10000boatnames.com
- Classifieds Sell Your Boat Used Gear for Sale
- Parts General Marine Parts Hunter Beneteau Catalina MacGregor Oday
- Help Terms of Use Monday Mail Subscribe Monday Mail Unsubscribe
 Rebedding Chainplates- Thread starter Jack Jordan
- Start date May 1, 2001
- Catalina Owner Forums
Jack JordanI need some sage advice. My 1997 36mkII has started to leak around the chain plates where they pass through the deck. I have attempted to remove the chainplate cover plates to remove the old sealant and replace it, but without much success. I am afraid of damaging the deck in the process of removing these covers. Any suggestions would be greatly appreciated. Additionally, any suggestions as to which bedding material to use to reseal these sites as this is turning out to be a real job and not one I want to do on an annual basis.�Thanks,�Jack LaDonna Bubak - CatalinaOwnersBedding I don't know the set up for the 36 but if anything passes through cored deck, I would grind out any wet coring & fill with epoxy before reinstalling. Use a little bit of straight epoxy to wet out the area & strengthen the coring and then fill the rest with epoxy mixed with filler for flexibility. Make sure you do this to an area larger than the size of the hole. That way, if they start to leak again, it won't hurt the coring. ��As far as what kind of bedding compound to use, 3M 4200. Don't use 5200 cuz you'll never get it off. I've also heard LifeCaulk is pretty much the same as 4200 but haven't used it myself.��LaDonna How exactly did you attempt to remove them? Jack, I have the exact same problem on my 2000 model 36MKII. The port side aft and center chain plate both leak. I was thinking that I might get a very stiff putty knife and then attempt to drive the knife between the deck and the chain plate cover, however I am also worried about scratching the deck around the cover. Any help/advice would be appreciated. John VisserChoice of sealant? Whay would you choose 3M 4200 instead of 101 Marine Sealant (which is a polysulfide bedding compound)? LaDonna Bubak - Catalina OwnersNo particular reason Just what I've always used. Have had no problems whatsoever with 4200.��LaDonna Melody MillerCatalina Quality Hey Guys and Gals:��At risk of annoying some people, I would be livid if I had a 1997 boat that started leaking in such a critical area.��I hope you call Catalina and complain. This is one reason I will likely not buy another. ��Thanks��Melody Gene ForakerRebedding Chainpates I had the same problem on my 1999. As I recall, I just worked it loose with a screwdriver and pryed it up. Put something down on the deck to act as a fulcrum to the screwdriver's lever. Yes, this is certainly a pain. Other common problems almost everyone seems to have now includes a really crappy battery charger from Pro Mariner. I am now on my third (that's every year) and my dealer says that's not unusual. Always replaced by the manufacturer, but it's a pain and doesn't cost Catalina a dime. When it happens again, I'll replace it at my expense with something else. The other common complaints from everyone on a new C36 are a tachometer out of adjustment and lots of dirt and trash along the bilge and underneath the cabinets. I bet the cost to fix these right at the factory would be around 4 or 5 hrs. of low cost labor with most being cleaning the bilge areas. I hear Frank is very responsive to owners, so it just must be communication. Maybe he feels it is part of the dealer's responsibility at commissioning.��Don't think this is just a problem with Catalina. Overall, the problems are few and minor. I have a friend with a new Tarten 3700 and his problems while acceptable were greater and more serious. And this boat costs almost $100,000 more than a C36.��Cheers,�Gene Mask off the area around your chainplate cover With the blue or green 3m and then mask over that with duct tape, then get a gasket scraper and pry it off. Whatever you bed with if it is an adhesive it will pull the gel off with it. The idea is to caulk it not glue it. I wish I had researched the subject more before I started caulking stuff up on my boat. I can't remeber if it was Life Caulk or Life Seal but I pulled all the chaiplates for inspection, cleaning, and rebedding while my rig is down getting new paint and the one I bedded did pull off the gel coat.(oh well nothing a little epoxy won't fix and it is under the cover) Melody Do you own a Catalina 36MKII ?? What boat do you own? Why would you say you wouldn't own one??? Just because of a few deck leaks in a 5 year old boat????��I have been on Hinckleys, Tartans, Sabre, Watkins and other sailboats and they all are not immune to deck leaks. Its' a boat and sometimes it happens. ��I own a '99 Cat 36MKII and it too had these leaks. While I'm not too happy about such a annoyance, its probably the ONLY problem I found on this great boat.��In fact if you asked me weather I would buy this boat again I WOULD DO IT IN A HEARTBEAT !!!!! And I think most (maybe ALL) Cat 36 owners would say the same thing. It is a VERY sweet boat. Practical Sailor Just did a review on the Cat 36 and had a lot favorable comments. And if you read Practical Sailor at all that translates to very high praise. In fact a least 3 of these boats have done circumnavigated the world....not trivial.��(ps. They did note this minor leak annoyance in their report) ��Now back to the Chainplates leaking. The previous owner did nothing about it (he was not a sailor and only owned the boat for a year.....I saw the boat and bought it right there and then).........I was going to re-chaulk but as a temporary fix I used that "Creeping Crack Cure" stuff from a marine store. Guess what after 9 months I have yet to see a drop come through !!!......What an easy fix, If I ever see any water I'll just keep dripping this stuff down the bedding. Even if it only lasts a year or two, who cares its so easy. (caution will only work for fine cracks-- but typically that's mostly what we have on the shroud fittings)...... - This site uses cookies to help personalise content, tailor your experience and to keep you logged in if you register. By continuing to use this site, you are consenting to our use of cookies. Accept Learn more…
| | | | |

IMAGES
VIDEO
COMMENTS
Rebedding the chainplates. After 10+ years, I decided it was time to rebed the chainplates. They had not been leaking, but I wanted to keep it that way. ... On my boat, once the rigging screws were loosened all the way, they were just long enough to make it to a shackle on the toe rail. YMMV. On the J/42 the cap shrouds will just make it to the ...
Location: Saint Augustine, FL. Boat: 1975 Downeaster 38' Cutter. Posts: 363. Re-bedding Chainplates - advice needed. I had new stainless chainplates made for my boat and am ready to install them. I plan on using Sikaflex 291 or 4200 to fill the gap around the chainplate and the caprail/deck, and then using butyl tape to seal the cover plate.
For safety and peace of mind, however, sailboat chainplates require attention and possibly upgrading. For example, many chainplates are too thin to grip clevis pins correctly. For a ½-inch turnbuckle with a ½-inch toggle, the chainplate should be at least ⅜ inch thick. For a ⅝-inch turnbuckle and toggle, a minimum thickness of.
The bedding you select should be easy to apply, long-lasting and elastic. Its primary use, when sealing hardware, is as a gap filler, with the aim of preventing water from passing between the hardware and deck/cabin surface. Options include polyurethane, polysulfide and silicone. Each has its own strengths and weaknesses.
The holes for the bolts must be cut oversize for the same reason. Use a hole cutter (the pipe-like tool that you hit with a hammer. The surface that the plate bolts onto must be nice and flat so that the plate touches everywhere before tensioning the bolts. Fair it with epoxy/high-density filler mixture if needed.
Departments - BUTYL TAPE BED-IT 1/2" x 50' ROLL. Bed-It Butyl Tape, 1/16" thick, 1/2" wide x 50' roll. Gray. This tape is specifically formulated and extruded for the installation of deck fittings to the decks of boats. All aspects of the installation procedure and necessary formulation requirements have been brought together in a marine...
Feb 14, 2010. 156. Hunter H33C Quincy, MA. Mar 30, 2010. #1. Hey all, my first project is to inspect and rebed the chainplates. Questions 1) the mast is up, I've read it's feasible to remove chainplates for inspection/rebedding a pair at a time (ease all shrouds) - is this OK? 2) I used Sika 291 when I did my Pearson 26 a few years ago, is this ...
Jereme used butyl tape to rebed (or seal) the chainplates. From our his extensive research, butyl tape is a much better solution for bedding than using silicone or caulk because the tape never dries, always remains flexible, has unlimited working time, isn't messy, etc. etc. etc. Just a few of the many pros of using this tape.
Rebedding chainplates. Thread starter karellen; Start date Mar 21 ... is it possible to safely rebed the chainplates with the rig still up? ... Take a photo of it to refresh my memory. I introduced the boat for Hunter years ago as a dealer but memory is rusty now being an old fart. kloudie1. Nov 6, 2006 9,969 Hunter 34 Mandeville Louisiana ...
If this is an older boat I would be really tempted to pull the chainplates for inspection before rebedding. Stainless steel is subject to crevasse corrosion and it would be prudent to see what the hidden area of the chain plates looks like, especially if you have seen water dripping through into the cabin.
Rebedding Upper & Lower Chain Plates. Thread starter fruition; Start date Jul 24, 2015; ... a 1 piece weldment that had one little dollop of sealant and the stbd side leaked badly over the 1st winter I owned the boat. While the dealer's repair guy had them off, and was drying out the interior with 2 electric heaters, I countersunk the holes so ...
Step 3: Loosen the turnbuckle and remove the pin attaching it to the chain plate. Use crescent wrenches for this; do not use a screwdriver, which stresses the turnbuckle. Remove the pin on the opposite end that attaches the turnbuckle to the shroud and lash the shroud (s) to the mast. Note: try to keep the parts of each turnbuckle and ...
Inspect where it passes through the deck, then rebed it.|. you can give it a fighting chance to adhere to chainplates by dewaxing the metal, then giving it some "tooth" by sanding it with 220-grit emery cloth. Afterward, clean the chainplate and the surrounding deck bedding surface with solvent, then liberally apply bedding material.
Remove the terminal hardware from the chain plate that you are rebedding. Disconnect the threaded rods that terminate inside the boat, under the setees cushions. Unscrew the bolts that attach to the deck plate from beneath the deck. Pull out the assembly from above deck, clean off all of the old caulk, recaulk, & reassemble.
For handrails, stanchions, cleats, winches etc. The chainplate seems like a bit of a challenge. As it's a long rectangle hole. I was going to drill a series of 1/2 to 3/4 holes, fill with epoxy and then drill with appropriate size bit and then file them into one longer hole for chainplate.
Inspecting and Re-bedding Chainplates. By Mike Vaccaro, Spirit #563 (1988) Chain plate shows signs of surface corrosion due to leaking around the bolt on the left and the top edge of the plate. This was the original factory bedding, 19-years old at the time the picture was taken—long over-due for replacement.
2) Rebed their chainplates. 3) Wait until the bedding cures (if you are using bedding that cures). 7) Wait until the bedding cures (if you are using bedding that cures). You can do them all in 3 days (assuming a 24 hour cures). The stays + uppers is far more than what you need to support the mast at your slip.
Boat: 1979 Hughes 35. Posts: 219 Rebedding Chainplates. Currently 6 of my chainplates are each bolted to a hanging knee (tab) which is glassed to the hull, and the chainplates are through bolted to it. The chianplates are then heavily glassed over which makes it impossible to inspect.
Jeff_H. 12528 posts · Joined 2000. #17 · Mar 15, 2021. My guess is one of/or both of two things: 1)The fittings were bedded with 5200 adhesive sealant, which makes a very tenacious bond between aluminum and fiberglass but which is not the best sealant, and 2) the stainless steel bolts have electrolytically bonded to the aluminum block.
Rebedding chainplates Jim, We have a 79 H30 that we just rebedded the chainplates on. Those 4 little screws, on our boat, screw through the fiberglass into the core. Sail magazine had a very good article on rebedding chainplates that we followed. The article had good pictures to show the process the author used.
Rebedding chainplates and stantions. I'm eager to get back to work on the boat as it warms back up. I have a keel-stepped mast and I need to remove the shrouds to remove the chainplates. Can I just removed all the stays and the mast will be fine or should I do one side at a time? We don't have the equipment to pull the whole mast or I would.
Assuming it is dry, hose down the topside. If you have any leaks it will likely be around the chainplates or at the deck/hull seam. Hopefully there will not be any but as long as they are not too bad you can still use the boat and plan to work on them during the winter. Pull the cover of at the rear of the aft berth.
Rebedding Chainplates. Thread starter Jack Jordan; Start date May 1, 2001; Forums. Catalina Owner Forums. ... Rebedding Chainpates I had the same problem on my 1999. ... And this boat costs almost $100,000 more than a C36. Cheers, Gene . R. Rod H. May 11, 2001