Navigational aids can be found throughout coastal waters, inlets, harbors and more to help you boat safely and efficiently. Understanding what these aids to navigation mean is therefore vital to making the most of your time on the water. You’ll be expecting other boats to follow these navigational aids and they’ll be expecting the same from you.
What Do Aids to Navigation Do?
In order to find our way safely from place to place on the water we must depend on road signs just as we do on land. The aids to navigation are the road signs of the water. Learning to understand them requires experience and practice. However, the benefit to be derived in being able to navigate safely by using the system is well worth the effort.
There are two systems of marking the waterways in the United States; the U.S Aids to Navigation System (ATONS) which includes the Western River System, and the Uniform State Waterway Marking System. Both systems are described below. The Uniform State Waterway Marking System is being phased out in favor of the U.S. ATONS. This change will be gradual and should be complete by 2003. In the meantime, you may see either system in use on state waterways.
Types of Aids to Navigation
U.s. aids to navigation (u.s. atons).
The buoys and beacons in this system conform to the International Association of Lighthouse Authorities (IALA) guidelines and are located in IALA region B. They are sometimes referred to as the IALA-B system. In this system, there are lateral and non-lateral markers. The lateral markers indicate the navigable channel by their position, shape, coloring, numbering and light characteristics. The non-lateral markers are informational and regulatory markers.
To navigate safely using the lateral markers, you should pass between the red and green. Returning from sea, the red markers are on your right (red, right, returning) and the green are on your left.
Lateral Buoys and Waterway Markers
In the International system, navigation aids mark the edges of channels to tell which way open water is. They are called day beacons if unlighted, lights if lighted at night, or buoys if they are floating. Some buoys are also lighted for identification at night.
“Red, Right, Returning” tells you to leave the red markers to your right, or starboard, when returning from sea. The green markers are then left on your port side and between is the channel. Be sure to look behind you when navigating a narrow channel to make sure you are not being pushed out by wind or current.
Floating Red markers are called nuns and are triangular in shape. They are numbered with even numbers. Floating Green markers, on the other hand, are called cans and are square or shaped like a large can and carry odd numbers.
Preferred Channel Markers or Junction Markers
These i ndicate the preferred channel at points where the waterway splits or branches off in another direction. If you are returning from sea and see a preferred channel marker that is red over green, to stay in the main channel you would consider the marker as if it were a red marker and keep it on your right. However, if your intended destination is the waterway branch consider the marker a green marker and leave to your port side. (See example below.)
When looking at a chart you read the markers as follows:
The first marker you see entering from sea is the open, or safe water, marker. The means that it is a ed and hite striped marker with, in this case, the letter on it.
A lighted marker flashes at night and during restricted visibility. The next marker you see as you enter this waterway is the . This tells you it is reen, has the number on it, and it lashes reen once each seconds.
plus the red symbol indicates a ed un buoy with the even number on it. Conversely , is a reen an buoy with the odd number on it.
When entering from seaward you may find two channels which separate and go in different directions. A junction marker referred to as uses its top color to show you the major or primary channel. This is represented by a ed and reen un buoy with (in this case) a on it. You use the top color and shape as if it were a stand alone marker if you want to follow the primary channel. In this case leave the ed un to the right. Otherwise use the bottom color.
Intracoastal Waterway System
The Intracoastal Waterway (ICW) runs parallel to the Atlantic and Gulf Coasts from Manasquan Inlet on the New Jersey shore to Brownsville, Texas at the Mexican border. Aids to navigation marking these waterways have some portion of them marked with yellow. Otherwise, the colors and numbering of buoys and day marks, and lights follow the same system as that observed in all other waterways.
Red, right, returning also applies to the ICW markers. However, how do you know which way is returning?
Generally south, from New Jersey to Brownsville, Texas is considered returning. So, going generally south on the ICW you would have red right. There are some areas of the ICW such as the West Coast of Florida where you are actually going north. Still, if you are going from New Jersey to Texas you are returning.
Aids to navigation marking the Intracoastal Waterway (ICW) display unique yellow symbols to distinguish them from aids marking other waters. Yellow triangles indicate aids should be passed by keeping them on the starboard side of the vessel. Yellow squares indicate aids should be passed by keeping them on the port side of the vessel. A yellow horizontal band has no lateral significance, but simply identifies aids as marking the ICW.
Dual Purpose Markings
Red Buoy with yellow square — marks left side of channel when traveling the intracoastal waterway (south), but right side of channel when coming in from sea.
Green Buoy with yellow triangle — marks right side of channel when traveling the intracoastal waterway (south), but left side of channel when coming in from sea.
Red Buoy with yellow triangle — marks right side of channel when traveling the intracoastal waterway (south), and right side of channel when coming in from sea.
Green Buoy with yellow square — marks left side of the channel when traveling the intracoastal waterway (south), and left side of channel when coming in from sea.
Non-Lateral Informational and Regulatory Markers
Regulatory or informational markers are used to advise you of situations, dangers, or directions. They may indicate shoals, swim areas, speed zones, etc. They can be easily identified by the orange bands on the top and bottom of each buoy.
Explanation may be placed outside the crossed diamond shape, such as dam, rapids, swim area, etc.
The nature of danger may be indicated inside the diamond shape, such as rock, wreck, shoal, dam, etc.
Type of control is indicated in the circle, such as slow, no wake, anchoring, etc.
For displaying information such as directions, distances, locations, etc.
Buoy used to display regulatory markers.
May show white light May be lettered
Other Non-Lateral Markers
Safe Water Marker: These are white with red vertical stripes and indicate unobstructed water on all sides. They mark mid-channels or fairways and may be passed on either side.
Inland Waters Obstruction Marker: These are white with black vertical stripes and indicate an obstruction to navigation. You should not pass between these buoys and the shore.
Mooring Buoys: These are white with a blue horizontal band. They are usually placed in marinas and other areas where vessels are allowed to anchor. These are the only buoys you may legally tie up to.
Western Waterway Marking System
Found only on the Mississippi River and its tributaries as defined by the U.S. Coast Guard in Rule 3 of the COLREGs. These aids to navigation are not numbered as in IALA-B system. Numbers indicate mileage from a fixed point. Lights on green aids show a single-flash which may be green or white. Lights on red aids show a group-flash which may be red or white. Diamond-shaped crossing dayboards, red or green as appropriate, are used to indicate where the river channel crosses one bank to the other.
Uniform State Waterway Marking System (USWMS)
On bodies of water wholly within state boundaries and not navigable to the sea, each state is responsible for establishing and maintaining aids to navigation. A uniform system of aids and regulatory markers has been agreed to by all states
Some informational/warning flags you might see include:
Divers’ Flag indicates that scuba divers or snorkelers are operating in the area. Stay well clear of this flag. Many states have specific distance-away requirements from 100 to 300 feet. Check your state regulations.
Rigid Alpha Flag is flown by a vessel engaged in diving operations. This flag does not substitute for the diver-down flag above in states that require the diver-down flag. You will usually see both flags in use. The alpha flag indicates that the vessel is restricted in ability to maneuver, in this case due to the nature of its work.
Additional Markers To Know
1. –
1. Preferred Channel Marker , Red and Green Nun labeled with the letter “C” in this example . Because top color is red you would treat the marker as a red nun if you want to take the preferred channel.
2.
2. Lighted MOA (morse code alpha) fairway or safe water marker labeled with the letter G in this example. This marks center of channel and can be passed on either side. Light will flash morse code alpha one short and one long (di dah)
3.
3. USWMS regulatory buoy . In a danger area the danger would be printed in the diamond.
4. –
4. Lighted green ” Can Buoy “, port side channel marker returning from the sea. Flashing Green light every 4 seconds. Labeled with the number 1 in this example.
5. –
5. Unlighted ” Nun Buoy ” starboard channel marker when returning from the sea. Labeled with the number 2 in this example.
6.
6. Unlighted Can Buoy marks the left side of the channel returning from sea. Labeled with the number 3 in this example.
Using Aids to Navigation
So how do you use these markers practically? Let’s run through an example.
You are fishing offshore when you hear storm warnings on your radio. You decide to head for the nearest inlet. You encounter the following buoys in the following order. What do they mean and what should you do?
This maker indicates a mid-channel or safe water mark. This will usually be the first marker you see returning from sea. It will not have a number and may be lettered. It may be lighted or unlighted and may have an associated sound. The light (if lighted) will be white and will flash the Mo (A) sequence. (Morse Code Alpha). You may pass to either side of the marker.
This represents the next set of markers you might see when returning from sea. You should pass between them leaving the red marker on your starboard side. Remember “RED RIGHT RETURNING” . The red “Nun” starboard side markers are even-numbered and, if lighted, have red lights. The green “Can” port side markers are odd numbered and, if lighted, have green lights.
This is a preferred channel or junction marker and indicates a bi-furcation in the channel. To navigate the preferred or primary channel, you should treat the marker as if it had all the characteristics of the color of the top band. If the top band is red, such as the one shown above, you would treat it as a red, starboard side marker (leave it on your right) to access the primary channel. If the top band is green, you would treat it as a port side marker to access the primary channel. If lighted, the marker would have a light the same color as the top band.
This is where it gets a little tricky. The yellow triangle and yellow square are dual purpose marks where the Intracoastal Waterway (ICW) and other waterways coincide. Now what?
: Between which markers and in which direction (right or left) would you turn to follow the ICW going north?
To enter the ICW in a northerly direction you would turn starboard (right) between red marker #4 with the yellow square and red marker #6.
: Between which markers and in which direction (right or left) would you turn to follow the ICW going South?
To enter the ICW in a southerly direction you would turn port (left) between green marker # 3 and green marker #5 with the yellow triangle.
: How do you know which direction to turn to go north or south?
The ICW is a special waterway which runs from New Jersey to Texas. Traveling from New Jersey to Texas is considered returning so you would have Red Right Returning when going “generally” south, or from NJ to TX regardless of compass setting.
Now, remember those dual purpose yellow markers? (The yellow triangle represents a red nun buoy and the yellow square represents a green can buoy.) These are found, on the ICW, in areas where other waterways connect with or cross the ICW. When operating in the ICW, take note of the yellow triangles and yellow squares and treat them as the buoys they represent no matter what the color of the buoy they are on.
Another way to remember this is to think of the ICW (the blue line) as a ditch just inland of the waters surrounding the US from New Jersey to Texas. You would always keep the yellow triangles or red markers on the land side and the yellow squares or green markers on the “green” ocean/Gulf side.
About Chris
Outdoors, I’m in my element, especially in the water. I know the importance of being geared up for anything. I do the deep digital dive, researching gear, boats and knowhow and love keeping my readership at the helm of their passions.
Categories : nauticalknowhow
Rudy Shappee on May 7, 2020
What does a lighted nun buoy look like?
W f Jones on September 6, 2020
What does a square green sign with the letters in NS mean?
Dalton Bourne on August 22, 2022
If you encounter a red buoy and a green buoy on your way back to the home port from seaward, your boat is entering a channel. Both red buoys and green buoys are known as lateral markers and assist you in determining which side you should pass on to stay in a channel: Based on general guidelines, regardless of whether you are moving from waterways to inland water or a river’s upstream in a river, keep the red buoys to your right and the green markers to your left.
Leave a Reply Cancel reply
Your email address will not be published. Required fields are marked *
Save my name, email, and website in this browser for the next time I comment.
More in nauticalknowhow
How to Tie a Boat to a Dock
How to Clean a Boat Cover
Everything You Need to Know About Your Boat’s Bilge Pump
4 Ways to Tie Your Boat Shoes
The People’s Poncho Review and Ratings
Oru Lake Kayak Review
What Is A Gunwale?
131 of the Best Hawaiian Boat Names
167 Patriotic Boat Names
About boatsafe.
Established in 1998, BoatSafe is your independent guide into the world of boating, fishing, and watersports. We provide expert insights and detailed guides to help you find products tailored to your needs and budget.
Contact Boatsafe
Address: 4021 West Walnut Street. Rogers, AR 72756
Mastering sailboat navigation is of paramount importance for sailors of all levels of experience. Whether you’re a seasoned sailor or a novice setting out on your first boating adventure, having a solid understanding of marine navigation is essential for your safety and confidence on the open waters. By honing your navigational skills, you can ensure that you navigate waterways with ease and make informed decisions to avoid potential hazards.
In this guide to sailboat navigation, we will delve into the intricacies of navigating a boat. Whether you prefer electronic or traditional methods, we will cover them both. We will explore electronic navigation techniques, including the use of GPS systems and chartplotters, which provide real-time information and streamline your navigation process. Additionally, we will delve into traditional navigation methods, equipping you with the necessary skills to navigate using natural references such as compasses, charts, parallel rulers, and dividers.
The Art of Sailboat Navigation
Navigating a boat is a unique skill that differs significantly from driving a vehicle on land. Unlike roads and signs, the waterways present a dynamic environment with minimal navigational markers, and visibility can be limited due to fog or the absence of recognizable landmarks. Becoming a proficient marine navigator requires years of accumulated knowledge and advanced learning. However, with a solid understanding of the basics, navigating most inland and nearshore waterways under normal weather conditions becomes a manageable task. Let’s break it down into simple steps.
Electronic Navigation
Electronic navigation has revolutionized the way boaters navigate the waters. With advancements in technology, electronic navigation systems have become remarkably user-friendly, making them a popular choice among boaters. The benefits of electronic navigation include:
Real-time Information Electronic navigation systems, such as GPS (Global Positioning System) or chartplotters, provide you with accurate and up-to-date information about your boat’s position, speed, direction of travel, and more. This real-time data enhances your situational awareness and helps you make informed decisions while on the water.
Ease of Use These systems often feature intuitive interfaces, making them easy to operate. They typically have user-friendly menus, touchscreens, and controls that allow you to navigate through various features effortlessly.
Convenience Electronic navigation systems simplify the process of charting your course. They eliminate the need for traditional paper charts and manual calculations, saving you time and effort.
You can find some helpful tips about GPS Navigation here !
Operating GPS or Chartplotter
To make the most of electronic navigation, it’s crucial to familiarize yourself with the features and operation of your GPS or chartplotter. Here’s a general overview of operating these devices:
Familiarization Take the time to understand the different functions and settings of your GPS or chartplotter. Refer to the user manual or online resources specific to your device for detailed instructions.
Position Acquisition Ensure that your device has acquired a strong GPS signal for accurate positioning. This may involve waiting for the system to connect to satellites or adjusting the device’s settings to optimize signal reception.
Creating Waypoints and Route Planning
Waypoints are specific locations on your navigation route that serve as markers for your journey. To create waypoints on your chartplotter:
Manual Input You can input coordinates manually, usually in latitude and longitude format, to mark a specific location as a waypoint.
Interactive Method Some chartplotters allow you to scroll a cursor across the digital chart or use a touch-screen to tap the desired position, automatically creating a waypoint.
Route planning involves connecting multiple waypoints to create a planned course. This allows you to chart a path that aligns with your intended destination or desired route. Some advanced chartplotters even offer autopilot capabilities, enabling your boat to follow the planned route automatically.
Following the Route and Chart Considerations
Once your route is established, your chartplotter will provide you with guidance on following the course. The device will display a compass course to steer, directing you toward each waypoint. It’s important to refer to the steering screen on your chartplotter, which shows both the desired compass course and your current heading.
While electronic navigation offers convenience and accuracy, it’s essential to exercise caution and consider chart considerations. Study the chart carefully, paying attention to potential obstructions such as landmasses, restricted areas, or shallow waters that could pose risks to your boat. It’s advisable to have backup plans and be aware of the limitations of your electronic devices. Remember, electronic navigation should be used in conjunction with other navigational tools and techniques for a comprehensive and reliable approach to marine navigation.
Traditional Navigation
While electronic navigation has become increasingly popular, traditional navigation methods still hold significant importance, especially as a backup when electronic devices malfunction or lose power. It’s essential to have a solid foundation in traditional navigation techniques, as they provide valuable skills and knowledge that can save the day in unexpected situations. By familiarizing yourself with traditional navigation, you can navigate effectively using natural references and maintain your course even when modern technology fails.
The compass is a fundamental tool for determining the direction in which your boat is heading. It provides readings in degrees relative to magnetic north and serves as a reliable reference point during navigation. By referencing the compass, you can steer your boat accurately along a chosen bearing, ensuring you stay on course even without electronic assistance.
Charts are detailed maps specifically designed for waterways. They contain crucial information such as water depths, channel markers, lighthouses, and restricted areas. Obtaining and utilizing charts for your intended routes is vital for traditional navigation. You can purchase printed versions or access online resources that provide free digital charts . Understanding how to interpret charts and extract pertinent information is essential for safe and effective navigation.
Parallel Rulers
Parallel rulers are invaluable tools used in traditional navigation to determine the exact compass bearing of a course you wish to steer. These rulers consist of two straight edges joined by adjustable knobs. By “walking” the rulers across the chart, you can align them with the compass rose, providing you with the desired bearing. Parallel rulers allow for accurate and precise course plotting, helping you navigate along your intended route.
Dividers, also known as navigation dividers, are essential tools for measuring distances on a chart accurately. These tools consist of two hinged arms with pointed ends that can be adjusted to the desired width. By adjusting the dividers according to the chart’s scale, you can determine the distance between two points with precision. The chart’s key will provide the necessary scale information in miles or nautical miles. Dividers help you measure distances along your planned route, ensuring you maintain accurate positioning throughout your journey.
By utilizing the compass, charts, parallel rulers, and dividers, you can navigate using traditional methods and rely on these tools as backups or primary navigation techniques when needed. Traditional navigation provides a solid foundation for understanding the principles of navigation and is an essential skill for all boaters, complementing and enhancing electronic navigation systems. It ensures you have the knowledge and capabilities to navigate safely and confidently, regardless of technological advancements.
Basic Navigational Tasks
Determining your boat’s location.
To navigate effectively, it’s crucial to determine your boat’s location on the water. Here’s how you can ascertain your boat’s position using navigational aids:
Identify Charted Landmarks Look for at least three charted landmarks, such as navigational aids, bridges, or prominent features on the shore. These landmarks should be visible and recognizable from your boat.
Use a Compass Point your compass towards each landmark one at a time and record the corresponding bearing. The compass readings should be in degrees relative to magnetic north.
Plot Your Position With the compass bearings obtained, place the parallel rules on the compass rose of your chart. Adjust the rulers until they intersect with the landmarks on the chart, creating a small triangle. This triangle indicates your boat’s location.
By using this triangulation method, you can determine your boat’s location with a reasonable degree of accuracy, even without electronic navigation devices.
Navigating to Your Destination
Once you know your current location and have identified your desired destination, it’s time to chart a course and navigate towards it:
Determine the Compass Bearing Calculate the compass bearing between your current location and the destination. This involves identifying the direction you need to steer to reach your desired location.
Set Your Boat’s Compass Set your boat’s compass to match the determined bearing. This ensures that you are steering your boat in the correct direction towards your destination.
Consider External Factors Take into account external factors that may affect your journey, such as wind and currents. Adjust your course and steering to compensate for these factors and maintain your intended path.
Following Your Course
Maintaining a steady course is essential during navigation. Here’s how you can follow your course effectively:
Continuously Monitor Your Compass Keep a close eye on your boat’s compass to ensure you stay on the desired bearing. Make small adjustments to your steering as necessary to stay on track.
Account for Deviations Understand that small deviations from the intended course are inevitable, especially in challenging conditions or due to external factors. Aim to keep your boat within a few degrees of the desired course, making periodic adjustments as needed.
Utilize Navigation Aids Make use of visual aids and markers, such as buoys or landmarks, to assist you in staying on course. These aids provide valuable reference points and help you maintain a consistent heading.
By diligently monitoring your boat’s compass, making necessary adjustments, and utilizing navigational aids, you can successfully follow your course and reach your destination safely and efficiently.
Remember, mastering basic navigational tasks is essential for any boater. These tasks form the foundation of marine navigation and allow you to confidently explore the open waters while maintaining a clear sense of direction and control over your boat.
Embracing Technology for Enhanced Navigation
Radar systems.
Radar systems offer a valuable technological advancement in marine navigation, providing real-time information about your surroundings. Here’s what you need to know about radar systems:
Situational Awareness Radar helps enhance your situational awareness by detecting and displaying nearby vessels, landmasses, and potential obstacles. It allows you to identify other boats, track their movements, and take appropriate actions to avoid collisions.
Navigating in Low Visibility Radar is especially useful during low visibility conditions, such as fog or darkness, when visual references are limited. It helps you navigate safely by providing a clear picture of the objects and vessels around you.
Understanding Radar Displays Familiarize yourself with the various elements displayed on the radar screen, including radar targets, your boat’s position, and other relevant information. Learn to interpret radar echoes, differentiate between stationary and moving objects, and adjust settings to optimize the radar display for your specific needs.
While radar systems are incredibly beneficial, it’s important to understand their limitations and use them in conjunction with other navigation methods for a comprehensive approach to marine navigation.
Autopilot Systems
Autopilot systems offer convenience and assistance by relieving you of the constant task of manually steering the boat. Here are key aspects of autopilot systems:
GPS and Compass Integration Autopilot systems utilize GPS coordinates and compass data to maintain a steady course automatically. By inputting your desired destination or following a pre-planned route, the autopilot system can steer your boat while you attend to other navigation aspects.
Windex Integration By combining GPS, compass, and wind data, the autopilot can follow a specific angle to the wind. It ensures that the sails are properly trimmed to capture the maximum amount of wind and propel the boat forward effectively.
Monitoring and Override Capabilities While autopilot systems can handle routine navigation, it’s important to continuously monitor their performance. Be prepared to take manual control whenever necessary, especially in challenging situations or when unexpected obstacles arise.
Nautical Mobile Apps
Nautical mobile apps offer a wide range of features to assist boaters with navigation. Here are the benefits and some cautionary notes regarding the use of these apps:
Real-time Charts and Weather Updates Nautical mobile apps provide access to real-time charts, allowing you to view your boat’s position and track your route. They also offer weather updates, tides, and currents information, enabling you to make informed decisions about your journey.
Route Planning and Navigation Tools Many apps include route planning functionalities, allowing you to create and optimize your navigation routes. They may provide features such as waypoint creation, automatic route suggestions, and navigation alerts to enhance your overall navigation experience.
Cautionary Notes While nautical mobile apps offer valuable resources, it’s important to exercise caution when relying solely on them for navigation. Factors such as cell phone reliability, battery life, and connectivity can impact their effectiveness. Always have backup navigation methods in place, such as paper charts and traditional navigation tools, to ensure you can navigate even if your mobile app becomes inaccessible.
By embracing technology in marine navigation, you can enhance your overall boating experience and improve your navigational capabilities. Radar systems, autopilot systems, and nautical mobile apps offer valuable tools and information that, when used appropriately, can increase your situational awareness, streamline your navigation process, and help you navigate safely and efficiently. However, always remember to complement technology with traditional navigation skills and remain vigilant to ensure a comprehensive and reliable approach to marine navigation.
Mastering sailboat navigation is a critical skill for boaters. In conclusion, mastering marine navigation is a continuous journey of learning and practice. By combining the knowledge and skills presented in this guide with hands-on experience, you can become a proficient navigator, ensuring your safety and enabling you to explore the open waters with confidence.
So, set sail, embrace the art of marine navigation, and enjoy the exhilarating adventures that await you on your boating journeys. Fair winds and safe travels!
Similar Posts
The 6 Points of Sail: Diagram of Wind Direction and Sail Trim
Points of sail are the different angles at which a sailboat can sail in relation to the wind. Understanding these points is crucial for anyone who wants to learn how to sail, and it’s usually taught in sailing schools. Each point has its own characteristics that determine the boat’s speed and direction. The main points…
Sailing Etiquette: The Do’s and Don’ts
Sailing is a wonderful way to enjoy the beauty of nature and explore the open waters. However, it’s important to remember that sailing etiquette plays a crucial role in ensuring everyone’s safety and enjoyment on board. Whether you’re an experienced sailor or a beginner, understanding and following proper yachting etiquette is essential. Yacht clubs and…
Navigating Life’s Storms: 7 Life Lessons from Sailing
Sailing is more than just a hobby; it is a lifestyle that can help you develop a wide range of skills and abilities. Whether you are a seasoned sailor or just starting, the 7 life lessons from sailing can be applied to various aspects of your life, from your personal relationships to your professional endeavors….
Basic Sailing Terminology: Sailboat Parts Explained
Sailing is a timeless activity that has captivated the hearts of adventurous souls for centuries. But, let’s face it, for beginners, sailing can be as intimidating as trying to navigate through a dark, labyrinthine maze with a blindfold on. The vast array of sailing terminology, sailboat parts and jargon can seem like a foreign language…
10 reasons why sailing is the best way to travel
Are you feeling restless and looking for a new way to explore the world? Tired of being cooped up in airplanes, trains, or cars for hours on end? Well, why not try something different and embark on a sailing adventure? While I may not be a seasoned sailor myself, I can tell you that there’s…
How to Sail Around the World on a Budget
Sailing around the world is a dream for many adventurers, but the idea of circumnavigating the globe can seem daunting, especially when considering the potential costs involved. However, with careful planning, a bit of know-how, and a willingness to live frugally, it’s possible to embark on this adventure without breaking the bank. In this article,…
Marine Navigation: How to Navigate a Boat
How to Navigate a Boat
Decide on your method: electronic navigation or traditional (analog) navigation.
If using electronic navigation, start by operating your GPS or chartplotter.
Make note of your real-time position, speed and direction of travel.
To get from point "A" to point "B," create a waypoint.
String waypoints together to create a route; utilize auto-pilot when applicable.
For traditional navigation, use: a compass, charters, parallel rulers and dividers.
Stay within sight of land and use major landmarks as points of reference.
Electronic Marine Navigation
Thanks to modern tech, navigating with a modern GPS/chartplotter is a piece of cake. You can pull up an electronic map (though mariners always refer to their maps as “charts”), which shows your real-time position, speed and direction of travel, and more.
Locating your position is as simple as looking for the boat icon and/or GPS coordinates on-screen. To get from point “A” to point “B,” all you’ll have to do is create a waypoint.
Depending on how advanced your chartplotter is this might mean scrolling a cursor across the chart, then creating a waypoint by pressing a button.
In other cases you might have a touch-screen and merely need to tap the position you’d like to create a waypoint at.
Then, you’ll want to press a “go to” button (or give the screen a swipe, as appropriate for your chartplotter).
With the navigation from your present position to the waypoint then initiated, the chartplotter will give you a compass course to steer. Most chartplotters also have one or more “steering screens” to choose from, which will display both the desired compass course and the one you’re currently following.
Use the chartplotter menu to pull this steering screen up, and you’re ready to follow the unit as you steer an accurate course to the waypoint. You can also plot in multiple waypoints and string them together, into a “route.”
The most important thing about creating waypoints and routes and then navigating to them is to look closely at the chart, and make sure you won’t be trying to cross any major obstructions like a finger of land, restricted areas, or waters which may not afford your boat it’s minimum draft (how much water your boat needs to avoid running aground).
There are many other electronic items that assist in navigation, like radar and autopilots . But these are naturally a bit more advanced. What about using a navigational app on your cell phone? There are a number that can prove helpful to boaters, including a wide range of iOS boating apps and Android boating apps .
However, boats and cell phones don’t always mix well; the moist environment and risk of shock damage are ever-present, and cell phone coverage can be sketchy or non-existent in many boating areas. As a result, you should never rely completely on a cell phone for navigating a boat.
Traditional Marine Navigation
Electronics can and do fail, so it’s also important to gain a basic understanding of the tools you need for analog navigation, and keep them aboard your boat at all times. These include:
Charts for the waterways you travel
Parallel Rulers
With these basics, as long as you’re within sight of land and major landmarks you can figure out where you are and where you’re going.
A compass tells you which direction your boat is heading in—north, south, east, or west – as measured in degrees relative to magnetic north. There are 360 degrees representing a full circle. Zero degrees on the compass is north, 180 degrees points south, it’s 90 degrees to the east, and 270 degrees leads to the west. So a glance at your compass tells you what direction you’re travelling in, at any given time. When you steer your boat to a specific degree on the compass to maintain a straight course, you call this your “bearing.” So if you’re cruising to a restaurant for lunch and it’s directly to your north, you’ll be steering a zero-degree bearing. If it’s to your south you’ll steer a 180-degree bearing, and so on.
Charts are simply maps of the water and waterways, with special marking for water depths, channel markers, lighthouses, and restricted areas. NOAA produces charts for US waterways which can be viewed online for free , but to get printed versions you have to purchase charts or books of charts (for larger areas) from a NOAA certified agent . You can also pick up charts and chart books for your local waterway in virtually any marine supply store.
Parallel rulers are two rulers attached by a pair of swiveling arms, so you can swing the rulers close together or far apart but they will always remain perfectly parallel. By doing so repeatedly, you can “walk” the rulers across a chart. Why in the world would you want to? Because it will allow you to determine the exact compass bearing of any course you may want to steer. All charts have a compass rose with all 360-degrees printed on them. Place the ruler on top of the chart, on the course line you’d like to steer. Then walk the rulers to the compass rose, and viola—you know what compass bearing you need to steer your boat on to run the course.
Dividers have two arms that are attached at one end, and can be pulled apart to different widths at the other end. These are used to measure distance. All charts have a key which shows scale by miles and nautical miles. Hold the dividers up to the scale and pull them apart until the arms’ width equals the chart scale for a mile or any increment of miles (it’s common to see one, five, 10, or even 20 mile increments depending on the scale of the chart). With the dividers set you can then use them to measure the distance between any two points on the chart.
Marine Navigation Basic Tasks
With these tools in hand—or at the helm—you can accomplish the three most basic navigational tasks: figuring out where you are, where you want to go, and following a course to get there.
Where is Your Boat?
To figure out where you are, look around and locate three charted landmarks like navigational aids, bridges, or water towers on shore.
Point your compass (which means pointing your boat, unless you have a handheld compass) at them one at a time.
Record the bearing.
Then set your parallel rules on the compass rose so it matches the bearings and, one by one, walk them until they intersect with the landmark for the corresponding bearing and draw a line down the edge of the ruler.
After doing all three lines, they will intersect to create a small triangle—and that’s your location.
How to Navigate to Where You Want to Go
This is just a matter of identifying your location and destination, then determining the corresponding compass bearing between the two places. Set your boat’s compass to match the bearing, and you’re ready to get underway.
Following a Course
Now that you know how to get a bearing, following the course is easy—all you have to do is steer the boat to keep the compass on that bearing. You’ll notice that keeping a boat on course can be difficult, especially with smaller, faster boats, and if you can keep your path within five or so degrees of the intended course you should consider it a job well done. Now get out there, and navigate!
Read Next: Boating Safety Guide
You Might Also Like:
How to Dock a Boat
How to Use a VHF Radio
Weather Safety Tips for Boaters
Pre-Departure Checklist
Explore Boat Types
Join Our Newsletter!
Get community news, buying bargains, and how-to guides at your fingertips.
| |
|
Strategic Plan
Frequently Asked Questions
U.S. Coast Guard Facts
People of Boating Safety
District Recreational Boating Safety Specialists
Vision/Mission
Partnerships
Federal Laws
Federal Regulations
State Boating Laws
State Guidance
Navigation Rules
Federal Register
Vessel Determinations and Policy Letters
Vessel Safety Check
Boating Safety Courses
Accident Reporting
BUI Initiatives
Carbon Monoxide
Life Jacket Wear / Wearing your Life Jacket
Float Planning
Manufacturers Identification
Consumer Safety Defect Report
Product Assurance Branch
Boating Safety Circulars
Beacon Alerts
Marine Safety Alerts
Image Library
PFD Labels & POS Graphics
Accident Statistics
Search Data
National Life Jacket Wear Rate Observational Study
Recent Research on Recreational Boating Accidents and the Contribution of Boating Under the Influence
National Recreational Boating Safety Survey
Education Quick Phase In Study
Meeting Information
Resolutions
How to Apply to NBSAC
Further Information About NBSAC
State Grants
Nonprofit Organization Grants
Grant Archives
Grant Links
The Navigation Rules are much like the rules of the road on the highway. They establish a consistent way to navigate safely and avoid collisions when two boats are crossing paths, are on course to meet head-on, or when one boat wishes to overtake another.
The U.S. Aids to Navigation System is a system maintained by the U.S. Coast Guard, consisting of visual, audible, and electronic signals which are designed to assist the prudent mariner in the process of navigation. The aids to navigation system is not intended to identify every shoal or obstruction to navigation which exists in the navigable waters of the United States, but rather provides for reasonable marking of marine features as resources permit. -->
Should you wish to explore the subject of Federal navigation rules further, below are some additional resources:
For more information from the Department of Homeland security and the U.S. Coast Guard on navigation:
The Strategic Plan of the National Recreational Boating Safety Program 2012-2016 is finalized and can be downloaded. Download the Strategic Plan
The U.S. Coast Guard's Boating Safety Division (CG-BSX-2) is dedicated to reducing loss of life, injuries, and property damage that occur on U.S. waterways by improving the knowledge, skills, and abilities of recreational boaters.
Ultimate Guide to Nautical Chart Navigation (Plotting, Reading)
Whether you're on your dream vacation, heading out for a short weekend, or dreaming over the winter, you'll be looking at charts. Large-scale charts, small scale charts, harbor charts - what are all those symbols and how do you use them to find your way in the world?
How to read a chart, plot a course and navigate?
In order to read a chart, you interpret longitude and latitude lines to determine your coordinates, which is your position.
You have to understand and interpret different symbols like depth, scale, and navigation marks.
Using these symbols, you find a safe course and plot it on the chart.
Find the direction of this course using a compass.
Maintain direction using the compass readings.
If you're new to navigation this can overwhelm, especially if you're looking at a crowded electronic vector chart. This guide gives you all the basics on how to read a chart and use it to plot a safe course from where you are to where you want to go.
On this page:
Navigation basics, reading a chart, using a chart - plotting a course, dead reckoning - pulling it all together, master chart navigation with one course.
A nautical chart is like a road map. It shows you the expected lay of the land and gives references for finding your way to somewhere when don't know the path.
On land you've got roads, which limit where you can drive and how much trouble you can get into. If you're on Interstate 95 and you know the next exit number, you're good for figuring out where you are and how to get where you're going. No one will put a big rock in the middle of the highway that you won't see until you hit it.
But one patch of water looks a lot like another. When you can see land it's easier to figure where you are. If you get fog or it's night time or you're far out to sea, you have nothing to make one patch of blue look any different from another. And even if you can see landmarks, they won't help you if you can't identify them. And the water may cover hazards like rocks and shoals that you need to avoid. Eyeballing a lighthouse on land won't help you miss a shoal unless you know where the shoal is relative to your boat.
A nautical chart shows things under water and describes the landmarks and references you can see. Navigation is traveling a planned course from start to finish, using the chart to avoid obstacles and hazards. To understand how to do this, you need to understand how we refer to places in the world.
Geographic Coordinates
Centuries ago cartographers devised Geographic Coordinate system to locate any place on the world. Lines of latitude range from 0° at the equator to 90° at the poles and run parallel to the equator. Lines of longitude run from the north to the south start at 0° in Greenwich, England and run to 180° West and East.
We express Geographic Coordinates as Degrees/Minutes/Seconds (e.g. 35°43"25'), or with a decimal instead of Seconds (e.g. 35°43.424). There will also be a letter at the end to designate the hemisphere. They are always in pairs, with latitude followed by longitude.
An example of a complete coordinate is:
41° 39' 48" N 071° 26' 44" W
This will be a little over 41° North of the equator, and a little more than 071° West of Greenwich, England. If a longitude is only two digits (like the example), add a zero to the front of it to avoid confusion.
With a road map, I can give you directions to that place by saying "From Post Road, take a left on King Street, then another left on Water street." But coming by water those directions are useless. Coordinates tell you where something is, then you can find it with your charts.
How to recognize latitude lines
Latitude lines will be North or South of the equator and are always parallel to each other. One minute of latitude is equal to one Nautical Mile . So every degree of latitude is always 60 nautical miles from the next. If you have two latitude positions, you can estimate how far apart they are in a north/south direction.
We'll find this very convenient later on when we're measuring distances and plotting courses.
How to recognize longitude lines
We designate lines of longitude West or East, relative to Greenwich England. For example 071° West is a line running roughly through Cape Cod on the U.S. East Coast. But 071° East is near Kabul, Afghanistan.
Because they run from the North Pole to the South Pole, lines of longitude are not always the same distance apart. Picture slicing an orange into sections - two straight cuts from the "poles" on a curved orange result in a section of peel pointy on each end and fat in the middle. You can not use longitude lines to measure distance .
Using Degrees and Math
Degrees, minutes and seconds may seem counterintuitive when you work with geographic coordinates. But it's all based on circular geometry, or "clock math." Just like an hour has sixty minutes and a minute has sixty seconds, a degree also has sixty minutes and a minute has sixty seconds. Electronic navigation tools often use decimals instead of second, but the concept is the same. Thirty seconds is half a minute (.500), forty-five seconds is .750, etc.
The only mistake you have to watch for is adding minutes and seconds. While 50 seconds plus 20 seconds equals seventy seconds, with "clock math" that's one minute and ten seconds, or 1"10' or 1.167".
Outside of latitude and longitude lines, another other key component of navigation are the earth's poles. The True North pole as a geographic location is at latitude 90° North at the very top of the planet on the axis of rotation of the earth where the longitude lines converge.
But the North pole we use for navigation with compasses, known as Magnetic North , is about 500 Km away from true north, and it drifts. When you're thousands of miles from the north pole, a compass will point to the magnetic pole, not the true north pole. This may be a difference of 15 degrees or more, and the amount of variation is different depending on where you are in the world.
This data is well tabulated and predicted, and we can make adjustments so what you plot on paper matches what you see on your compass.
This article teaches reading paper charts, since paper charts are the basis of navigation for chart plotters and electronic charts. There are variations in how electronic charts may display information, especially vector charts , but once you know paper charts e-charts are easy. We’ll take you through each part of the chart, explaining the key information needed for basic navigation. Raster charts on your plotter look just like paper charts.
How to read latitude and longitude lines
At the top and bottom of the chart, you'll see a scale of numbers for longitude. On the left and right edges of the chart, you'll find the latitude scale. At certain points on the chart, reference lines will run from north to south and east to west at fixed intervals. The corners will show you the degrees and minutes where the scale starts, though points on the scales may be marked with minutes or even seconds.
Near the edges of the chart you will often find a distance measuring scale to measure a mile, half a mile, a kilometer, and so on. As we learned already, we don’t need that since we have lines of latitude running down the sides of the chart. Every minute of latitude is one nautical mile, so every chart has a built in scale even if they don't add a separate one.
Scales, Depths, and Notes
Somewhere on the chart will be a bit of text describing in some detail what the chart is. Not all of this applies to plotting a basic route, but it's good to know things like how old the chart is.
Some critical pieces of information include:
Scale. The chart scale will be a ratio, for example “1:25,000" or “1:500,000". With this ratio, one unit as measured on the chart equals 25,000 of the same units in the actual world. If you measure a centimeter on the chart, it's 25,000 centimeters (or 250 meters) in the real world. One inch on the chart is 25,000 inches in the world, or 2,083 feet.
Depth soundings. Numbers will be sprinkled over all areas covered in water to show depths. Somewhere you will find the notation "Depths in UNIT" where UNIT is feet, meters, or fathoms. This is significant, make sure you understand what the soundings mean or you may end up aground. Soundings are taken for low tides, there may be water on a spot at high tide.
Navigational Marks. Any notes on the mark system used and it will probably note the buoyage system.
Tides and Currents. In areas with noteworthy currents and tidal swings, they may provide critical details.
Special Marks, Notes or Considerations. Denoted with black, red or purple text, special notes may pertain to anything from fish trap locations, anchorages, military restrictions zones, or anything else which may affect navigation through the covered areas.
Compass Rose
Every chart will have a compass rose. Some may have more than one. The compass rose should have two circles, the outer denoting true north, and the inner showing magnetic north. There will also be variation data to calculate magnetic north from true, and information about the annual expected change in the position of the magnetic north pole.
We will use the compass rose later when we plot lines and courses and measure angles to determine numeric directions.
Depths and Contours
A good chart will have many depth soundings - small numbers on the bottom of the water parts of the chart. But not too many, for readability. It will also have contour lines. These lines connect soundings of the same depth to show you the relative shape of the bottom. Contour lines at ten-foot intervals, for example, will show you how the bottom shallows out or drops off. The closer the lines, the steeper the drop.
Many charts with land on them also show contour lines on land, showing hills and land structures. These are useful to determine where you are from the hills and valleys you expect to see.
Chart colorations are the reverse of what a novice might expect - shallows are blue, shading to lighter colors, then white for the deepest places on the chart. The darker the blue, the shallower the water .
Symbols, Marks and Lights
The most useful information on the chart is the various marks and symbols. Every sailor should have a copy of U.S. Chart Number 1 , the master list of all symbols, signs and objects you will see on any U.S. government chart. Some details may vary on charts from other countries, but most of the symbols and abbreviations are used on almost all English language charts. It's a great reference to learn chart reading and is available as a free download. You can also order a paper copy for your nav station.
Download the US Chart Number 1 here (pdf )
Aids to Navigation
Permanent government or private marks will be on a chart with a detailed abbreviation describing their markings and how to identify them. Most aids are showing the way around a hazard, or the way to the best navigation channels. Small scale charts without much detail may not show all marks in an area. It’s important to have detailed charts for harbor approaches and coast lines.
Aids to navigation include buoys, day marks, lights, beacons and a few less common marks. The symbols and lettering at each mark describe how you can identify them with color, shape, lighting, and light patterns.
In this example, you can find government two marks and a lighthouse.
G "1" Fl G 2.5s means green mark,. numbered "1", with a flashing green light every 2.5 seconds.
R "8" Fl R 4s BELL is a red mark with the number "8" and a red light that flashes every 4 seconds and a bell.
WARWICK Oc G 4s 66Ft 12M is Warwick Light, with an occulting (mostly on) green light with a 4s cycle. It is 66ft tall and visible for 12 nautical miles.
Most of the descriptions aren't hard to puzzle out once you get the pattern down, but now and then you have to go have a look at Chart Number 1 .
A chart will also show a variety of permanent hazards and dangers. The example above shows "Round Rk" as a rock awash at low tide. You can also see "Spring Rk," "Old Pier Rk," and "Barden Rk" which do not show as being awash but are shallow enough to be notable. They should show anything which may pose a hazard. Changes since they printed the chart will not be on there. Most chart authorities produce a periodic Notice to Mariners reporting any changes.
When land shows on a chart, it may show standpipes, towers, flagpoles and other permanent structures if they may be helpful to navigation. You can sight these with a compass to get your position and use them to get your bearings. In the sample below, you can find a monument, a tower, and a chimney as visible landmarks from the water.
The Gloucester Fisherman's Memorial shown on the chart sample.
Putting it Together
You've got the latitudes and longitudes, depths, landmarks, and aids to navigation. You should be able to read the chart samples to see how you might find your exact location even without a GPS. It the sample chart above from Gloucester, MA, if you sail right to that G "9" marker near Babson Ledge, you will know exactly where you are.
Practice if you can, sitting on your boat or on shore with a chart and trying to pick out the landmarks and aids. Also try it at night.
Plotting a course from one place to another isn't complex, it's a matter of breaking the trip down to segments, or legs , each with a known course and distance and safe to navigate. When you string a series of legs between waypoints around known hazards and land masses to reach your destination, you've plotted a course.
To do this exercise, you will need a paper chart, a sharp pencil (not a pen), a parallel ruler , a set of dividers (sometimes called a "compass"), a starting point and a destination.
Learn to Plot Your First Course If you have never plotted a course before, we recommend first reading our full guide on how to plot your first course . It will walk you through the entire process step-by-step.
Laying in the Course
To plot a course, first look over the chart to see what is between your start and your destination. You can even trace a rough course with your finger, noting hazards like islands, shallows and rocks you want to avoid.
Make a mark at the start of your course, a buoy outside your marina is a common starting point. From there, pick a point in the general direction of your destination with no hazards between the start and the first mark. Placing a mark near a government aid is convenient, but do not put your mark ON the aid to navigation. For one, you don't want to hit the mark, so don't aim right at it. Second, everyone else is plotting to that mark too, and you don't want to pile up on the water if visibility gets poor.
Place your mark a little away from the government mark on the safe navigation side. With the straight edge of your parallel rule, draw a line from the starting mark to the first mark. Check the line to make sure it doesn't run over any hazards or depths shallower than your draft. If you find problems, erase the line and pick another point and repeat.
Once you have a safe first leg, find another mark on the way to your destination from the first leg. Draw another line to the new mark and check for hazards. Repeat this process for each leg until your last leg ends at your destination. Your course shouldn't run through any shallows or hazards.
When the line is complete, it still needs to be measured and marked before you know what courses you have to steer to get where you're going.
Measuring Lines and Marking Your Course
We use parallel rules to create lines with a known compass heading, or to measure the compass heading of line you drew on your chart. The compass rose is the gauge to measure and draw your lines. We will use the parallel rules and the compass rose to measure the course to steer on each leg, and the dividers to measure the length.
The Course to Steer
Take the outer edge of your parallel rule and place it along the first leg of your course. Now, pressing gently on the rule on the course to hold it in place, move the other ruler away from the line towards the compass rose. With luck, you'll reach it in the first move. Most of the time you will have to "walk" the ruler across the chart to the compass rose. The goal is to maintain the same angle on the rulers as the line you're measuring, so take it slow and smooth and don't make jerky motions. If you wiggle the rulers, start over.
Maintaining pressure on the first ruler, open the rulers toward the compass rose. When you can't move it any more, put pressure on the leg you just moved, move the other leg up until it's touching the leg you're holding down. Then put pressure on the first leg again and open the rulers towards the rose. Repeat and walk the rulers until you reach the center point of the compass rose with the outside edge.
Once the edge of the ruler is through the center of the rose, read the headings from the points on the outside of the rode. The outer circle will show numbers for the true bearing, the inner circle is for magnetic. Note the bearing on a scrap of paper.
In the center of the compass rose, you will see a measure for variance on the north line of the compass. This is the difference between true and magnetic north on the current chart. Next to that will be a year, with a number and direction. For example, it may read 18°35'E 1994 2'E . This tells you your compass will read almost 20 degrees from true, and it the variance changes two seconds every year.
In most cases you can ignore that, unless your chart is very old or the annual change is large. In 2020, the chart above has 26 x 2' = 52' of additional variance, or almost a degree change in heading. If (years ago x annual change) is less than a minute you can usually ignore it for short legs. A degree change in course on a five or ten mile leg won’t take you out of sight of your next mark. If it's significant, for East variance, you ADD the annual change to the magnetic course you recorded, otherwise subtract it.
When you have the final magnetic course measurement, write it over the course leg with a "C" for course, the course, and "M" for magnetic. If your course is less than 100° put a leading zero on it to avoid ambiguity. For example, record a 92° magnetic course as C 092M , or 273° we write as C 273M .
Leg Distance
There are several was to use dividers to measure your leg lengths, you'll figure out which works best for you and some techniques work better in some situations than others.
The easiest is, if your leg is short enough, to spread the dividers between the two points on the leg. Then move them to the latitude scale on the side of the chart and see how many minutes of latitude they spread out. That is the leg length in miles. You may have to interpolate or make a rough guess at partial seconds on large-scale charts.
Another method is to open the dividers a fixed, measured distance such as a mile. The choice depends on the length of your leg. Put one divider leg on the starting point of the leg, and the second leg on the course line. Now rotate the dividers around the second leg and put the first leg on the mark. Walk the dividers down the course line while counting how many lengths you measure, then you have the miles in the leg.
Except for the last rotation, that will be a fractional distance and the divider leg will go past the mark. Push the dividers together until the leg is on the mark, then measure on the latitude scale how long the fractional amount is.
Record the leg distance under the course like with “D” plus the length of the leg and the units you measured. A 7.8 mile leg we write as D 7.8 NM . If you use a different unit, note it. But most sailors do navigation with nautical miles.
You will want to complete these steps for each leg of the trip. I also like to record the course details and the Lat/Long of each waypoint on a separate sheet for easy reference during navigation.
Measuring and Plotting Points
To measure a point and get the geographic coordinates, find a government mark on your chart, like the "R8" in the first example chart. You can see two reference lines on that chart, one for one for longitude and one for latitude. Find the reference lines on your chart and follow them to the edge; and you will see the actual latitude or longitude.
With the divider, put one leg on the mark you picked to measure. Expand the dividers to put the other leg on the nearest latitude reference line, measuring shortest difference between the two. If you drew a line from the mark to the line, it would be perpendicular to the line so visualize that as you measure. If you rotate the dividers on the leg on the mark, the measurement will be right when it only touches the reference line in one place.
Now move your dividers to the latitude scale on the chart and put the reference line leg on the same line on the scale. Be careful not to change the divider measurement; most will be tight enough to stay fixed. The other divider leg will sit on the actual latitude reading for the mark. The scale will vary with the detail of the chart, but you should be able to record a full latitude reference from that point. If it only shows minutes or seconds, look at the top or bottom of the scale for the degrees and minutes. Write it all down.
Repeat the process with the longitude reference line. When you finish, you will have the Lat/Long coordinates of the point you measured. You don't have to do this for a manually plotted course, but it's not a bad idea on principle. And you will need to do it if you plan to enter the manual course into a GPS or chart plotter.
Want Another Course Plotting Example? If you have never plotted a course before, we recommend first reading our full guide on how to plot your first course . It will walk you through the entire process step-by-step.
Now that you can read a chart and plot a course, it's time to put this knowledge to work. Before chart plotters and the GPS, sailors navigated by dead reckoning . When old-time sailors used a sextant to get a position, they could only use it to calculate their latitude. We cannot derive longitude with celestial navigation, and few sailors knew the math to make it work, anyway.
Dead reckoning is nothing more than estimating your position on a chart using your known speed and course. There is a specific notation to record this, and techniques to refine the accuracy when you can fix a position. You need a speed log and a compass, with that you can estimate your position from a known starting point.
Note - many consider Dead Reckoning an obsolete skill in the age of the GPS. While there is some truth to this, it is an important skill to have in case you find yourself without a GPS or chart plotter. It's an excellent backup, and like plotting a course on a paper chart, it keeps you in tune with and alert about the waters you're sailing through. Electronics fail; when we're offshore we record our position hourly on paper, just in case we need to start a DR plot due to instrument failure.
Making the Basic DR Plot
Somewhere in your plotted course, you will pass known government marks or a reference that will give you an exact position fix. You can cheat and use a GPS if you must, but don't refer to it after that in this exercise.
The general process is:
Every hour on the hour, note your speed through the water and magnetic course on a piece of paper.
On your paper chart, find the last dead reckoning point (or known fix).
With your parallel rules, move a line with to your magnetic course to the last known mark. This is the reverse of measuring the line. Put your parallel rules on the course through the center of the compass rose, then walk that line to your last DR mark.
Draw a line on your course the same length as your average speed in knots from the last mark.
Put a dot on the mark, and a half circle around the top half to show it's a DR position.
Record the time under the DR mark and note speed and distance on the line between the points.
There are a few more specifics, but that general process will give you an estimate of roughly where you are.
If you make a course change, add a DR plot at the change. If you don't change course on the hour, you will have to do a little math. Draw the course line to the course change in the same way, but the length of the line will have to be a fraction of your boat speed. This is the number of minutes since your last DR position divided by 60 minutes. Multiply this fraction by your speed to get how many miles long the DR line needs to be at the course change.
Dead Reckoning Errors and Inaccuracy
At its best, DR plotting is a good estimation of your position. You want the best estimate you can, and there are factors which will push your DR plot away from your actual position. Do not treat dead reckoning positions as an actual fix, DR is a tool to get you to a place where you can get a better fix from an aid to navigation or a landmark for accurate navigation.
Some factors which can reduce the accuracy include:
Current. Tidal currents may be invisible to you, but a one knot current sweeping you sideways or pushing you backwards will make your DR estimate off by a mile after an hour. If you know the currents for an area, you can correct for this by adding a vector for the current to your DR course and speed line and plotting that as the DR position. Note the correction on the plot.
Leeway and drift. Similar to current, but leeway is sideslip in your boat. All sailboats sideslip a little, it's the nature of the forces that make a boat sail against the wind. The heading on your compass will not fully match your forward progress as your boat slips a little away from the wind.
Variable Speeds. The best you can do for your estimates is the average speed of your boat over an hour. If the wind is variable this may be difficult to figure. Do your best, but if you have a big lull for half an hour, think before using the full boat speed if the wind picks up before you record your DR.
Compass Deviation. Metal objects on a boat can affect a compass heading. The effects vary with the direction the boat is heading. Imagine a compass with a magnet a foot away. The compass will point mostly north, but a little towards the magnet. Now move the magnet in a circle around the compass; the readings will change slightly but still stay mostly north. On your boat, the magnetic interferences will change as the boat sails in different directions. A profession can “swing” a compas and give you a deviation card for your boat. You use this to build the known deviation into your courses to eliminate this inaccuracy. Most electronic compasses calculate deviation during calibation, consult your manuals and calibrate if you aren’t sure if your compass is calibrated.
Correcting the DR Position
The longer you sail on dead reckoning, the more inaccurate your estimated position will be. If you're sailing near shore, you can correct this by fixing your position, or getting a known position to correct your DR plot and start plotting from the new accurate position.
A simple way to fix your position is to sail near a mark on your chart. For coastal navigation, you've likely plotted your course relative to government marks because they are convenient. This is to give you a periodic fix as you pass waypoints on your course. When you come close to the mark, record your position with the time, and circle the position dot to show it's a "fix" and a good known position.
Another fix technique needs at least two visible landmarks or aids to navigation you can identify, and a hand bearing compass. To start, take a bearing on the first point and record it. As quickly as you can, record a bearing to the second mark. If you have time, repeat the bearings. You want to hurry because the boat is moving and the more time between bearings, the greater the error.
Find each mark you took bearings for on your paper chart, then take your parallel rules and draw a line from each mark on the sighted heading. The marks should intersect, and the intersection is your rough position. If you took multiple bearings, you can draw more lines to get a sense of the uncertainty introduced by your boat speed. Circle the intersection and note the time, then use this as the basis for your next DR plot. This is less accurate than finding a mark, but will let you correct your DR plot for accuracy. There are several other techniques such as the running fix and more complex uses of a compass, landmarks, and math that are outside the scope of this guide.
Dead Reckoning and the GPS
GPS navigation makes all this DR plotting seem like a lot of unnecessary work. That doesn't mean it's not worth learning and doing. On coastal cruises it keeps us tuned in to the sailing, though we also record GPS fixes on shorter legs and at course changes.
It is important that sailors understand not only how to push the right buttons on the chart plotter, but how navigation works. Not that we're expecting a calamity that will take down your electronics or make the GPS system unreliable, but it can and has happened.
Electronic navigation makes all of this very simple, but it's good to know how to find your way without it.
When you're ready to master chart navigation, I recommend you check out the Coastal Navigation course at our partner NauticEd. It is quite excellent. They cover chart navigation in-depth and will guide you through multiple quality exercises to make sure you really practice your new skills. It is really affordable as well.
You'll leave Coastal Navigation Clinic with an understanding of:
The Charts and how to use navigation tools
True north and magnetic north - and variation and deviation
Determining your position using various techniques such as dead reckoning, running fixes and triangulation
What to do with your GPS position to get you to your destination
Set and drift from wind, tides and current
How to simply determine your heading based on Set and Drift
Check out NauticEd's Navigation Clinic now .
Hi Anybody can help and tell me how to find a one to one tutor to teach navagstion plotting?
Hi Alan, you can find a great course on navigation at NauticEd. I’ll email you the link.
Thanks for this article! I found it helpful and easy to understand. In the section “Dead Reckoning - Pulling it all Together” you wrote, “we cannot derive longitude with celestial navigation”. A method using lunar distances to find longitude first started being used in 1763: https://en.wikipedia.org/wiki/Lunar_distance_(navigation )
Lynette Rolland
This is quality work regarding the topic! I guess I’ll have to bookmark this page. See my website <a href=” http://psfond.ru/bitrix/redirect.php?goto=http://article-star.com/eine-effektive-html-sitemap-erstellen">Article Star</a> for content about SEO and I hope it gets your seal of approval, too!
Leave a comment
Sailing Navigation Tools: A Comprehensive Guide
by Emma Sullivan | Jul 21, 2023 | Sailing Adventures
Short answer: Sailing navigation tools
Sailing navigation tools refer to equipment used by sailors for determining their position, planning routes, and navigating at sea. These include compasses, charts, GPS devices, sextants, and electronic navigation systems. These instruments aid in calculating direction, measuring distances, and ensuring safe passage during sailing expeditions.
How Sailing Navigation Tools Can Enhance Your Nautical Experience
Sailing is not just a hobby; it’s an adventure that pushes us to explore the vast expanse of the open waters. As sailors, we not only rely on our intuition and knowledge but also on advanced sailing navigation tools. These tools are like trusted companions that enhance our nautical experience in ways we couldn’t have imagined.
Let’s dive deeper into the world of sailing navigation tools and how they revolutionize our time on the water.
Firstly, one cannot discuss sailing navigation tools without mentioning GPS (Global Positioning System). GPS has become an indispensable tool for modern sailors as it provides accurate positioning information in real-time. Gone are the days when navigating solely relied on traditional methods like a compass and celestial observation. With GPS, you can precisely pinpoint your location, track your course, and even set waypoints to guide you along your journey. This not only ensures safety but also adds an element of convenience allowing you to focus more on enjoying the beauty of the sea.
Another remarkable tool that enhances your nautical experience is electronic chart plotters. Imagine having access to detailed charts right at your fingertips! Electronic chart plotters use GPS data to display digital maps, offering valuable information about water depths, hazards, marinas, and much more. You can customize these charts according to your needs and easily visualize routes before embarking on a voyage. This foresight allows you to plan better and avoid potential dangers, making every trip a stress-free delight!
One cannot underestimate the importance of weather instruments when it comes to sailing navigation tools. Weather plays a significant role in determining sailing conditions – from wind speed to wave height – which ultimately affects safety and comfort onboard. Equipping yourself with weather instruments like anemometers (wind speed), barometers (air pressure), or even sophisticated weather software gives you real-time data on current conditions as well as forecasts. By staying ahead of changing weather patterns, you can make informed decisions about adjusting your route or seeking shelter when needed, making your nautical experience not only safer but also more pleasurable.
Now, let’s venture into the realm of autopilots. Embracing technology in sailing often means relinquishing control, but not in this case. Autopilots take some of the workload off your shoulders by automatically steering the boat as per preset instructions. This feature allows you to free up valuable time to enjoy the company of your crew or simply immerse yourself in the serenity of the sea. Whether it’s a long passage or a short trip, having an autopilot ensures precise and consistent navigation while adding a touch of luxury to your sailing experience.
Lastly, we cannot forget about AIS (Automatic Identification System). This ingenious tool enhances safety at sea by exchanging vital information between vessels. AIS displays data such as vessel identity, position, speed, and course on compatible devices like chart plotters or radar screens. By knowing where other vessels are heading, you can avoid collisions and navigate safely through busy traffic zones. The peace of mind that comes with AIS is unparalleled; it allows you to focus on enjoying the wonders of sailing without constantly worrying about other ships lurking in the distance.
In conclusion, sailing navigation tools have revolutionized how we approach and enjoy our nautical adventures. From GPS providing real-time positioning information to electronic chart plotters offering detailed charts on demand – these tools have elevated our sailing experiences beyond what was once imaginable. Weather instruments keep us informed about changing conditions while autopilots ensure smooth journeys with added comfort. And lastly, AIS serves as a guardian angel guiding us through crowded waters safely.
So why limit yourself? Embrace these advanced technologies because they aren’t just enhancements; they are catalysts for unforgettable moments and unbeatable memories on the high seas!
Exploring the Various Types of Sailing Navigation Tools
When embarking on a sailing adventure, navigation tools become your best friends. No matter how experienced you are as a sailor, having the right tools at hand is essential to ensure a safe and smooth voyage. In this blog post, we will delve into the various types of sailing navigation tools that every sailor should be familiar with. From traditional compasses to advanced GPS systems, let’s explore these indispensable instruments that keep sailors on course.
1. Compass: The trusty companion of sailors for centuries, the compass remains an essential tool onboard any boat. This simple yet ingenious invention uses Earth’s magnetic field to determine direction accurately. With its needle always pointing north, it allows sailors to navigate without relying solely on landmarks or celestial bodies.
2. Sextant: Take a step back in time and imagine yourself as an adventurous sailor during the era of exploration. The sextant was their secret weapon for celestial navigation! Employing angles between heavenly bodies and the horizon, this handheld instrument allowed sailors to determine their latitude and longitude accurately by observing the sun, moon, stars, and planets.
3. Nautical charts: A sailor’s map filled with intricate details is what sets nautical charts apart from regular maps. These specialized charts provide vital information about water depths, hazards like reefs or rocks, currents, tides, buoy locations and aids to navigation – everything necessary for plotting your course effectively.
4. GPS (Global Positioning System): Stepping into the modern age of sailing technology brings us face-to-face with GPS devices—a marvel that revolutionized navigation techniques at sea. Using signals from satellites orbiting Earth, GPS receivers precisely calculate your position in real-time anywhere on the planet within moments!
5. Electronic Chart Plotter: Imagine combining a nautical chart with GPS technology – introducing the electronic chart plotter! These smart devices display navigational data directly onto digitalized marine charts based on input from GPS or other sensors onboard your vessel.
6. Radar: Don’t let fog or darkness ruin your voyage—get equipped with radar! Using radio waves, radar allows sailors to detect and locate nearby vessels, landmasses, or hazards even in adverse weather conditions. It provides an invaluable early warning system for collision avoidance.
7. AIS (Automatic Identification System): A more recent addition to the world of sailing tools is AIS. This sophisticated technology enables ships to communicate their positions, course, speed, and identification information to each other electronically. It enhances situational awareness by displaying real-time data about surrounding vessels on a chart plotter or dedicated AIS display.
8. Logbook: While not a navigation tool itself, keeping a logbook remains crucial for sailors to record essential information about their journey. Documenting details like distance sailed, course changes, weather conditions, and any notable events aids in assessing progress and ensuring accurate navigation when planning future voyages.
As you set sails towards your next maritime adventure, make sure you equip yourself with these indispensable navigation tools. Whether you prefer the charm of traditional instruments like compasses and sextants or rely on advanced technologies such as GPS and radar, their combined use ensures safe passage through the vast seas while honoring the spirit of exploration that fuels every sailor’s heart. So get ready to navigate confidently as you conquer the waters using these various types of sailing navigation tools!
Step-by-Step Guide: Mastering the Art of Using Sailing Navigation Tools
Are you ready to embark on a thrilling sailing journey but feel overwhelmed by the vastness of the open sea? Fear not, for we have compiled a comprehensive step-by-step guide that will equip you with the skills to master the art of using sailing navigation tools. Whether you are a seasoned sailor or just starting out, this guide will provide you with detailed instructions, sprinkled with professional expertise, witty anecdotes, and clever hacks. So hoist your sails and let’s set sail towards greatness!
Step 1: Know Your Tools
Before we delve into the depths of sailing navigation, it’s crucial to familiarize yourself with the essential tools at your disposal. From traditional gadgets like compasses and charts to modern electronic systems such as GPS units and chartplotters – understanding their functionalities is paramount. Professional tip: Remember that having multiple navigation tools ensures redundancy and reduces reliance on a single source.
Step 2: Get Acquainted with Nautical Charts
Nautical charts are like blueprints for sailors; they reveal intricate details about water depths, currents, buoys, and hazards. Our witty suggestion: Think of them as treasure maps leading you to victorious seafaring escapades! Understanding symbols, scales, and depth contours will enhance your ability to interpret these masterpieces accurately.
Step 3: Master Celestial Navigation Techniques
Ahoy there! In an era where technology governs our lives, learning celestial navigation techniques can be seen as an ode to seafaring pioneers. By utilizing the sun’s position during daylight or stars’ alignment at night time (with sextants or star finding apps), ancient sailors established their location – proving that even before Siri existed, humans had ingenious ways of navigating.
Step 4: Navigate with Electronic Chartplotters
Tap into technological wonders by acquainting yourself with electronic chartplotters. These savvy devices combine GPS data with digital charts providing real-time boat positioning. With a touch of cleverness, you’ll be able to plan routes, mark waypoints, and even receive weather updates – all while calmly sipping your morning coffee.
Step 5: Tap into Weather Patterns
We can’t control the weather, but we can certainly make informed decisions based on meteorological forecasts. Understanding how to access weather data using satellite communication systems or internet resources provides valuable insights. Knowing which way the wind blows will allow you to plot an optimal course and avoid unwanted surprises mid-voyage.
Step 6: Embrace Radar for Safe Navigation
Picture yourself sailing through dense fog or encountering unexpected obstacles in low visibility conditions. Fear not! Radar is here to save the day. By emitting radio waves that bounce off objects and return as echoes, this ingenious device can detect other vessels or solid structures in your path. For an added touch of professionalism, don’t forget to dramatically exclaim “I’ve got them on radar!” whenever someone passes by.
Step 7: Utilize Electronic Navigation Apps
In this digital age, there’s an app for just about everything – including sailing navigation! Equip your smartphone or tablet with electronic navigation apps like Navionics or iNavX. With features like real-time AIS (Automatic Identification System) vessel tracking and integration with your onboard instruments, these nifty tools provide accurate information at your fingertips.
Step 8: Brush Up on Sailing Terminology
To truly master the art of using sailing navigation tools, familiarize yourself with nautical jargon that seasoned sailors use effortlessly. Cleverly incorporating expressions like “Make fast” (secure something tightly), “Head up” (steer closer to the wind), or “Prepare to tack” (change direction) will not only impress fellow sailors but also add a touch of wit and authenticity to your seafaring experience.
By following this step-by-step guide filled with witty banter and professional wisdom, you’ll soon find yourself navigating the open waters with confidence and mastery. So, seize the helm, adjust your sails, and embark on an extraordinary sailing adventure where you are the captain of your own destiny! Bon voyage!
Frequently Asked Questions about Sailing Navigation Tools Answered
Navigating the vast and unpredictable waters is no easy feat, which is why sailors rely on a wide range of navigation tools to ensure a safe and successful journey. If you’re new to sailing or simply curious about the tools used by experienced sailors, you’ve come to the right place. In this blog post, we’ll answer some of the most frequently asked questions about sailing navigation tools, unraveling their purpose and shedding light on their importance. So grab your sextant and chart plotter, and let’s set sail on this informative journey!
1. What are sailing navigation tools?
Sailing navigation tools encompass an array of instruments specifically designed to aid sailors in determining their position, plotting routes, calculating distances, monitoring weather conditions, and avoiding obstacles at sea. These instruments vary from tried-and-true devices that have been used for centuries to modern electronic gadgets that utilize advanced technology.
2. Which traditional navigation tools are still widely used today?
While technology has revolutionized many aspects of sailing, several traditional navigation tools remain widely used due to their reliability and simplicity. One such tool is the sextant—an intricate instrument used to measure angles between celestial bodies (like the sun or stars) and the horizon. By recording these measurements alongside precise timekeeping methods like using a chronometer or GPS device, sailors can accurately determine their latitude and longitude.
Another essential tool is the nautical chart—a detailed map specifically designed for maritime use. These charts provide crucial information such as water depths, coastal features, navigational aids like buoys or lighthouses, as well as other hazards such as rocks or wrecks.
3. How have modern electronic gadgets enhanced sailing navigation?
Advancements in technology have undoubtedly made navigating at sea more efficient and precise than ever before. Electronic Chart Display and Information Systems (ECDIS) have revolutionized traditional paper charts by providing real-time positioning information, automatic route planning, and up-to-date data on tides, currents, and weather conditions. GPS devices have also become a staple onboard, offering accurate positioning using satellite signals.
Furthermore, radar systems play a vital role in modern navigation, allowing sailors to detect other vessels or obstacles even in poor visibility conditions. AIS (Automatic Identification System) has also gained popularity by providing information about nearby ships’ positions and intentions, further enhancing safety at sea.
4. Are there any tools specifically for measuring wind direction and strength?
Yes! Sailing relies heavily on harnessing the power of the wind, so it’s crucial for sailors to monitor its direction and strength continuously. Anemometers provide real-time measurements of wind speed, while wind vanes indicate its direction relative to the boat’s heading. These tools are often integrated into electronic displays known as marine instruments or multi-function displays (MFDs) that consolidate various data points simultaneously.
5. Can smartphones be used as sailing navigation tools?
While smartphones offer many useful applications for sailors through various navigation apps available on both iOS and Android platforms, they should not be solely relied upon for critical navigational tasks. Smartphones may lack the durability and accuracy required in demanding maritime environments. However, when combined with traditional navigation tools or dedicated marine electronics designed for harsh conditions, smartphones can serve as a useful supplementary aid.
In conclusion
Sailing navigation tools encompass a wide variety of instruments that cater to different aspects of maritime exploration. From traditional devices like sextants and nautical charts to modern electronic gadgets such as GPS devices and ECDIS systems—the options available today are vast. By combining time-honored techniques with cutting-edge technology, sailors can ensure their safe passage across oceans while embracing the rich history behind these essential navigational tools. So whether you’re charting your course using celestial sightings or plotting your route with digital precision, rest assured that you’ll be well-equipped to navigate any voyage that lies ahead.
Essential Sailing Navigation Tools Every Sailor Should Have
Title: Navigating the Seas with Finesse: 8 Essential Sailing Navigation Tools Every Sailor Should Have
Introduction: Embarking on a sailing adventure is a thrilling endeavor that demands precision, knowledge, and well-equipped navigators. Whether you’re gliding through calm waters or tackling stormy seas, having the right tools at your disposal can be the difference between smooth sailing and being adrift in confusion. So, let’s dive into a world where professional seamanship meets wit and cleverness as we uncover the eight essential sailing navigation tools every sailor should have.
1. Nautical Charts or Electronic Chartplotters: In a digital era, it’s easy to overlook traditional nautical charts. However, these age-old maps remain an invaluable asset for sailors of all levels. Combining meticulous detailing and rich information about tides, currents, hazards, and landmarks, nautical charts offer a tangible connection to maritime history while providing a reliable backup if electronic systems fail. On the other hand, electronic chartplotters merge precision with convenience by displaying your vessel’s position on an electronic screen alongside vital navigational data.
2. Compass: No sailor worth their salt would dare leave port without a trusty compass by their side. This timeless instrument guides seafarers by pointing towards magnetic north—allowing for accurate course plotting and orientation even when GPS signals are disrupted or unavailable due to solar flares or malicious interference.
3. GPS Navigation System: While maintaining appreciation for traditional methods, harnessing modern technology like Global Positioning System (GPS) navigation systems is essential for sailors seeking precise positioning accuracy in real-time. These compact devices receive signals directly from orbiting satellites to pinpoint your location with impressive accuracy—an indispensable tool when entering unfamiliar waters.
4. Binoculars: As Jack Sparrow famously said in Pirates of the Caribbean: “It’s not just about living forever; it’s about living with yourself forever.” Similarly, binoculars empower sailors to survey the vast horizons, keeping a watchful eye for approaching vessels, navigational markers, or land masses. Investing in high-quality binoculars enhances safety and situational awareness while allowing you to take in breathtaking coastal views like a true seafaring connoisseur.
5. Automatic Identification System (AIS): Conjuring thoughts of James Bond’s gadgets, AIS is an impressive technology that brings efficiency and sophistication to the world of sailing navigation tools. This maritime transponder system allows vessels equipped with AIS to broadcast their identities, positions, course, speed, and other critical information to nearby ships. Integrating AIS into your navigation repertoire adds an extra layer of security by helping you avoid potentially dangerous encounters.
6. Marine Radar: When fog blankets the sea or darkness falls upon your watery realm, reliable marine radar becomes a sailor’s trusted ally. Operating on principles similar to those used by bats and dolphins, radars emit radio waves that bounce off objects—detecting obstacles such as other boats, islands, or even wayward buoys along your intended route. With its ability to penetrate inclement weather conditions or lackluster visibility spells—it’s like having Superman’s X-ray vision when it matters most.
7. Sextant: Bringing back a touch of romantic nostalgia from days of yore, the sextant remains pivotal for skilled navigators aiming for impeccable celestial navigation proficiency. Reflecting light off celestial bodies such as the sun or stars onto mirrors and measuring angles accurately can determine latitude at sea without relying solely on electronics. A sextant symbolizes the profound connection between sailors and the night sky—an elegant tool steeped in mystique.
8. Handheld VHF Radio: Last but not least on our list is the trusty handheld VHF (Very High Frequency) radio—a staple communication tool for any sailor venturing beyond sight of land or near busy shipping lanes. In the event of an emergency, it provides a direct line to help—a vital feature when time is of the essence. Additionally, VHF radios allow sailors to communicate with nearby vessels or harbormasters, enhancing safety and exchanging valuable information about navigational hazards or weather conditions.
Conclusion: By embracing these eight essential sailing navigation tools, every sailor can navigate the seas confidently with a blend of professional expertise and wittiness. Armed with nautical charts alongside electronic chartplotters, compasses next to GPS with binoculars in hand, AIS coupled with marine radar—all topped with sextants and handheld VHF radios—you’ll embark on maritime adventures fully prepared for whatever Mother Nature throws your way. So hoist those sails high, unleash your inner mariner spirit, and let these tools be your guiding stars amidst the vast oceanic landscape!
Tips and Tricks for Maximizing the Benefits of Sailing Navigation Tools
Title: Unlocking the True Potential of Sailing Navigation Tools: Expert Tips and Clever Tricks
Introduction: Setting sail on a vast ocean is both thrilling and unpredictable. To navigate these expansive waters with confidence, sailors rely on the power of cutting-edge navigation tools. However, merely possessing these tools is not enough; understanding their intricacies and utilizing them to their full potential can significantly enhance your sailing experience. In this blog post, we will share invaluable tips and clever tricks that will unlock the true benefits of sailing navigation tools, helping you embark on memorable seafaring adventures.
1. Familiarize Yourself with Your Sailing Navigation Tools: To harness the full potential of any tool, comprehensive knowledge is essential. Take the time to familiarize yourself thoroughly with your chosen sailing navigation tools before embarking on any voyage. Read the user manual, attend training sessions or workshops offered by manufacturers or experts in maritime navigation technology.
2. Master Electronic Chart Plotter Systems: Electronic chart plotters are versatile tools that simplify navigation significantly. Maximize the benefits they offer by mastering their use beforehand. Learn how to mark waypoints effectively, plot courses accurately, and customize settings to match your preferences.
3. Stay Updated with Satellite Imagery: Sailing involves engaging with constantly changing situations at sea. Be sure to utilize satellite imagery services provided by navigation tool manufacturers or third-party providers regularly to stay updated on real-time weather conditions, currents, and other navigational hazards that could affect your voyage.
4. Utilize AIS for Enhanced Safety: Automatic Identification System (AIS) has revolutionized maritime safety by enabling vessels to track each other’s movements accurately. By integrating AIS data into your sailing navigation system, you gain valuable information about nearby ships’ speed, course, identification details while ensuring effective collision avoidance techniques.
5. Leverage Voyage Logging Features: Voyage logging features available in modern navigation systems provide an excellent means to review past journeys, learn from experiences, and improve future performances. Utilize these features to document critical highlights, record adjustments to navigation plans and evaluate your overall performance as a sailor.
6. Combine Traditional Navigation Techniques: While sailing navigation tools have become more advanced, they shouldn’t replace traditional navigation methods completely. Knowledge of traditional techniques such as celestial navigation, dead reckoning, and pilotage will complement your digital tools and act as reliable backups when facing unforeseen circumstances or technological failure.
7. Optimize Power Consumption: Sailing journeys can be lengthy, requiring efficient use of available power resources. To maximize benefits without compromising safety or convenience, optimize the power consumption of your navigation tools by adjusting brightness settings and disabling unnecessary features when not required.
8. Explore Third-party Navigation Apps: In addition to conventional sailing navigation instruments, explore third-party smartphone apps that offer additional functionalities such as tide predictions, marine charts port directories, anchorage guides, local points of interest and more. These supplementary apps can enhance your overall navigational experience while offering handy information at your fingertips.
9. Take Advantage of Online Communities: To expand your knowledge base on sailing navigation tools further, engage with online communities comprising experienced sailors and maritime enthusiasts. Participation in dedicated forums or social media groups provides opportunities to discuss tips and tricks related to specific tools or troubleshoot any challenges you may encounter during your voyage.
Conclusion: Navigating the vast expanse of the ocean is immensely gratifying when armed with proper sailing navigation tools utilized to their fullest potential. By implementing the tips and tricks provided in this blog post—familiarizing yourself thoroughly with your chosen toolset; mastering electronic chart plotters; staying updated through satellite imagery; leveraging AIS for enhanced safety; utilizing voyage logging features effectively; combining traditional techniques with modern technology; optimizing power consumption; exploring third-party apps; and engaging with online communities—you are well-equipped to embark upon exhilarating seafaring adventures while maximizing the benefits of sailing navigation tools. Bon voyage and safe travels!
Recent Posts
Sailboat Gear and Equipment
Sailboat Lifestyle
Sailboat Maintenance
Sailboat Racing
Sailboat Tips and Tricks
Sailboat Types
Sailing Adventures
Sailing Destinations
Sailing Safety
Sailing Techniques
Water Sports
Accessories
Navigation Buoys And Markers Explained With Meaning
Buoys and markers serve to direct the operator of the water vessels on the safe course to take. They warn the operator of the underlying dangers in the waterways. Navigation buoys and markers are also effective navigation aid in directing the water vessel operator on the best route to use.
They aid in determining the safest way through the waters. The functions of the buoys, lights, and marks in navigation serve equivalent to those of traffic lights and road signs for drivers.
Navigation Buoys & Markers
In the navigation system, each mark features its color, shape, top mark, alongside the light. Boaters and other watercraft operators should acquaint themselves with the different meanings of each mark. By doing so, they can navigate safely to reach their destinations.
Every boater is therefore advised to carry along a navigation chart. The chart is essential in determining your location. It also serves to familiarize one with the features found in the waterway. The chart features markers, buoys, beacons, and even lighthouses.
It is essential to know that, when heading upstream, red buoys are present and are on the right side. When heading downstream, green buoys are on your left starboard, and they seem reversed.
Navigation Buoys And Markers That We Need To Know
Lateral marks.
Lateral markers are a navigation aid that serves to indicate the extent of safe water. The markers incorporate colors and numbers to pass the information.
There are different types of lateral marks; port, starboard, and even single lateral markers. Both the port and the starboard are best recognized as the lateral marks. The functionality of the different markers differs.
Port Hand Markers
Port hand markers feature different shapes. They are represented by red colors and also red lights. At the top, they are designed to have a can-shape. The can shape also known as a buoy. When lit, the left-hand markers display a flashing red glint of light.
Port Hand Lateral Mark
Starboard Hand Markers
Starboard markers feature a cone-shaped top mark. They are green in color. When lit, they exhibit a green flash of light. They are designed to have varying shapes. However, watercraft operators are advised to sail between the port and the starboard markers if they are in proximity.
Starboard Hand Lateral Mark
Single Lateral Marks
It is not often that you find lateral marks in pairs. Therefore, it is upon oneself to decide which side is safe to pass. The safest side through lateral navigation markers depend on; whether traveling towards or away from the sea. When sailing upstream, it denotes that you are sailing away from the sea. When one is sailing downstream, it signifies that one is traveling towards the sea.
Watercraft operators should know that, when traveling upstream, one should keep the red port hand marks on the left side. At this point, the green starboard hand marks should be on the right side. It is different when traveling downstream where the red left-hand marks should stay on the right side. In contrast to when sailing upstream, the green starboard hand mark should stay on the left-hand side on your way downstream.
They feature a red color. They are cone-shaped and are marked with even numbers. They are lateral navigation aids.
They are cylindrical shaped. They feature a green color. Cans are marked with odd numbers
Cardinal Buoys
Cardinal buoys serve to give the direction of deeper waters away from water dangers. The dangers may be reefs, shallow areas, or even buoyant water surfaces. The cardinal marks give the compass direction towards the safe water. They appear painted with black and yellow colors. The cardinal buoys indicate the location of danger for each of the four cardinal points. They include;
North Cardinal Buoy
Its location indicates that safe waters are in the northern direction. It features a yellow coloration at the bottom and it’s black at the top. The coloring is equal for both black and yellow colors. And, they are above the waterline.
It also features two cones as the top marks. The cones are black, and they lie above each other. The points face upwards. When lit, the buoy features a continuous white flash of light. But, when not lit, it remains spar shaped.
East Cardinal Buoy
Its location indicates that safe waters exist on the eastern side of the cardinal. It features a combination of yellow and black colors.
Even so, the yellow band is broad and horizontal and usually in the middle. If it features a top mark, it is two black cones. The cones lie above each other bases. When lit, it displays a white color that flashes in a group of threes. The flashes are rapid.
South Cardinal Buoys
Its location indicates that the safe waters exist on the southern side of the buoy. It has an equal color of yellow and black. The coloring is above the waterline.
South Cardinal Buoy
The upper part of the buoy is yellow whereas the lower part is black. If the buoy features a top mark, they exist as two black cones. The cones lie above each other their points pointing downwards. The buoy features a white light when lit. The light gets exhibited in groups of six which occurs very quickly. After, the lights get followed by a long flash.
West Cardinal Buoys
The location of the west cardinal buoys suggests that the deeper waters exist on the western side of that buoy. It features a yellow color which is separated by a broad black band.
West Cardinal Buoy
Its top mark features two cones that lie above each other. The cones’ points face each other. When lit, the buoy exhibits a white color which flashes in a group of nine. The flashes are rapid. If in any case, the buoy has no light, it is spar-shaped.
Isolated Danger Mark Buoys
The buoy indicates the presence of danger such as rocks and shoals. The waters around the buoy are navigable only when the vessel does not get too close. The buoy is black, featuring one or more horizontal red bands. At the top, they have two black spheres.
Isolated Danger Mark
When lit, the buoy exhibits white flashes of light in groups of two.
Safe Water Marks
Safe water marks indicate the existence of navigable waters all around the buoy. The buoy has red and white vertical stripes. The top mark features a red sphere.
Safe Water Mark
When lit, the buoy exhibits a white flash of light that lasts for about ten seconds. And, after every ten seconds, the flash is on again.
Special Mark buoys
The buoy serves to indicate the presence of special features. Such a feature may be pipelines or cables. They can also indicate the presence of a channel within a channel.
Special Mark Buoy
The way out through such special features is indicated in the boating charts. The buoy features a yellow color, and an X indicates the top mark. When lit at night, the buoy exhibits a yellow flash of light.
Emergency Wreck Marking Buoy
They are useful in indicating new dangers and wreckage. They feature some vertical blue and yellow stripes. The top mark is a yellow cross.
They are designed to have either a spar or a pillar shape. When lit, the flash of blue and yellow light alternates in a span of about one minute. Before another light flash, a moment of about half a second gets marked with darkness.
Non-Lateral Markers ( Information And Regulatory )
They inform the watercraft operators about another topic alongside an area of safe waters. Commonly used are the regulatory markers. The markers are white and utilize orange markings and black lettering. They include;
Squares (Information)
They deliver information about where to find food, supplies, or even repairs. They also give information about the direction.
Regulatory Markers
Restricted Operations Mark
This mark with a circle means that only regulated operations are permitted in this zone.
A white buoy with orange bands at the top and bottom. In the middle with the diamond means danger. Usually, the danger is lettered.
A cross inside the diamond signifies that boats can not enter that area.
Diving Buoy
It serves to mark an area where activities such as scuba are taking place. The buoy features a white color with a red flag of above fifty centimeters square. The flag has a white diagonal stripe. When lit, the buoy exhibits a yellow flash of light
Mooring Buoys
They serve to indicate the anchoring zone. They are white, featuring a blue horizontal band. Mostly, they are found in marinas.
It’s important to know where we can anchor. Also, we must know where we should avoid anchoring .
Inland waters Obstruction Markers
White and black vertical stripes are the colors of these buoys. It indicates an obstruction to the navigation. We should not go between these marks and the closest shore.
Inland Waters Obstruction Mark
Intercoastal Waterway Marks (ICW)
These yellow squares and triangles are used to mark other waters. ICW marks are found from New Jersey To the Mexican border. Yellow triangles should be kept on the starboard side (right) of the vessel and the yellow squares should be kept on the port (left) side of the vessel.
Intercoastal Waterway Markers
A yellow horizontal band does not provide any lateral information but, marks the ICW.
Leads and Sector Lights
Leads serve to guide water vessels through the waterway. Not only navigation buoys and markers but also the leads are navigation aids through the water. When in the waterway, your vessel should always remain on the safe course.
When it is dark, one should ensure that all the red white, and green lights are vertically aligned with each other. The boaters’ charts and maps have leads. Thus, they are easy to identify.
The chart will help one familiarize himself with the leads before he or she enters an insecure waterway.
Even though, sector light varies from one to the other. When present with a red sector light, one should turn to starboard. If the color is green, one should turn to port.
But, the white color sector light indicates that it is safe to take the course. In some sectors, the lights may mark the entrance to the port. Therefore, it is wise to know that the white sector is the shipping way to the sea.
Blue Middle Channel Mark
These are fixed blue lights. They indicate the middle of a channel. The buoy is useful for a vessel passing below a bridge to maintain its track. However, on boating charts, the blue middle channel marks appear as a star. The star gets symbolized with a flash.
Speed Signs
Speed signs are installed in the waterway to ensure safety. When sailing, the watercraft operator should ensure that he or she travels within a limited speed.
Otherwise, exceeding the speed incurs penalties. Mostly, the speed restrictions are between Four knots and fifteen knots. Every speed determines the kilometers to travel with the speed.
Navigation Through Channels and Rivers
A channel is taken to mean a place whereby it is safe to navigate through. Some channels, though navigable, are not marked. When navigating through channels, it is advisable that one keeps to starboard. Normally, a channel can get too narrow, and thus, it is a must that the sailor keeps to starboard.
However, when sailing along estuaries and rivers, watercraft operators are advised to be super cautious. The reason is that; it is not always that the shallow and navigation hazard zones get marked with the buoys and markers. Even when marked, the shallow area may shift position.
When negotiating bends, extra caution is required. One should look out for oncoming boats to avoid accidents. It is also advisable not to cut corners.
Similarly, in channels and other shallow water stretches, rules and regulations for safety still abide. Forever, it is safe to keep to the starboard which is the right-hand side.
One should be cautious not to impede the passage of large vessels. Water alterations may result to change of the course. Thus, one should be well informed about the channel.
Fishing in channels can obstruct other watercraft from the easy passage. It is therefore right not to go fishing in narrow channels.
The watercraft operator should ensure that the wash they create does not impact negatively on life in the water or constructions in progress. Different sites get placed with no wash sign. Thus, the vessel operators should ensure that they abide by the rules.
It is wise to be cautious and look behind to see whether your vessel is creating any wash. The excess wash may endanger other vessels and also destroy plants in the water. It is fair enough to adjust to the necessary speed that is wash free.
It is upon all watercraft holders to know their way through the waters. One should get acquainted with every sign and symbol and still know their meaning. By doing so, boating safety is enhanced.
If we find the navigation aids or buoys and markers are not in good condition or not used in the right place, we must inform the nearest US Coast Guard unit.
Leave a Comment Cancel reply
Channel Markers & Navigation Aids: 3 Types of Buoys
Table of Contents
Last Updated on February 24, 2023 by Boatsetter Team
Almost 72 percent of the Earth is covered in water, making it seem like a boater’s paradise where sailors and powerboaters alike can climb onboard their vessel and head for the open seas without a care.
Although there is a lot of water sloshing around on this planet, much of it is covering places too rocky, too shallow, or too dangerous which makes it extremely important that navigational aids show boaters where to go and what to avoid.
In every place, unseen obstructions and dangers exist below the water’s surface, making it important to understand the different types of buoys and markers that indicate where captains can find the underwater “roads and trails” that safely lead back home.
A wide variety of navigational aids, often referred to as buoys or channel markers, exists to protect boaters, property owners, and the environment, and help boaters find their way around.
Already Own a Boat? Earn an Average of $20K/season by Renting it Out on Boatsetter
Types of Channel Markers
Whether created by man or nature, the channels that provide deep water paths and help boaters get home with propellers intact must be clearly marked so vessel operators can tell where safe passage can be found.
Channel markers can be unlit triangular and square shapes perched on top of sticks, or well-lit red and green steel buoys anchored in place to keep captains from wandering into the rocks or mud.
The most important details boaters should learn about channel markers is how to understand what they are telling you.
Yes, the old adage “Red, Right, Return” is accurate, but only if you understand the meaning of the word “return.”
At the mouth of a harbor or port , the start of the channel will be clearly marked with a red and green buoy. If you are returning to port, the red buoy should be kept on your right, thus – RED on the RIGHT means you are RETURNING.
The opposite is true if you are headed out to sea. While leaving, keep the red on your left.
Once in the channel, there will be many places where only one marker is visible. Coming in from sea, a captain might pass a red marker on his right with no green on the left. Looking ahead, a green marker might be visible several hundred yards ahead.
By keeping the vessel between the markers and alternating red-right and green-left, the captain can stay in the channel and return safely to their home slip.
Navigation Lights
Whether found on a boat or on a marker or buoy, lights provide important navigation information to boaters returning to port in the dark.
Like channel markers, the red and green lights on top of buoys and larger markers tell captains how to find the channel and keep the vessel safely in deep water.
Like channel markers, red on the right means you are returning to your home port.
At the entrance to a channel, both red and green will be visible, while further up the channel, only one or the other may be present.
By paying close attention, keeping a single red on your right (while returning) means you should look for a green light next and keep it on your left—even if it is once again paired with a red.
Learn more by reading Boat Navigation Lights: Understanding the Basics.
Graphic Courtesy of U.S. Coast Guard
Buoys and Other Boating Regulatory Markers
To protect other boaters, their property, and the environment, boating regulatory zones were created for different purposes. The boundaries around these zones are defined with white markers with orange shapes, such as a circle or diamond, and are used to inform boaters of no wake zones, exclusion zones, or speed limits.
A white marker with an orange circle is used to inform boaters of no wake zones, slow speed zones, or other important information.
White markers with an orange diamond shape are used to tell boaters of hazardous conditions such as submerged objects, rocks, and other dangers.
White markers with crossed diamond shapes are used to keep boaters out of dangerous spots such as that great fishing hole that’s a little too close to the dam or waterfall, or an area where boating would present a danger to others, such as in a swimming area.
Other navigation markers for boats provide important safety or directional info, such as red and white flags alerting others that divers are in the water.
It is important to learn how to properly read and understand navigational aids before hitting the water. Like street signs, markers and other navigational aids provide boaters with important safety and directional info to help get them safely home.
Ready to Go Boating? Browse Available Boat Rentals Near You
Boatsetter is a unique boat-sharing platform that gives everyone — whether you own a boat or you’re just renting — the chance to experience life on the water. You can list a boat , book a boat , or make money as a captain .
Chuck Warren fell in love with boats at 9 years old while helping to restore his grandfather’s 1939 44-foot Elco cruiser. A lifelong boater, Chuck has experience operating large and small vessels on the waters of the Atlantic, Gulf of Mexico, Caribbean, and the Great Lakes.
During his 35-year marine industry career, Chuck has been the driver for several offshore powerboat racing teams, the chief engineer aboard a Caribbean research and salvage vessel, captain of a Florida Keys sunset cruise, and more.
Today, Chuck is a boating industry writer, copywriter, and captain who lives on his 40-foot boat in the summer when he isn’t delivering vessels around the Great Lakes or teaching new boaters to drive. Winters are split between the West Michigan lakeshore and wherever his travels take him.
Browse by experience
Explore articles
How To Have An Unforgettable Spring Break On A College Budget
5 Best Fishing Lakes in Arizona
7 Earth Day Activities for Boaters
Top 9 Apps for hard core boaters
Email Address
Password
--->
Marine Navigational Aids to Have Aboard Your Boat
By Randy Troutman
The U.S. Coast Guard stresses the importance of following the guidelines provided by them to promote boating safety. Those guidelines advise boaters on how to be prepared and ready for almost anything on the water by taking the guess work out of boating safety; and among other things has determined what is considered required boating safety equipment and navigational aids.
Marine navigational aids would consist of maps and charts, knowing the “Rules of the Road”, a two-way communication system, and a Global Positioning System.
It would be hard to find a person who is not familiar with what a “GPS” is and what they are used for. Many people have one in their automobiles and the number of those people with GPS for boats is growing.
Is it a good idea to have a GPS for boats, as part of the marine navigational aids on board your boat? Sure it is – but, maybe not as a stand-alone all in one navigational aid.
As a boater, you could use a regular GPS for your boat, whether it is a hand held or stationary mounted model. Since both the regular GPS and the GPS for boats will tell you where on earth you are and both will either have maps already downloaded or for a small fee, you can get maps downloaded from the Internet, either one would work in conjunction with the charts and maps.
But, when deciding which is best for you there are a few things you would want to keep in mind. Marine GPS for boats do have a few or a lot of other tricks designed for boaters, depending on the amount of money you want to spend, such as:
Water depth
Predicting tides
Charting and plotting a navigational course
Not only the “You are Here” feature but will remember the courses you take and will show you the way next time with the navigate to track feature
Fish finder options
Compass and charts stored within the gadget
Warn of obstacles in the path of the vessel
accurate speed, distance/time to way point and course made good readouts, as well as a digital compass
you can see where you are and where you are going even if you cannot see anything else, like in fog or bad weather
Man Overboard feature that with just a touch of a button the operator can mark the position of an incident
The costly ones can even send photographs in real-time of a storm many miles away
So, depending on the bells and whistles you require will determine the cost of the gadget. Any way you go, the GPS will be a good addition to your navigational aids.
It is said that maps and charts are the most important part of any navigational aids. Sailors have been exploring this world with the aid of maps and charts for centuries – that has not changed.
Maps and charts are very different from one another. Charts show what is beneath the surface of the water, what cannot be seen just by looking, but is necessary to know for safe and effective navigation, while maps only show the surface, and cannot be used to plot your course. There are too many things that weather and man has had effects on and maps are stagnate, charts are not. Charts and maps can be purchased online.
The next part of your Marine Navigational Aids is knowing the “Rules of the Road,” which is essential in boat navigation. The USCG states “Aids to Navigation Are the Waterways’ Road Signs.” Safely driving a car would be nearly impossible if you did not know street signs, stop signs, barriers, detours and even stop lights.
The USCG has a pamphlet – U.S. Aids To Navigation System – which they recommend be printed and kept on board as part of the navigational aids.
It is important to know the basics at least, and the more you know, the safer you, your family, and your boat will remain. You will learn what to do when you have to interact with other boats and how to read the charts – symbols and colors – which you will encounter on the water.
For instance, when in a channel, and you are heading to shore with open water behind you, make sure the red colors and lights remain on your starboard side (right side) and when heading out to open waters, the green colors and lights remain on your starboard side; some boaters use the “3R Rule” which is “Red, Right, Returning.”
When coming up to another boat, head to head, each would preferably pass port to port side with one short horn blast to alert your intent, and one short blast for agreement. If it is necessary to pass starboard, then two short horn blasts from both boats.
It is always the preference to pass on the port side with one short blast.
It is also imperative to learn the colors and images for warnings. Each color and design is there to give warning that for whatever reason, a boat is not allowed or permitted in an area.
Taking these extra steps, learning the “Rules of the Road,” is only part of the Marine Navigational Aids.
It is also recommended to have a two-way communication system of some sort on board. We all know that cell phones do not go every where and often lose their connectivity when out on the water.
Keeping everyone on board your boat and around your boat safe is the responsibility of the operator and is required by the USCG and your boat insurance company.
In A Historic First, 2 Chinese Container Ships Cross Paths Just 75 Nautical Miles From The North Pole
MSC Competes with Maersk For Denmark’s Largest Container Port of Aarhus
Watch: Cruise Ship Collides With Large Piece Of Drifting Ice In Alaska
Canadian Coast Guard Acquires Its First-Ever Autonomous Surface Vessel
30 Types of Navigation Equipment and Resources Used Onboard Modern Ships
Gone are the days when a ship navigation officer had to take help of unconventional ways to plan and navigate a voyage at sea. Today, a ship officer has myriad of marine navigation equipment which makes his life a lot simpler, thanks to the advancement in technology. Moreover, present-day seafarers are trained so as to know the functioning and operation of all modern day navigational equipment that has made the journey at sea smoother and safer.
With modern day facilities and automation, a ship today has several advanced navigation equipment systems which give accurate data for the voyage.
Download Practical Maritime eBooks With Amazing Bonuses:
Here are a few fantastic ebooks to get important maritime information in the next couple of minutes!
eBooks For The Smart Mariner
Herein, we have enlisted 30 types of navigational equipment, both old and new, which are present on all merchant ships.
1. Gyro Compass
It is used for finding the right direction. Unlike magnetic compass, gyro compass is not hampered by an external magnetic field. It is used to find the correct North Position, which is also the earth’s rotational axis to provide a stable directional source. Its repeater system must be present in the steering platform for emergency steering.
Read more about Gyro Compass here
Related Read: Top 3 Free Marine Compass Apps for Android Smart Phones
The seagoing vessels depend on S-band and X-band frequency radar system for navigation as it can detect targets and display the information on the screen such as the distance of the ship from land, any floating objects (an island, rocks, iceberg etc.), other vessels, and obstacles to avoid a collision. It is a rotating antenna which discovers the surrounding area of the ship.
Read more about ECDIS here .
Related Read: 15 Things To Consider While Using Radar On Ships
3. Magnetic Compass
The magnetic compass work in conjunction with the magnetic field of the earth and is the essential means of the direction indicating device. It is used to get a planned course for the voyage. This ship navigation equipment is usually fitted at the centre line of the ship on the monkey island. A transmitting magnetic type compass is fitted so that the output can be displayed in the bridge panel.
Related Read: What is a Binnacle On Ships?
4. Auto Pilot
The ship bridge layout is filled with equipment and tools used for navigation. The autopilot is considered to be one of the most effective bridge navigational equipment as it assists the human operator in controlling the ship by keeping the steering in autopilot, which allows them to concentrate on broad aspects of the operation.
It is a combination of hydraulic, mechanical, and electrical system and is used to control the ship’s steering system from a remote location (Navigation bridge).
Related Read: 10 Things to Consider While Using Auto-Pilot System on Ships
Automatic Radar Plotting Aid displays the position of a ship and other vessels nearby. The radar displays the position of the ships in the vicinity and selects the course for the vessel by avoiding any kind of collision.
This bridge navigational equipment constantly monitors the ship’s surrounding and automatically acquires the number of targets, in this case; ships, boats, stationary or floating objects etc., and plot their speeds and courses respectively. It also presents them as vectors on the display screen and constantly update the parameters with each turn of the antenna by calculating their nearest points of approach to own ship and also the time before this will occur.
6. Automatic Tracking Aid
Just like ARPA, automatic tracking aid displays the information on tracked targets in graphic and numeric to generate a planned layout for a safer and collision-free course.
Usually, A large size target measuring 800 m or more in the circumference is considered as a landmass and not tracked. Echoes less than 800 m are deemed as targets to be tracked.
Related Read: 10 Important Things To Do During Ship Collision Accident
7. Speed & Distance Log Device
This bridge equipment on a ship is used to measure the speed and the distance travelled by a ship from a set point. By calculating the same, ETA of the ship is adjusted or given to the port authority and agent.
8. Echo Sounder
There are many modern ship navigation tools present on ship and echo sounder is one of the instruments which has been in the play from almost 100 years now. It is used to measure the depth of the water below the ship’s bottom using sound waves which work on the principle of transmission of sound waves and an audio pulse which will bounce off a reflecting layer, returning as an echo to the source.
9. Electronic Chart Display Information System
ECDIS is a development in the navigational chart system used in naval vessels and ships. With the use of the electronic navigation equipment, it has become easier for a ship’s navigating crew to pinpoint locations, and attaining directions are easier than before.
Related Read: Pros and Cons of ECDIS Or Paperless Navigation Of Ships
10. Automatic Identification system
AIS is also among the types of a navigation system which helps to pinpoint the location and other navigational statistics of ships. AIS uses VHF radio channels as transmitters and receivers to send and receive messages between ships which endeavours to fulfil a lot of responsibilities.
As per the regulation enforced by The International Maritime Organisation (IMO), all passengers’ vessels and commercial ships over 299 Gross Tonnage (GT) sailing in the international to carry a Class A AIS transponder.
Read more about AIS here .
Related Read: Download: The Definitive AIS Handbook
11. Long Range Tracking and Identification (LRIT) System
LRIT is an international tracking and identification system incorporated by the IMO under its SOLAS convention to ensure a thorough tracking system for ships of 300 gross tons and above which are on international voyages across the world. This maritime equipment is fitted to improve the maritime domain awareness.
Read more about LRIT here .
12. Rudder Angle Indicator
Rudder angle indicator, as the name indicates, provides the angle of the rudder. The display is provided on the navigation bridge equipment console so that the ship navigation officer can control the rate of turn and rudder angle of the ship. The indication is also provided in the bridge wing and engine control room.
Related Read: How Does A Rudder Help In Turning A Ship?
13. Voyage Data Recorder
A VDR or voyage data recorder is a crucial instrument among the ship navigation equipment list which is installed on a ship to continuously record vital information related to the operation of a vessel. It contains a voice recording system for a period of at least the last 12 hours. This recording is recovered and made use of for investigation in events of accidents. The importance of VDR is similar to a “black box” installed on an airplane.
Read more about VDR here .
14. Rate of turn indicator
This navigational tool indicates how fast the ship is turning at a steady rate (useful during pilotage and manoeuvring ) , normally shown as a number of degrees turned. The rate a ship is turning is measured in degrees per minute. This essential tool assists a coxswain in steering a course safely.
15. GPS Receiver
A Global Positioning System (GPS) receiver is a display system used to show the ship’s location with the help of Global positioning satellite in the earth’s orbit.
With the record of the ship’s positions, the speed, course, and the time is taken to cover the distance between “two marked positions” can be calculated.
Related read: 5 Best Handheld Portable Marine GPS Devices
16. Sound Reception System
This acoustic system is required for a ship with a fully enclosed type bridge. It enables the navigating officer inside the cabin to listen to the sound signals (such as fog or ship’s horn) from other ships in the vicinity. This is fitted in ships bridge equipment console and helps the navigating officer to conduct the look-out duty as per the International Regulations for Preventing Collisions at Sea.
Related read: 10 Important Points Ship’s OOW Should Consider During Restricted Visibility
17. Navigational Lights
All boats – whether big or small are required to have night lights as a part of the navigation systems. This system was introduced in the year 1838 by the United States and then was followed by the United Kingdom in 1849. In the year 1889, the International Maritime Conference was established by the United States to establish proper guidelines to prevent marine accidents. In the year 1897, these rules were officially adopted internationally. The navigation lights are one of the most critical navigation equipment needed for sailing in high seas as it enables self vessel being clearly visible to other ships in the vicinity.
Read more about navigation lights here .
Related read: How Maintenance of Navigation Lights is Done On Ships?
18. Ship Whistle
A ship’s horn is known as a whistle and it is generally provided in duplicate. One is driven by air and the other is electrically operated. The whistle should be both manually and electrically operational from the bridge.
Among different instruments used in difficult navigation such as bad weather, fog, poor visibility, high traffic etc., the ship’s whistle or horn helps in alerting the nearby vessels.
During an emergency, the horn is used to notify and alert the ship’s crew and other vessels nearby.
19. Daylight Signalling Lamp
They are light-signalling devices used for emergency signalling in the day time (and can also be used during the night). Like other emergency ship instruments, the energy source for the lamp is not solely dependent on the ship’s main power supply. Also, the lamp enclosure should be weather and seawater- proof material.
20. Pilot Card
It is an informative booklet provided to the ship’s pilot . It consists of the dimension, draught, turning circle, manoeuvring, propulsion equipment and other navigation tools and instruments list of the vessel for safe manoeuvring.
Related Read: What Are The Duties of Officer On Watch When Pilot is On Board Ship?
21. Voyage Plan
A voyage Plan must be present onboard for referring past voyage plans or planning a future voyage. Among the different aids to navigation carried on a ship, a voyage plan is a tool for the deck officer to ensure the safety of the ship from a commercial and legal perspective too. It is prepared by gathering different information such as weather, meteorological, ship’s current and future cargo data, other navigational data etc.
Read more about Voyage Plan here
22. Forecastle Bell
It is used to mark the presence of the ship in fog or bad weather and sound the alarm in case of an emergency, along with the ship’s main horn or whistle.
Related Read: What to do When Ship Encounters Rough Weather?
23. Manoeuvring Booklet
In this booklet, the performance of the propulsion plant and the ship during manoeuvring in different weathers and situations is recorded for quick reference. The important content of the manoeuvring booklet are:
Ships General description
Manoeuvring characteristics in deep water
Stopping and speed control characteristics in deep water
Manoeuvring characteristics in shallow water
Manoeuvring characteristics in wind
Manoeuvring characteristics at low speed
Additional information
Related Read: Understanding Different Types Of Manoeuvres of a Vessel
24. Black Ball Shape
It is a day time signalling shape used to determine the characteristics of the vessel with a different arrangement of ball shapes. For e.g. a vessel at anchor will show a black ball at the foremost end of the forecastle and a ship not under command shows two black balls in a vertical line on her highest mast.
Related Read: Responsibilities Of Deck Officer During Anchoring Operation
25. Record of Navigation Activities
All the navigational activities which are performed by the ship’s officers and crew using different navigation equipment on the bridge must be recorded and kept on board for ready reference. This is mandatory and the most important log book.
Related Read: Different Entries To Be Made In Bridge Log Book of The Ship
26. Record of Maintenance of Navigational Equipment
The hard copy of all the ship navigation system and equipment list must be present as records onboard ships for ready reference of port and regulatory authorities and must be signed by master and duty officers of the ship.
Related Read: Daily, Monthly And Weekly Tests Of GMDSS Equipment On Board Ships
27. Wheelhouse Posters
Present in the Navigation bridge, it displays detailed information of manoeuvring characteristics of the ship including turning circle, stopping and manoeuvring characteristics of the vessel.
28. Transmitting Heading Devise
Transmitting Heading Devise or THD is an electronic device which is used to display the information of the vessel’s true heading. The THDs compliance information is provided in chapter V of the SOLAS Convention.
29. Black Diamond Shape
When the ship is being towed or when a vessel is unable to manoeuvres on itself, a black diamond shape is shown during the day time.
Related Read: Preparations For Emergency Towing Of Ship – 10 Important Points
30. Ship Flags
Various types of ship flags with different colours and signs are used to indicate a navigation ship’s position. Signal flags are they are commonly known, have been used since the ancient times and are still used on all vessels.
These are the different bridge equipment and their uses which are installed on the ship to assist the deck officer for navigating the vessel safely. If we missed any equipment or you want to add more to the list, please comment below.
Related Read: Understanding Nautical Flag Etiquettes
Top 10 Celestial Navigation Books
An Introduction to Fluxgate Compass
Bridge Equipment For Navigation And Control Of Commercial Ships
Bridge Equipment For Navigation And Control
For all maritime professionals
4 FREE Bonuses
Read Instantly
Guaranteed For 30 Days
Disclaimer : The information contained in this website is for general information purposes only. While we endeavour to keep the information up to date and correct, we make no representations or warranties of any kind, express or implied, about the completeness, accuracy, reliability, suitability or availability with respect to the website or the information, products, services, or related graphics contained on the website for any purpose. Any reliance you place on such information is therefore strictly at your own risk.
In no event will we be liable for any loss or damage including without limitation, indirect or consequential loss or damage, or any loss or damage whatsoever arising from loss of data or profits arising out of, or in connection with, the use of this website.
Do you have info to share with us ? Suggest a correction
Daily Maritime News, Straight To Your Inbox
Sign Up To Get Daily Newsletters
Join over 60k+ people who read our daily newsletters
By subscribing, you agree to our Privacy Policy and may receive occasional deal communications; you can unsubscribe anytime.
BE THE FIRST TO COMMENT
49 comments.
Thanx mate it was a short and sweet useful info.
Appreciate ur work.
this is educating for the beginners. i guess to make this site a complete marine site, more diagrams of navigational equipment and their function should be uploaded. good work
This page is helping many maritime student to know the fundamentals of marine navigation, especially student of Maritime Management Technology (MMT). Federal University Of Technology, Owerri (FUTO), In Nigeria. I love this page, kudos to the owner..!
very informative n interesting website for student and enthuisist
This is really navigation made easy….recommended for every navigator. A must read for every seafarers…i have really learnt enough.
i really like this pages, this information helps me a lot. i am a BSMT student.
nice site but needs full navigating equipment’s update for us maritime students in Nigeria, especially for our students in federal college of fisheries and marine technology that does not have a vessel to show and teach us practical things about ships
Very usefull
IF YOU HAVE ANY MARINE NAVIGATION REQUIPMENT PLEASE INFORM US
Gud and usefull
This remains my best maritime website ever seen very rich and educating, i have recommended it to a number of my friends in Nigeria and they were glad indeed. The marine combo pack has widen my knowledge as a young practitioner and i now stand tall among my colleaques. kudos to you for a job welldone.Love you all
Thank you so much for spreading the word. Let’s know if you would want to read anything specific at [email protected] . All the best!
realy i appreciate this website. thanx he given me a lot experience about navigation
Thkx for dishing out the entics of today nav equipment for modern seafarer
Thkx for dishing out the entics of today nav equipment for modern seafarers
So much very good
Very useful site for marine inventories
Very informativ & interesting websit
very important side for marine navigation
Thang you so much all
I learned a lot of navigation type And I like it. Thanks.
Thanks for present info. Can you guide me to such manufacturers who are providing all in one navigational equipment including but not limited to, gyro, compass, echo sounder, GPS, radar and displaying all functions on one screen? Thanks and looking for response to my query.
Its quite helpful to all those involved in marine duties,am frm the nigerian navy , on my radar plotter course 1 final yaer
This information is very useful for me.i preparing for AU seamanship exam.thanku
Thank you very much.
its really great system i like this
Thanks so muc for desining, this sites ,was very useful for me , because I am employee of marin company and I need to know about all of necessary devices a ship. Sanam from Iran
It will help us to those study inBSMT.please inform us a new update.
Can anyone give any insight on what are CRITICAL Navigation Equipment as required by Offshore Vessel Management and Self Assessment (OVMSA)? Thank you.
Just to thank you, atleast l learn types of Equipment inside the Ship. I really enjoy reading.
Marineinsight is the best site to give information about various shipping equipments in marine fields. It is very useful to all people who related to marine society.
@Papu: Thank you so much for the appreciation and support. ??
What is the most reliable navigational Equipment?
it help me to defend my log book. thanks al lot
thanks for this information
@Zubair: Cheers mate ????
I think you forgot the palindrome (palinorium).
On my years it was an important equipment.
Allot of information, for real I appreciate
@Aguma: Thanks a lot. Glad the information is useful.
Great Knowledge one should better be stuck on it Navy Captain Onana Essomba /cameroon Navy
What of Navtex, Inmarsat,Binacular,sextant. Emekpa Prosper from Nigeria.
Thanks for spreading your knowledge 👍
I want to navigation ebook because I am a seaman
Hey Deepak – You can check our digital guides for the same – https://learn.marineinsight.com/eBooks/e-deck-department/
very nice but you didnt mention at GIS and MDA
Leave a Reply
Your email address will not be published. Required fields are marked *
Subscribe to Marine Insight Daily Newsletter
" * " indicates required fields
Marine Engineering
Marine Engine Air Compressor Marine Boiler Oily Water Separator Marine Electrical Ship Generator Ship Stabilizer
Free Maritime eBooks Premium Maritime eBooks Marine Safety Financial Planning Marine Careers Maritime Law Ship Dry Dock
Shipping News Maritime Reports Videos Maritime Piracy Offshore Safety Of Life At Sea (SOLAS) MARPOL
WAIT! Did You Download 13 FREE Maritime eBooks?
Sign-up and download instantly!
We respect your privacy and take protecting it very seriously. No spam!
Product Reviews
The Small Craft Nav-Aid
Going analog for a quick fix
From Issue January 2016
To facilitate reading in magnetic bearings, this Nav-Aid has been marked with a line through the angle of the magnetic deviation for the area covered by the chart.
I like “big-screen” navigation, and in a small boat the only way I can do it is to use an old-fashioned paper chart. My handheld GPS often sits idle. While it’s great for detail, it’s hard to read in sun and needs seconds, even minutes to give me big-picture information. The challenge for chart users on little boats is determining one’s position or calculating course and distance to a spot, a “waypoint” in today’s language. The usual navigational aids—parallel rulers and large rigid-armed protractors—need a big flat place, out of the wind and spray. They don’t work on kayak decks, rowboat thwarts, or cockpit seats.
Chuck Sutherland, a serious paddler and scientist, solved the problem decades ago with his Small Craft Nav-Aid. It’s a compass rose printed on transparent plastic, with a monofilament line coming out of the center. Designed to be used on a kayak deck or an open-boat thwart, it provides results in a fraction of the time needed for conventional tools.
Using the Nav-Aid is simple. You place the center of the rose over a point of interest and align the edges of the plastic with the latitude or longitude lines on the chart. Stretch the line out to a second point and read the bearing off the rose. To get distance, mark the monofilament with miles according to the scale of your chart using a waterproof marker, and the line becomes a movable scale. When the Nav-Aid is aligned with the chart, its compass rose will read true north and you can calculate magnetic north by doing the math for the local variation or customize the Nav-Aid to read magnetic. With a waterproof marker, draw a line on the rose through the variation, and add two lines at 90 degrees, kind of like a sideways H. Orient these lines to the chart’s longitude and latitude, and the compass rose reads magnetic. (If you travel to another region with a different variation, draw new lines in a different color.)
Now you can read the magnetic bearing and distance from your position to any point on the chart in less time than it takes me to write this, much faster than using a GPS. I’ve customized my Nav-Aid a bit further by marking its lanyard with the scale of nautical miles; it’s really handy when trying to figure out non straight-line distances. You can also mark a scale on the side of the plastic.
The Nav-Aid comes with a booklet of instructions and a mini-course in chart use. There are some issues to be aware of. With the prevalence of non-NOAA charts, the scale on the chart may be different from the 1:40,000 system common to NOAA. You may need to put an additional set of markings on your monofilament in a different color or estimate the differences. I also make paper copies of the scales and put them in my chart case at a convenient place on the chart.
This 19th-century device is quite similar to the Nav-Aid in appearance and function.
Ben Fuller , curator of the Penobscot Marine Museum in Searsport, Maine, has been messing about in small boats for a very long time. He is owned by a dozen or more boats ranging from an International Canoe to a faering.
The Nav-Aid is available by mailing $8 to Chuck Sutherland at 2210 Finland Road, Green Lane, PA 18054. You can reach Chuck by email at [email protected] .
Is there a product that might be useful for boatbuilding, cruising or shore-side camping that you’d like us to review? Please email your suggestions.
Share this article
Join The Conversation
We welcome your comments about this article. If you’d like to include a photo or a video with your comment, please email the file or link.
Comments (4)
If you plan to mark distances on your monofilament line, be sure to use the scale on the right or left sides of the chart, as they show true nautical miles and fractions thereof. The scales at the top and bottom will throw off your calculations because the longitudinal lines converge as they approach the poles. Of course, you can also use the scale in the chart’s legend, but that is a part that I often trim away, as I try to make the charts as compact as possible to go into my waterproof chart case for using on the deck of my kayak.
I’m in Bellingham, WA, and much of my paddling is done in Canadian waters for which we use Canadian Hydrographic charts. These come in many different scales, and as far as I know, there is no “standard” scale for Canadian charts. This matters, because I believe errors often occur because the navigator isn’t aware of the scale of his chart. I read of one case where a power-boating family from out of state left Anacortes, WA to head for the San Juan Islands. They ended up in Victoria, BC because they expected the San Juans to be much larger islands than they actually are. The tone of the article about them seemed to indicate they were more amused than embarrassed by their blunder.
Basically, this is a Douglas Protractor with a line from the center, is it not? It’s a handy gadget for the job, I should think. Not that I use my Douglas Protractor much these days, but I’ll give serious thought to drilling a hole in its center and installing a length of monofilament. Not so sure about marking the lanyard with nautical miles. This will only work when using same-scale charts; okay if you’re mostly boating in the one area and likewise probably only using one chart, but could be a problem if you have to shift to another chart on a different scale. The point David Peebles made in his comment about using the side of the chart to take distances off is a good one. I thought everyone knew this, but frequently strike boaties who use the bottom edge and in consequence have erroneous ideas about distances.
The Douglas protractor is one of a handful of similar devices I’ve found on the web; it’s usually square and without a cord at the center. Another common device is a military protractor in a semi-circle with a string at the center and a perimeter marked not in degrees but in mils (6400 mils in a full circle). Christopher Cunningham, Editor
Most of the devices on the market are larger than the Nav-Aid and have more bells and whistles. I know about the scale problem as I’m using waterproof charts as much as the NOAA 1:40,000 series. One way around it is to mark some scales on the edges of the NAV-AID. After a bunch of years I broke my Nav-Aid that had more scales edge marked on it. You can also mark the string that you use as a lanyard with a different scale. If you do that, measure your distance with the monofilament then put it next to the other appropriate scale.
I usually use charts from Waterproof Charts, Inc. Their scales are a little closer to standard NOAA. You also need to adjust for the NOAA chart books.
Comments are closed.
Stay On Course
More From This Issue
From The Editor
The Wagner Education Center
I met Dick Wagner in 1976. I was fresh out of college, living in Seattle, and boatless; Dick and his wife Colleen ran a boat livery out of their home…
Boat Profile
The Cackler
Sam Devlin’s Cackler wears camo well, but if hunting’s not your thing, it can easily take on a different look and different duties: Its 14′4″ garvey hull and unobstructed cockpit…
The Adirondack Guideboat
The Adirondack guideboat traces its lineage back to the 1840s and the water-rich, road-poor Adirondack region of upstate New York. The myriad lakes, streams, and rivers there required slim, shallow-draft…
Handing Over the Helm
The boat ramp in Arcadia, Washington, lies at the end of a quiet road where a handful of modest houses nestle among cedar, fir, and alder trees. I stood on…
Rowing Rough Water
Sailors want wind; rowers don’t. Rough water can be a challenge to a rower’s skills, but I’ve found a few techniques that can help you reach a safe haven when…
The iBall Wireless Trailer-Hitch Camera
To get the two heaviest boats in my family’s fleet to the water, I have to back the car up to bring the trailer ball perfectly under the hitch. There’s…
I like “big-screen” navigation, and in a small boat the only way I can do it is to use an old-fashioned paper chart. My handheld GPS often sits idle. While…
Reader Built Boats
A Dragonfly Rowing Shell
When Bill Carlson decided to build a rowing shell, he had never sat in one, let alone tried to row one. But he had good shop skills: He’d already built…
More Product Reviews
BivyBag Duo
Everything about your day trip has gone wrong—you’re wet, cold, and far from your haulout—but if you’ve packed a bivy bag, your day has just gotten a bit brighter. The…
Ono Hatchet
I like the configuration of the Ono—a small hatchet with a big blade—and found it as able a cutting tool as the other Silky tools I’ve bought.
Malone’s MicroSport
Our small-craft collection includes a punt, two kayaks, seven sailboats, and a canoe; they range in length from 8′ to 17′ and in weight from 40 lbs to 150 lbs.…
Gaco Oarlocks
I had been curious about Gaco oarlocks for a long time, and finally decided to buy a pair to see how well they work. Instead of rotating in the socket…
Subscribe Today!
Become a subscriber today and you’ll recieve a new issue every month plus unlimited access to our full archive of backlogged issues.
Already a subscriber? Sign In
Subscribe For Full Access
Flipbooks are available to paid subscribers only. Subscribe now or log in for access.
U.S. Coast Guard Auxilary
Modern Marine Navigation
The boatus foundation and the united states coast guard auxiliary present modern marine navigation.
Prepare early and put your mind at ease.
About the course.
Whether you want to improve your navigational skills on your local waters, or you’re longing to cruise in foreign and exotic locations, Modern Marine Navigation will help you on your way to become a better boater conveniently, in your own home.
Interactive Exercises
Quiz Questions
With this course you will learn the basics of plotting, reading charts, identifying ATONs and using them to find your way on the water as well as an introduction to electronic navigation all presented online where you can study at your own pace. This is the only navigation course to be completely vetted by the US Coast Guard Navigation Center.
Rebuilding a RESCUED Sailboat. 4 Weeks Until We Move Back On Board
Sailing
Electronic Navigation Aid
McNabs Island Navigation Aid #djimini3pro
Going Greenland
The Sailing GPS
COMMENTS
PDF What You Need to Know About the Markers on the Water
What You See Depends on Where You Boat The Aids to Navigation system used on the majority of American waterways is referred to as the U.S. Aids to Navigation System or IALA-B. A description of USATONS follows. The Mississippi River and its tributaries follow a variation of USATONS called the Western Rivers Marking System.
Aids to Navigation
The Coast Guard is the agency responsible for maintaining aids to navigation on U.S. waters that are under federal jurisdiction or that serve the needs of the U.S. armed forces. On bodies of water wholly within the boundaries of a single state, and not navigable to the sea, the Coast Guard grants the state responsibility for establishing and ...
Navigation Buoys and Channel Markers 101: What Do the Red & Green
How to Read Channel Markers & Aids to Navigation. Okay: now that you know what all those red markers and green buoys mean—as well as the yellows, blacks, whites, and oranges—you can effectively navigate your boat through most waterways. Of course, there's more to getting where you're going than just understanding the navigational aids.
Understanding Aids To Navigation
Navigational aids can be found throughout coastal waters, inlets, harbors and more to help you boat safely and efficiently. Understanding what these aids to navigation mean is therefore vital to making the most of your time on the water. You'll be expecting other boats to follow these navigational aids and…
Sailboat Navigation: How to Navigate on Water
The Art of Sailboat Navigation. Navigating a boat is a unique skill that differs significantly from driving a vehicle on land. Unlike roads and signs, the waterways present a dynamic environment with minimal navigational markers, and visibility can be limited due to fog or the absence of recognizable landmarks.
Marine Navigation: How to Navigate a Boat
How to Navigate a Boat. Decide on your method: electronic navigation or traditional (analog) navigation. If using electronic navigation, start by operating your GPS or chartplotter. Make note of your real-time position, speed and direction of travel. To get from point "A" to point "B," create a waypoint. String waypoints together to create a ...
Navigation Rules
The U.S. Aids to Navigation System is a system maintained by the U.S. Coast Guard, consisting of visual, audible, and electronic signals which are designed to assist the prudent mariner in the process of navigation. The aids to navigation system is not intended to identify every shoal or obstruction to navigation which exists in the navigable ...
Ultimate Guide to Nautical Chart Navigation (Plotting, Reading)
Aids to Navigation. Permanent government or private marks will be on a chart with a detailed abbreviation describing their markings and how to identify them. Most aids are showing the way around a hazard, or the way to the best navigation channels. ... All sailboats sideslip a little, it's the nature of the forces that make a boat sail against ...
Sailing Navigation Tools: A Comprehensive Guide
Sailing navigation tools refer to equipment used by sailors for determining their position, planning routes, and navigating at sea. These include compasses, charts, GPS devices, sextants, and electronic navigation systems. These instruments aid in calculating direction, measuring distances, and ensuring safe passage during sailing expeditions.
Basic Intracoastal Waterway Navigation Aids
Buoys and Beacons. Buoys and beacons comprise the two main types of navigation aids, both on the water and on nav charts. Buoys are aids that float and are moored to the bottom. A buoy with a cylindrical shape and conical top is called a nun buoy. These are red with even numbers. A buoy with a cylindrical shape and a flat top is called a can buoy.
Navigation Buoys And Markers Explained With Meaning
Buoys and markers serve to direct the operator of the water vessels on the safe course to take. They warn the operator of the underlying dangers in the waterways. Navigation buoys and markers are also effective navigation aid in directing the water vessel operator on the best route to use. They aid in determining the safest way through the ...
Navigation Rules: Nav Aids
Learn the basic boating Navigation Aids. Learn more in person: https://www.centerhelm.com/classesNavigation Rules: Collision Avoidance https://www.youtube.c...
Navigational aid
Navigational aid. A navigational aid (NAVAID), also known as aid to navigation (ATON), is any sort of signal, markers or guidance equipment which aids the traveler in navigation, usually nautical or aviation travel. Common types of such aids include lighthouses, buoys, fog signals, and day beacons.
Channel Markers & Navigation Aids: 3 Types of Buoys
A wide variety of navigational aids, often referred to as buoys or channel markers, exists to protect boaters, property owners, and the environment, and help boaters find their way around. Already Own a Boat? Earn an Average of $20K/season by Renting it Out on Boatsetter. Types of Channel Markers
Ep 39: Understanding Navigational Aids
Welcome to Episode 39 of Carpe Diem Sailing. I'm back on my regular posting schedule and in this episode I go over the navigational aids systems in IALA Reg...
Best Marine Navigation Apps For 2020
iSail GPS. This is the cheapest app of those reviewed, and there aren't any signups, pop-up ads, or in-app purchases to spoil the experience. This isn't the most comprehensive navigation app, but a solid, easy-to-use, no-frills navigation tool. Easily measure distance between two points of interest, and import and export waypoints, routes ...
Marine Navigational Aids to Have Aboard Your Boat
The next part of your Marine Navigational Aids is knowing the "Rules of the Road," which is essential in boat navigation. The USCG states "Aids to Navigation Are the Waterways' Road Signs.". Safely driving a car would be nearly impossible if you did not know street signs, stop signs, barriers, detours and even stop lights.
30 Types of Navigation Equipment and Resources Used Onboard Modern Ships
3. Magnetic Compass. The magnetic compass work in conjunction with the magnetic field of the earth and is the essential means of the direction indicating device. It is used to get a planned course for the voyage. This ship navigation equipment is usually fitted at the centre line of the ship on the monkey island.
Navigation Lights
On any vessel, navigation lights have a specific color, (white, red, green, yellow, blue), arc of illumination, range of visibility, and location, as required by law and regulations. For the purposes of this course, we will concentrate on pleasure boats under 65 feet in length. Knowledge of navigation lights is important to a small-boat skipper ...
Rules of the Road : BoatUS Foundation
The Rules of the Road are published by the U. S. Government Printing Office, and are available in any boating supply stores. Every boat owner should have a copy, but they are mandatory to be kept on vessels over 12 meters (39.4 feet) in length. The Rules generally used in this course are Inland Rules, unless otherwise noted.
Navigation / Aids to Navigation
It's also important to know standard aids to navigation (ATONs) and abide by their warnings and advisories. Safe and responsible sailors understand tide charts, buoys, beacons, and lights. This quiz will test your knowledge and provide you with problems to help you study navigation and ATONs. Number of Questions: 14. Estimated Time: 15 minutes.
The Small Craft Nav-Aid
The usual navigational aids—parallel rulers and large rigid-armed protractors—need a big flat place, out of the wind and spray. They don't work on kayak decks, rowboat thwarts, or cockpit seats.Chuck Sutherland, a serious paddler and scientist, solved the problem decades ago with his Small Craft Nav-Aid.
Modern Marine Navigation
This course will teach you how to choose the proper Marine VHF radio for your boating style and give you the confidence to operate it effectively. Protect your boat from the ravages of wind, waves, torrential rain, tidal surges and high water. Learn about boating on the more than 30,000 miles of America's inland waterways - increase your ...
Historic peace boat that tried to stop nuclear weapon testing sails
The boat, which is owned and operated by Veterans for Peace as part of its Golden Rule Peace Boat Project, is visiting Portland until Sept. 18. The Golden Rule's next stops are Rainier (Sept. 18 ...
Trump threatens to withhold federal firefighting aid, blames Newsom
Trump threatens to withhold federal firefighting aid, blames Newsom by: Cameron Kiszla. Posted: Sep 16, 2024 / 10:11 AM PDT. Updated: Sep 16, 2024 / 10:33 AM PDT.


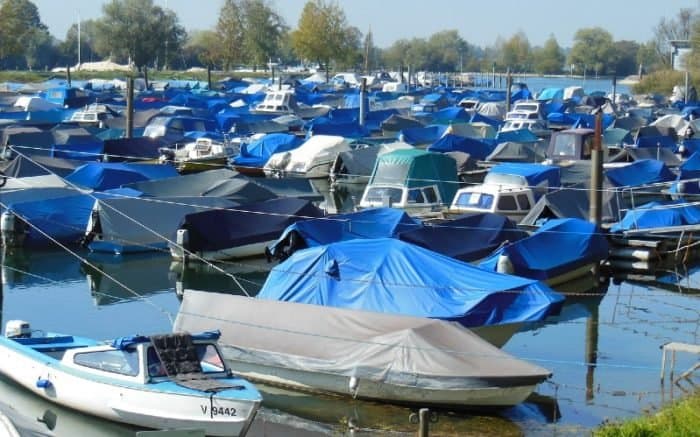
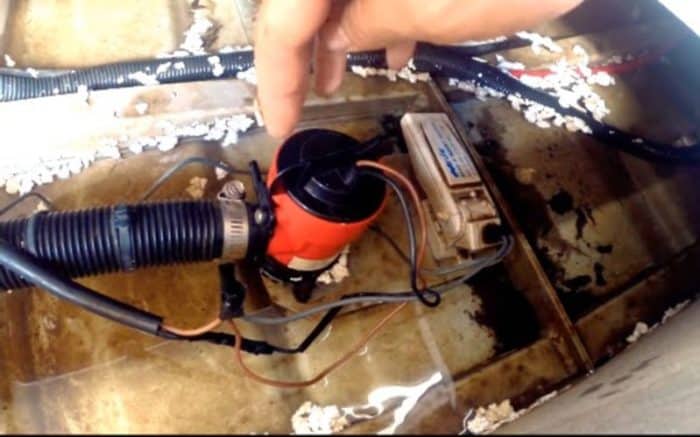


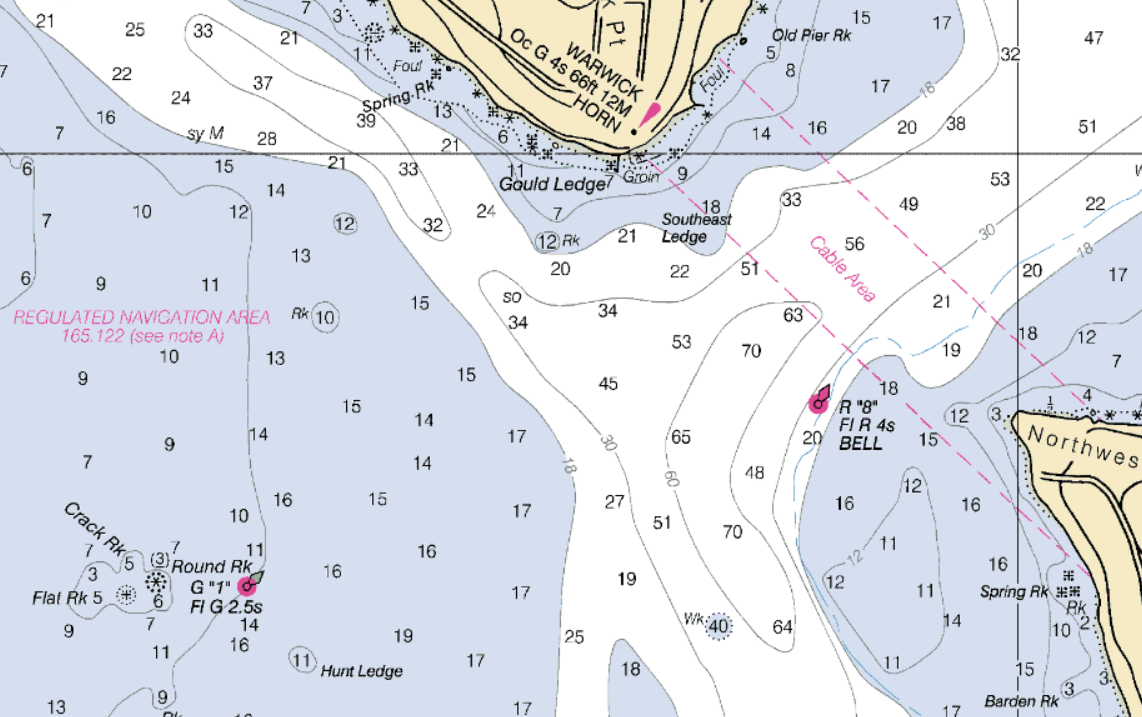
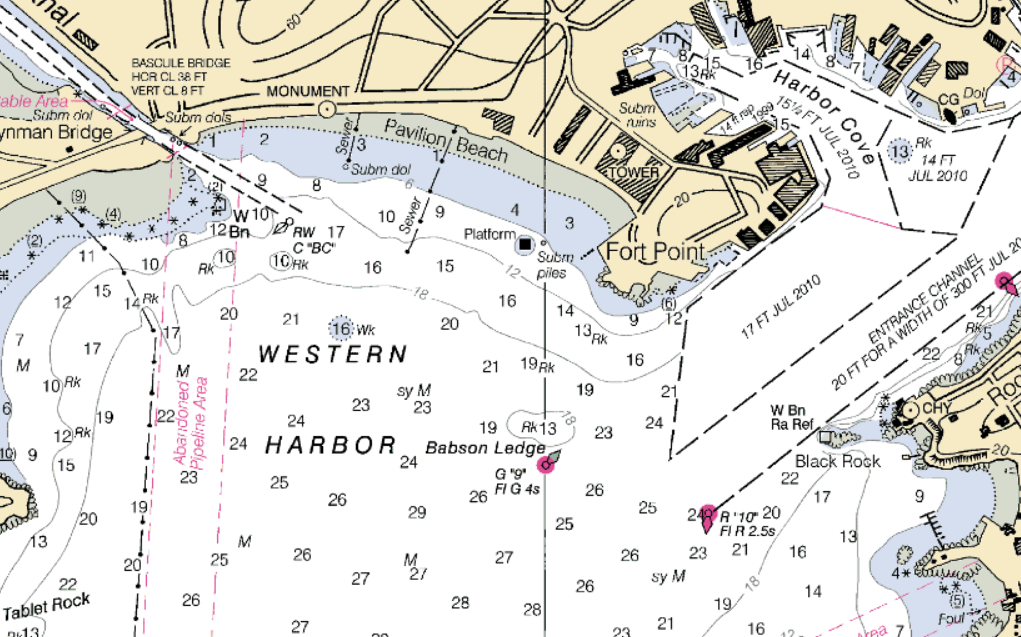


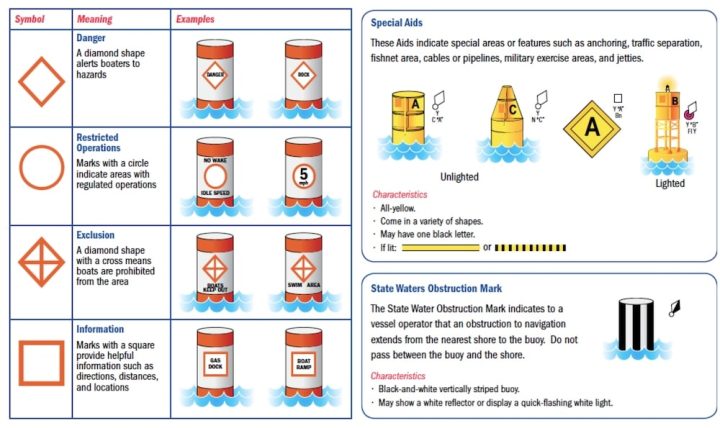


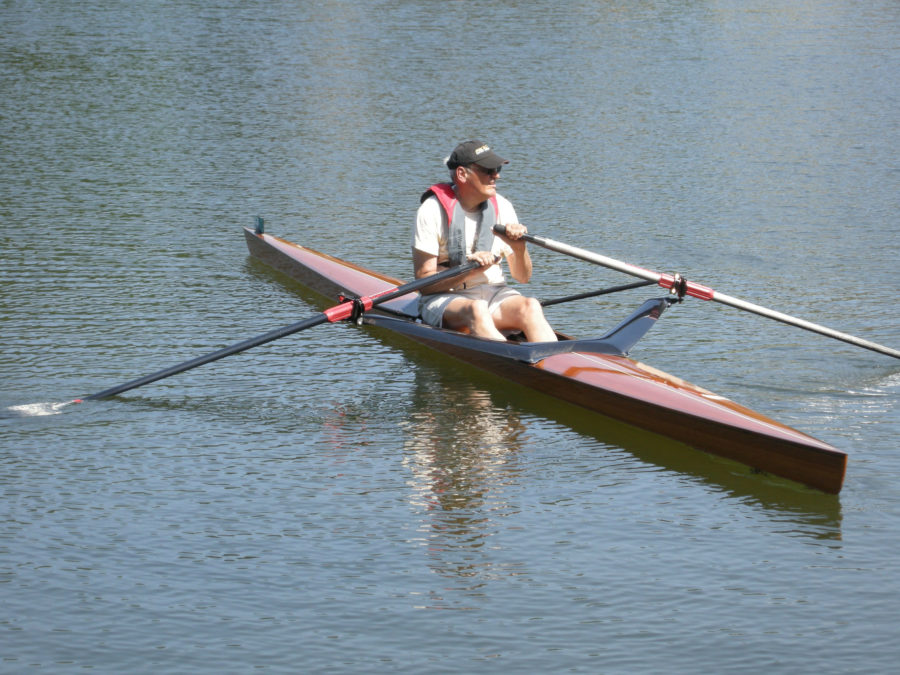

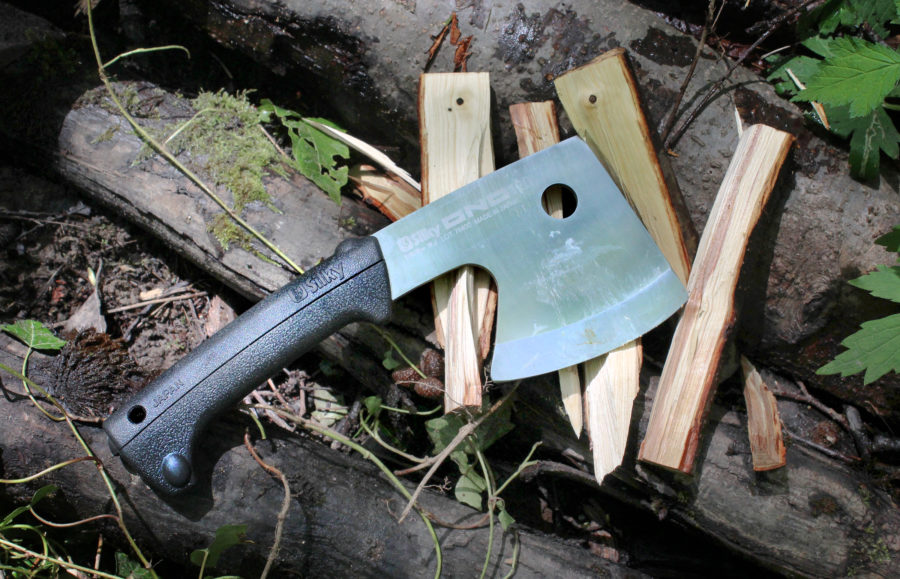


IMAGES
VIDEO
COMMENTS
What You See Depends on Where You Boat The Aids to Navigation system used on the majority of American waterways is referred to as the U.S. Aids to Navigation System or IALA-B. A description of USATONS follows. The Mississippi River and its tributaries follow a variation of USATONS called the Western Rivers Marking System.
The Coast Guard is the agency responsible for maintaining aids to navigation on U.S. waters that are under federal jurisdiction or that serve the needs of the U.S. armed forces. On bodies of water wholly within the boundaries of a single state, and not navigable to the sea, the Coast Guard grants the state responsibility for establishing and ...
How to Read Channel Markers & Aids to Navigation. Okay: now that you know what all those red markers and green buoys mean—as well as the yellows, blacks, whites, and oranges—you can effectively navigate your boat through most waterways. Of course, there's more to getting where you're going than just understanding the navigational aids.
Navigational aids can be found throughout coastal waters, inlets, harbors and more to help you boat safely and efficiently. Understanding what these aids to navigation mean is therefore vital to making the most of your time on the water. You'll be expecting other boats to follow these navigational aids and…
The Art of Sailboat Navigation. Navigating a boat is a unique skill that differs significantly from driving a vehicle on land. Unlike roads and signs, the waterways present a dynamic environment with minimal navigational markers, and visibility can be limited due to fog or the absence of recognizable landmarks.
How to Navigate a Boat. Decide on your method: electronic navigation or traditional (analog) navigation. If using electronic navigation, start by operating your GPS or chartplotter. Make note of your real-time position, speed and direction of travel. To get from point "A" to point "B," create a waypoint. String waypoints together to create a ...
The U.S. Aids to Navigation System is a system maintained by the U.S. Coast Guard, consisting of visual, audible, and electronic signals which are designed to assist the prudent mariner in the process of navigation. The aids to navigation system is not intended to identify every shoal or obstruction to navigation which exists in the navigable ...
Aids to Navigation. Permanent government or private marks will be on a chart with a detailed abbreviation describing their markings and how to identify them. Most aids are showing the way around a hazard, or the way to the best navigation channels. ... All sailboats sideslip a little, it's the nature of the forces that make a boat sail against ...
Sailing navigation tools refer to equipment used by sailors for determining their position, planning routes, and navigating at sea. These include compasses, charts, GPS devices, sextants, and electronic navigation systems. These instruments aid in calculating direction, measuring distances, and ensuring safe passage during sailing expeditions.
Buoys and Beacons. Buoys and beacons comprise the two main types of navigation aids, both on the water and on nav charts. Buoys are aids that float and are moored to the bottom. A buoy with a cylindrical shape and conical top is called a nun buoy. These are red with even numbers. A buoy with a cylindrical shape and a flat top is called a can buoy.
Buoys and markers serve to direct the operator of the water vessels on the safe course to take. They warn the operator of the underlying dangers in the waterways. Navigation buoys and markers are also effective navigation aid in directing the water vessel operator on the best route to use. They aid in determining the safest way through the ...
Learn the basic boating Navigation Aids. Learn more in person: https://www.centerhelm.com/classesNavigation Rules: Collision Avoidance https://www.youtube.c...
Navigational aid. A navigational aid (NAVAID), also known as aid to navigation (ATON), is any sort of signal, markers or guidance equipment which aids the traveler in navigation, usually nautical or aviation travel. Common types of such aids include lighthouses, buoys, fog signals, and day beacons.
A wide variety of navigational aids, often referred to as buoys or channel markers, exists to protect boaters, property owners, and the environment, and help boaters find their way around. Already Own a Boat? Earn an Average of $20K/season by Renting it Out on Boatsetter. Types of Channel Markers
Welcome to Episode 39 of Carpe Diem Sailing. I'm back on my regular posting schedule and in this episode I go over the navigational aids systems in IALA Reg...
iSail GPS. This is the cheapest app of those reviewed, and there aren't any signups, pop-up ads, or in-app purchases to spoil the experience. This isn't the most comprehensive navigation app, but a solid, easy-to-use, no-frills navigation tool. Easily measure distance between two points of interest, and import and export waypoints, routes ...
The next part of your Marine Navigational Aids is knowing the "Rules of the Road," which is essential in boat navigation. The USCG states "Aids to Navigation Are the Waterways' Road Signs.". Safely driving a car would be nearly impossible if you did not know street signs, stop signs, barriers, detours and even stop lights.
3. Magnetic Compass. The magnetic compass work in conjunction with the magnetic field of the earth and is the essential means of the direction indicating device. It is used to get a planned course for the voyage. This ship navigation equipment is usually fitted at the centre line of the ship on the monkey island.
On any vessel, navigation lights have a specific color, (white, red, green, yellow, blue), arc of illumination, range of visibility, and location, as required by law and regulations. For the purposes of this course, we will concentrate on pleasure boats under 65 feet in length. Knowledge of navigation lights is important to a small-boat skipper ...
The Rules of the Road are published by the U. S. Government Printing Office, and are available in any boating supply stores. Every boat owner should have a copy, but they are mandatory to be kept on vessels over 12 meters (39.4 feet) in length. The Rules generally used in this course are Inland Rules, unless otherwise noted.
It's also important to know standard aids to navigation (ATONs) and abide by their warnings and advisories. Safe and responsible sailors understand tide charts, buoys, beacons, and lights. This quiz will test your knowledge and provide you with problems to help you study navigation and ATONs. Number of Questions: 14. Estimated Time: 15 minutes.
The usual navigational aids—parallel rulers and large rigid-armed protractors—need a big flat place, out of the wind and spray. They don't work on kayak decks, rowboat thwarts, or cockpit seats.Chuck Sutherland, a serious paddler and scientist, solved the problem decades ago with his Small Craft Nav-Aid.
This course will teach you how to choose the proper Marine VHF radio for your boating style and give you the confidence to operate it effectively. Protect your boat from the ravages of wind, waves, torrential rain, tidal surges and high water. Learn about boating on the more than 30,000 miles of America's inland waterways - increase your ...
The boat, which is owned and operated by Veterans for Peace as part of its Golden Rule Peace Boat Project, is visiting Portland until Sept. 18. The Golden Rule's next stops are Rainier (Sept. 18 ...
Trump threatens to withhold federal firefighting aid, blames Newsom by: Cameron Kiszla. Posted: Sep 16, 2024 / 10:11 AM PDT. Updated: Sep 16, 2024 / 10:33 AM PDT.